How to Prevent Rot and Insect Damage in Wood Siding: Protecting your home’s exterior requires understanding the vulnerabilities of wood siding to rot and insect infestation. This guide delves into the crucial steps for selecting resistant wood, preparing it properly, employing effective installation techniques, and implementing ongoing maintenance strategies to ensure the longevity and beauty of your wood siding. We’ll explore everything from choosing the right wood species and applying protective coatings to identifying and addressing existing damage and preventing future problems.
By following the comprehensive advice outlined here, you can significantly extend the lifespan of your wood siding, saving you time, money, and the hassle of costly repairs down the line. From preventative measures to proactive solutions, we’ll equip you with the knowledge to safeguard your investment and maintain the curb appeal of your home.
Selecting Resistant Wood Species
Choosing the right wood species is crucial for preventing rot and insect damage in your siding. The natural properties of certain woods offer inherent resistance to decay and pest infestations, reducing the need for extensive treatments and prolonging the lifespan of your home’s exterior. Understanding the characteristics of various wood types will help you make an informed decision.
Comparison of Common Wood Siding Materials
The table below compares the natural durability of several popular wood siding options against rot and insect attack. Resistance levels are generally assessed on a scale, with higher numbers indicating greater resistance. Note that these values can vary depending on the specific source and growing conditions of the wood.
| Wood Type | Rot Resistance | Insect Resistance | Notes |
|---|---|---|---|
| Cedar (Western Red, Eastern White) | High | High | Naturally contains oils that repel insects and resist decay. |
| Redwood | High | High | Similar to cedar, possesses natural oils providing excellent protection. |
| Pressure-Treated Pine | High | Moderate to High | Chemically treated to resist rot and insects; effectiveness varies based on treatment type. |
| Pine (Untreated) | Low | Low | Susceptible to rot and insect infestation unless treated. |
| Fir (Untreated) | Low to Moderate | Low to Moderate | Requires treatment for exterior applications. |
Cedar Siding
Cedar, particularly Western Red Cedar and Eastern White Cedar, is prized for its natural resistance to rot and insect damage. This resistance stems from its high concentration of extractives, natural oils within the wood that act as a deterrent to fungi and insects. Cedar’s inherent durability minimizes the need for chemical treatments, making it an environmentally friendly choice. Furthermore, cedar is lightweight, relatively easy to work with, and possesses a beautiful, naturally aromatic character. However, cedar can be more expensive than other options and is susceptible to warping or cracking if not properly dried and installed.
Redwood Siding
Redwood shares similar properties to cedar, exhibiting exceptional natural resistance to decay and insect attack due to its high content of extractives. Its durability translates to a longer lifespan compared to many other softwoods, minimizing maintenance requirements over time. Redwood is known for its rich reddish-brown color and attractive grain pattern, adding aesthetic appeal to any home. However, like cedar, redwood can be costly and requires proper installation techniques to prevent warping or cracking.
Pressure-Treated Lumber Siding
Pressure-treated lumber, often pine or fir, undergoes a process where preservatives are forced deep into the wood under high pressure. This treatment significantly enhances its resistance to rot and insect infestation, making it a viable option even for species naturally prone to decay. The level of protection provided depends on the type of preservative used and the treatment process. While pressure-treated lumber is more affordable than cedar or redwood, it may not be as aesthetically pleasing and some preservatives contain chemicals that may be of environmental concern.
Proper Wood Preparation Before Installation
Proper preparation of wood siding before installation is crucial for preventing rot and insect damage. Taking the necessary steps to dry the lumber correctly, remove damaged sections, and apply a protective primer significantly extends the lifespan of your siding and enhances its aesthetic appeal. Neglecting these steps can lead to premature deterioration and costly repairs.
Properly drying lumber is essential to prevent rot and fungal growth. Wood contains moisture, and excess moisture provides an ideal environment for fungi and other microorganisms to thrive. This moisture can cause the wood to swell, warp, and crack, weakening its structural integrity and making it susceptible to decay.
Drying Lumber
The ideal moisture content for exterior wood siding is typically between 12% and 15%. Before installation, lumber should be allowed to acclimate to the ambient humidity and temperature of its intended location. This process typically takes several weeks, depending on the wood species, thickness, and environmental conditions. Methods to accelerate drying include air drying in a well-ventilated area or using a kiln to achieve the desired moisture content more quickly. Using a moisture meter to regularly check the moisture content is recommended to ensure the wood is sufficiently dry before installation.
Removing Damaged Wood
Inspecting each piece of wood siding for damage before installation is paramount. Any signs of decay, cracks, insect infestation, or significant warping should be addressed immediately. Removing affected areas with a sharp chisel or saw and replacing them with sound wood is necessary. Failure to remove damaged wood will allow the decay to spread, compromising the entire structure. This process ensures only high-quality, structurally sound wood is used in the final installation.
Priming Wood Siding
Priming wood siding acts as a barrier against moisture and provides a surface for the finish coat to adhere to properly. A high-quality primer designed for exterior wood applications is recommended.
Step-by-Step Guide to Priming Wood Siding
- Surface Preparation: Ensure the wood siding is clean, dry, and free of dust, dirt, or debris. Use a wire brush or sandpaper to remove any loose fibers or imperfections.
- Primer Application: Using a brush, roller, or sprayer, apply a thin, even coat of exterior wood primer. Follow the manufacturer’s instructions regarding application methods and drying times.
- Drying Time: Allow the primer to dry completely before applying a finish coat. Adequate drying time ensures proper adhesion and prevents peeling or blistering.
- Second Coat (Optional): For added protection, a second coat of primer can be applied, particularly in areas exposed to harsh weather conditions.
Proper priming significantly improves the wood’s resistance to moisture penetration, preventing rot and extending the life of your siding. Choosing a high-quality, exterior-grade primer is an important investment in the longevity of your home’s exterior.
Installation Techniques to Minimize Moisture Buildup
Proper installation techniques are crucial for preventing moisture buildup in wood siding, a leading cause of rot and insect infestation. Careful attention to flashing, ventilation, and drainage significantly extends the lifespan of your siding and protects your home’s structural integrity. This section details essential steps to ensure your siding remains dry and durable.
Proper Flashing Techniques
Flashing is a critical component in diverting water away from the siding and preventing it from penetrating the wall system. Proper flashing creates a barrier, channeling water to the exterior. Different flashing materials exist, including aluminum, galvanized steel, and rubberized asphalt, each suited for specific applications. The selection of the appropriate flashing material depends on factors like the climate and the type of siding used.
For instance, in areas with heavy rainfall, a more durable material like aluminum or galvanized steel might be preferable. The installation process involves carefully overlapping flashing pieces to create a continuous waterproof seal. Flashing should be installed at all vulnerable points, such as around windows, doors, and at the base of the siding. Critically, flashing should always extend beyond the siding to ensure water is directed away from the building envelope.
Siding Spacing and Ventilation
Adequate spacing and ventilation behind the siding are essential for allowing air circulation and preventing moisture from becoming trapped. This airflow helps to dry out any moisture that does penetrate the outer layer of siding, reducing the risk of rot and mold.
Imagine a diagram showing a section of wall with wood siding. The siding is affixed to vertical furring strips, creating a gap of approximately 1 inch between the back of the siding and the sheathing. This gap allows for air movement. The furring strips are spaced evenly and securely attached to the sheathing. At the bottom and top of the wall section, vents are visible, providing an inlet and outlet for air circulation. This creates a natural convection current, drawing moist air out from behind the siding.
Ensuring Proper Drainage Around the Foundation
Preventing water from reaching the foundation is paramount. Water pooling around the base of the house can wick up into the siding, leading to decay. Proper grading, gutters, and downspouts are crucial elements in this process.
Effective drainage involves sloping the ground away from the foundation, typically at a minimum gradient of 6 inches per 10 feet. This directs water away from the house. Gutters should be properly sized and regularly cleaned to ensure they efficiently channel rainwater away from the foundation. Downspouts should extend several feet away from the house, ideally into a drainage system or a dry well, preventing water from pooling near the foundation. Regular inspection and maintenance of these drainage systems are crucial to preventing moisture damage to the siding.
Protective Coatings and Treatments
Protecting your wood siding with appropriate coatings and treatments is crucial for extending its lifespan and preventing rot and insect damage. These treatments act as barriers, preventing moisture absorption and deterring insect infestations. The choice of product and application method will depend on the type of wood, the climate, and the desired aesthetic outcome.
Proper selection and application of wood preservatives and sealants are vital steps in ensuring long-term protection. Ignoring this step can significantly reduce the effectiveness of other preventative measures. Regular maintenance, including reapplication, is also key to maintaining the protective barrier.
Effective Wood Preservatives and Sealants
Choosing the right preservative and sealant is paramount. Several options exist, each with its own strengths and weaknesses. The selection should be based on factors such as the type of wood, the climate, and the desired level of protection.
- Penetrating Oil Sealers: These sealers soak into the wood, protecting it from within while allowing the wood grain to show through. They offer moderate protection against moisture and UV damage. Application involves brushing or spraying onto a clean, dry surface, ensuring even coverage. Reapplication is typically recommended every 1-3 years depending on climate and exposure.
- Solid-Color Stains: These stains provide more pigment and opacity, offering better protection against UV rays and moisture than penetrating oil sealers. They also help to mask minor imperfections in the wood. Application is similar to penetrating oil sealers, requiring even coverage for optimal results. Reapplication every 2-5 years is usually necessary.
- Water-Repellent Wood Preservatives: These preservatives are designed to repel water, preventing moisture from penetrating the wood. They often contain fungicides and insecticides to further protect against rot and insect damage. Application is usually by brushing, spraying, or dipping, depending on the product and the size of the project. Reapplication intervals vary, but generally range from 2 to 5 years.
Effectiveness of Different Wood Stains
Different types of wood stains offer varying degrees of protection against rot and insect damage. The level of protection is primarily determined by the stain’s ability to repel moisture and block UV rays.
- Oil-based stains: These stains penetrate the wood, offering good protection against moisture and UV damage. However, they can take longer to dry and may not be as durable as other types of stains.
- Water-based stains: These stains are easier to clean up and dry faster than oil-based stains. However, they may not offer as much protection against moisture and UV damage.
- Solid-color stains: These stains provide the most protection against moisture and UV damage, as they create a thicker film on the surface of the wood. However, they can also hide the natural beauty of the wood grain.
Reapplication Frequency for Optimal Protection
The frequency of reapplication depends heavily on several factors: the type of coating used, the climate (high humidity and UV exposure accelerate degradation), and the level of exposure to the elements (e.g., south-facing walls experience more intense sun exposure). Regular inspection is recommended. Signs of fading, cracking, or peeling indicate the need for reapplication. Failure to reapply at the recommended intervals will significantly reduce the effectiveness of the protective coating, increasing the risk of rot and insect damage. For example, a penetrating oil sealer in a harsh, sunny climate might need reapplication annually, while a solid-color stain in a milder climate could last for up to five years.
Identifying and Addressing Existing Damage
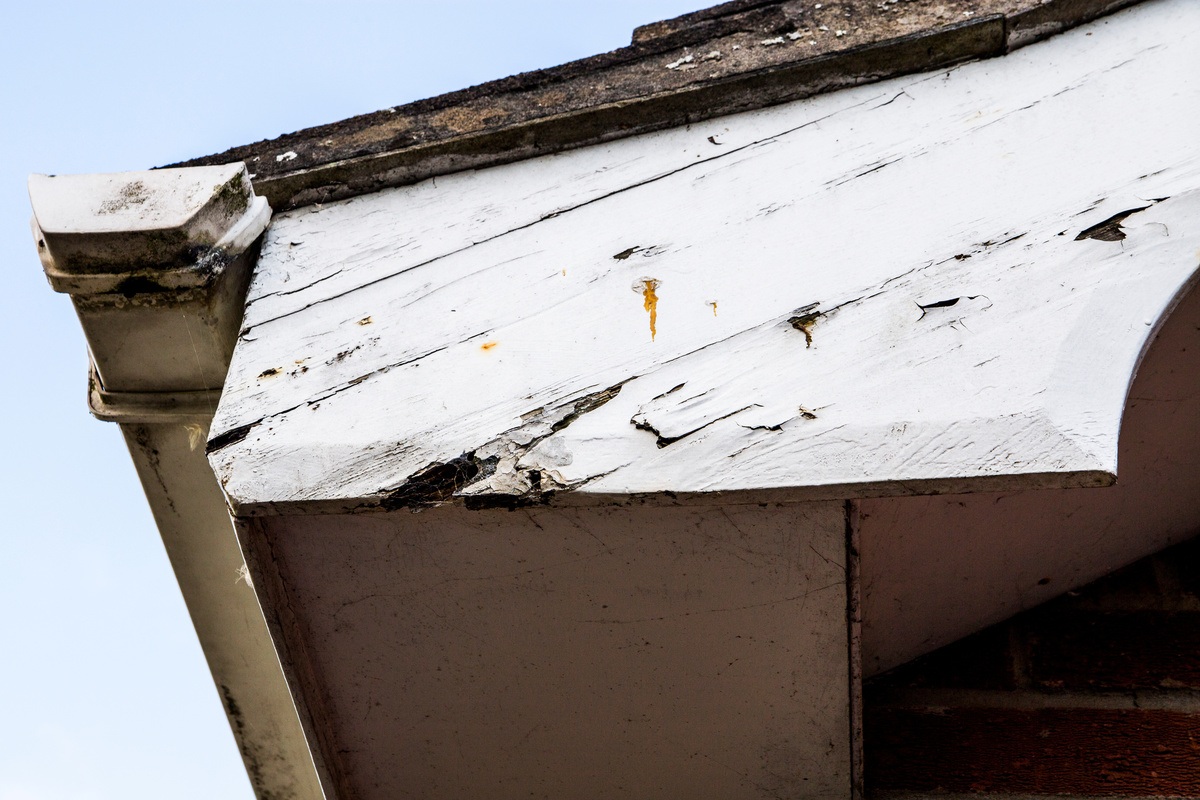
Early detection of wood rot and insect infestation is crucial for preventing extensive damage and costly repairs to your wood siding. Regular inspections, especially after periods of high moisture or extreme weather, can help identify problems before they become major issues. Knowing the signs and how to address them effectively will extend the lifespan of your siding.
Identifying common signs of wood rot and insect infestation involves a keen eye and a methodical approach. Wood rot often manifests as discoloration (darkening or softening of the wood), a spongy or crumbly texture, and the presence of fungal growth (often appearing as white, gray, or black mold). Insect infestation may be indicated by small holes in the wood, sawdust-like frass (insect excrement) around these holes, and the presence of live insects or their larvae. You might also notice tunnels or galleries within the wood itself. Damaged areas may also feel lighter than surrounding undamaged areas.
Repairing Minor Rot Damage in Wood Siding
Minor rot damage, typically confined to a small area, can often be repaired effectively without complete board replacement. The process involves careful removal of the affected wood, followed by the application of a wood hardener or epoxy resin to strengthen the remaining structure. Once cured, the repaired area can be filled with wood filler and then sanded smooth. Finally, the repaired area needs to be primed and painted or stained to match the surrounding siding. It’s essential to ensure complete removal of all decayed wood before applying the hardener or filler, otherwise, the rot may return. For example, a small area of rot around a nail hole could be addressed this way, ensuring the surrounding wood is sound.
Replacing Severely Damaged Siding Boards
Severe rot or extensive insect damage often necessitates the complete replacement of affected siding boards. This involves carefully removing the damaged board, taking care not to damage adjacent boards. Accurate measurements of the damaged area are taken before selecting a replacement board of the same species and dimensions. The new board is then installed, ensuring proper alignment and secure fastening. Appropriate caulking or sealant should be used around the edges of the new board to prevent moisture penetration. For instance, a board showing significant cracking, substantial fungal growth, or extensive insect damage extending along its length would require replacement rather than repair. It is crucial to use treated lumber for replacements in areas prone to moisture.
Insect Prevention Strategies
Protecting your wood siding from insect infestation requires a multi-pronged approach combining preventative measures and proactive inspections. Choosing resistant wood species and employing proper installation techniques are crucial first steps, but additional strategies are necessary to ensure long-term protection. Effective insect repellents, coupled with diligent monitoring, can significantly reduce the risk of damage.
Insect repellents vary in effectiveness and longevity, depending on the active ingredient and application method. Some repellents are designed to deter insects through odor, while others contain insecticides that kill insects upon contact. The choice of repellent should be based on the specific insect threat and the type of wood siding. For example, borate-based treatments are effective against many wood-boring insects, while certain pyrethroids are effective against termites. However, it’s crucial to always follow the manufacturer’s instructions regarding application and safety precautions. The effectiveness of any repellent can also be affected by environmental factors such as rainfall and sun exposure, requiring reapplication over time.
Effectiveness of Various Insect Repellents for Wood Siding
Several repellents offer varying degrees of protection. Borate treatments, for instance, are commonly used as a preventative measure. They’re applied by spraying, brushing, or dipping the wood before installation, offering long-term protection by making the wood less palatable to insects. However, their effectiveness can diminish over time, particularly with exposure to moisture. Another option involves using insecticides, such as permethrin or bifenthrin, as a topical treatment. These provide immediate protection but require reapplication at intervals specified by the manufacturer. Remember, always consult a professional for guidance on selecting and applying appropriate repellents for your specific situation. Improper application can be ineffective or even harmful to the environment.
Preventative Measures Against Termites and Carpenter Ants
Preventing termite and carpenter ant infestations involves creating an environment inhospitable to these insects. Maintaining proper drainage around the foundation of your home is critical to prevent soil moisture from reaching the wood siding. This reduces the attractiveness of the wood to termites, which thrive in damp conditions. Regularly inspecting the perimeter of your home for signs of termite activity, such as mud tubes or damaged wood, is essential. For carpenter ants, removing sources of moisture and food, such as decaying wood or standing water, will discourage them from nesting in your siding. Creating a physical barrier, such as a gravel barrier around the foundation, can also help to deter termites. In severe cases, professional pest control services may be necessary to eliminate existing infestations and implement long-term preventative measures.
Regular Inspection for Insect Activity
Regular visual inspection is paramount in early detection of insect infestations. At least twice a year, preferably in spring and autumn, thoroughly examine your wood siding for any signs of damage. Look for small holes, sawdust-like frass (insect droppings), mud tubes (indicative of termites), or areas of damaged or weakened wood. Pay close attention to areas where the siding meets the foundation, as these are often entry points for insects. Use a flashlight to illuminate crevices and inspect hard-to-reach areas. If you notice any suspicious signs, immediately consult a pest control professional for a thorough inspection and treatment plan. Early detection and intervention are key to preventing extensive and costly damage.
Maintaining Proper Ventilation
Adequate ventilation is crucial for preventing moisture buildup in wood siding, a primary cause of rot and insect infestation. Proper airflow helps to regulate humidity levels within the wall cavity and attic, preventing the condensation that fuels decay. Neglecting ventilation can lead to significantly shortened lifespan of your siding and other structural components.
Maintaining proper ventilation involves ensuring sufficient airflow in both the attic and wall cavities. Attic ventilation removes moisture-laden air that rises from the living spaces below, while wall ventilation allows for the escape of moisture that may penetrate from the exterior or be generated within the wall itself. This exchange of air prevents the saturation of wood components, significantly reducing the risk of rot and pest damage.
Attic Ventilation Strategies
Effective attic ventilation requires a balanced system of intake and exhaust vents. Intake vents, typically located in the soffits (the underside of the eaves), draw in fresh air. Exhaust vents, often placed in the gable ends or ridge of the roof, allow the moist air to escape. The ratio of intake to exhaust vents should be roughly equal to ensure proper airflow. Insufficient intake vents can restrict airflow, while too few exhaust vents can lead to a buildup of moisture. Consider the size of your attic and its insulation levels when determining the appropriate number and size of vents. A poorly ventilated attic can see temperatures soar during the summer, leading to accelerated deterioration of wood and other building materials. Conversely, in winter, inadequate ventilation can allow for the build-up of ice and moisture, causing damage to the roof and siding.
Wall Ventilation Improvements
Improving wall ventilation in existing structures may require more invasive measures. One common approach is to install vents in the lower portion of the wall, near the foundation, and corresponding vents higher up. These vents allow for a natural stack effect, drawing in fresh air from below and expelling moist air from above. However, it’s important to ensure that these vents are properly screened to prevent the entry of insects and rodents. Another method is to consider installing a continuous ventilation system within the wall cavity itself, which utilizes specialized building materials to allow for better air circulation. This approach might involve adding breathable housewrap or incorporating vents into the sheathing. The effectiveness of these strategies depends heavily on the existing wall construction and climate. In older homes, the presence of vapor barriers or lack of proper ventilation may necessitate a more comprehensive approach, potentially requiring partial wall reconstruction.
Impact of Proper Ventilation on Wood Siding Longevity
Proper ventilation significantly extends the lifespan of wood siding. By preventing moisture accumulation, it reduces the risk of fungal growth (such as rot), insect infestation (like termites and carpenter ants), and the degradation of the wood fibers themselves. Studies have shown that buildings with adequate ventilation experience a substantially lower rate of wood decay compared to those with poor ventilation. In regions with high humidity, proper ventilation is especially critical, as moisture is more readily absorbed by the wood, accelerating the deterioration process. Maintaining a dry environment minimizes the chances of wood warping, cracking, or losing its structural integrity, ensuring that the siding remains aesthetically pleasing and structurally sound for many years.
Regular Cleaning and Maintenance
Regular cleaning and maintenance are crucial for extending the lifespan of your wood siding and preserving its aesthetic appeal. Neglecting these tasks can lead to the accumulation of dirt, mildew, and algae, which can accelerate deterioration and create an environment conducive to insect infestation. A proactive approach to cleaning and inspection will help you identify and address potential problems early, preventing costly repairs down the line.
A well-defined cleaning and inspection schedule is essential for effective wood siding maintenance. This schedule should be tailored to your specific climate and the type of wood used. However, a general guideline would include annual inspections and cleaning, with more frequent cleaning in areas prone to heavy rainfall or pollution. Thorough inspections should check for signs of rot, insect damage, loose boards, and any other issues that require attention.
Cleaning Methods for Wood Siding
Appropriate cleaning methods are vital to avoid damaging the wood siding. Harsh chemicals and high-pressure washing can strip away protective coatings and damage the wood’s surface. Gentle cleaning methods are preferred. For routine cleaning, a solution of mild detergent and water applied with a soft brush or sponge is usually sufficient. Rinse thoroughly with clean water afterwards, ensuring all soap residue is removed. For stubborn dirt, a pressure washer can be used, but it’s crucial to maintain a safe distance and use a low-pressure setting to prevent damage. Always test any cleaning solution on a small, inconspicuous area first to check for adverse reactions.
Mildew and Algae Removal
Mildew and algae growth can be unsightly and can damage the wood siding over time. For mildew and algae removal, a solution of bleach and water (typically a 1:10 ratio of bleach to water) can be effective. Apply the solution with a soft brush, ensuring complete coverage of the affected areas. Allow the solution to sit for a few minutes before rinsing thoroughly with clean water. Always wear protective gloves, eye protection, and appropriate clothing when working with bleach. For extensive or persistent growth, consider using a commercially available wood cleaner specifically designed for mildew and algae removal. Follow the manufacturer’s instructions carefully. After cleaning, allow the siding to dry completely before applying any protective coatings.
Understanding Environmental Factors
The longevity and integrity of your wood siding are significantly impacted by environmental factors. Climate, weather patterns, and even the amount of sun exposure your home receives play crucial roles in determining the susceptibility of the wood to rot and insect infestation. Understanding these influences is key to implementing effective preventative measures.
Climate and weather conditions exert a powerful influence on wood degradation. Prolonged periods of rain or high humidity create ideal breeding grounds for fungi that cause rot, while extreme temperature fluctuations can cause the wood to expand and contract, weakening its structure and creating entry points for insects. Conversely, prolonged periods of intense sunlight and heat can lead to drying and cracking, making the wood more vulnerable to insect attack. For example, coastal areas with high humidity and frequent rainfall experience higher rates of wood rot compared to arid desert climates.
Climate and Weather Influence on Wood Deterioration
Variations in temperature and precipitation directly affect the moisture content of wood. High humidity promotes fungal growth, while fluctuating temperatures cause expansion and contraction, leading to cracks and splits. Regions experiencing frequent freeze-thaw cycles often exhibit greater wood damage due to the stresses imposed on the wood’s structure. For instance, areas with harsh winters can experience significant damage from ice formation within cracks, further exacerbating existing problems. Conversely, prolonged dry periods can lead to excessive shrinkage, making the wood brittle and prone to cracking, increasing the risk of insect infestation.
Shading and Sun Exposure Effects on Wood Siding
The amount of sun exposure significantly impacts the lifespan of wood siding. Direct, prolonged sunlight can lead to photodegradation, where ultraviolet (UV) radiation breaks down the wood’s lignin, causing discoloration, cracking, and reduced strength. This makes the wood more susceptible to both rot and insect damage. Conversely, areas with limited sun exposure may experience increased moisture retention, fostering the growth of fungi and mold. Optimal conditions involve a balance: sufficient sunlight to dry the wood quickly after rain, but with some protection from the most intense rays. Properly designed overhangs or strategically planted vegetation can help achieve this balance.
Humidity’s Impact on Wood Deterioration
Humidity plays a pivotal role in wood deterioration. High humidity levels create an environment conducive to fungal growth, leading to rot and decay. Wood with a high moisture content is significantly more susceptible to fungal attack. The ideal moisture content for wood siding is generally considered to be between 12% and 15%. Maintaining this level through proper ventilation, protective coatings, and appropriate site selection is crucial in preventing rot. Areas with consistently high humidity, such as those near bodies of water or in tropical climates, require extra attention to prevent wood degradation. Conversely, excessively dry conditions can also lead to problems, such as cracking and splitting, which again increase vulnerability to insect infestation.
Professional Inspection and Treatment
Regular professional inspections are crucial for the long-term health and longevity of your wood siding. A professional can identify subtle signs of rot, insect infestation, or moisture damage that might be missed by the untrained eye, allowing for timely intervention and preventing costly repairs down the line. Early detection significantly reduces the extent of damage and the overall cost of remediation.
Professional inspection offers a proactive approach to wood siding maintenance. Instead of reacting to visible problems, regular inspections enable preventative measures, saving you time, money, and the stress associated with extensive repairs. This approach helps maintain the aesthetic appeal of your home and protects its structural integrity.
Hiring a Qualified Professional
Finding a qualified professional involves careful research and verification of credentials. It’s essential to choose someone with experience in wood siding repair and treatment, ideally with demonstrable expertise in identifying and addressing various types of wood damage. Checking online reviews and requesting references from previous clients can provide valuable insights into their work quality and professionalism. Furthermore, confirming their licensing and insurance is crucial for protection against potential liabilities.
Checklist of Questions to Ask a Professional
Before hiring a professional, a comprehensive list of questions should be prepared to ensure a clear understanding of their services and approach. This proactive approach minimizes misunderstandings and helps establish clear expectations. These questions should cover their experience, methodology, materials used, warranty offered, and cost estimates.
- How many years of experience do you have in wood siding repair and treatment?
- What specific types of wood damage are you experienced in addressing (e.g., rot, insect infestation, moisture damage)?
- What methods and materials do you typically use for repair and treatment?
- Can you provide references from previous clients?
- Are you licensed and insured?
- What is your estimated cost for the inspection and any necessary repairs or treatments?
- What is your warranty policy?
- What is your expected timeline for completing the work?
- What is your process for dealing with unforeseen issues or complications during the repair process?
- What is your preferred method of communication during the project?
Conclusion
Preserving the integrity of your wood siding involves a multifaceted approach encompassing careful selection of materials, meticulous installation, consistent maintenance, and proactive pest control. By combining these strategies, you can effectively prevent rot and insect damage, ensuring your siding remains a beautiful and durable feature of your home for years to come. Remember, regular inspections and prompt attention to any signs of damage are crucial in preventing small problems from escalating into major, costly repairs. Invest the time and effort in protecting your wood siding – your home will thank you for it.
Leave a Reply