Common Mistakes to Avoid When Installing Vinyl Siding: Transforming your home’s exterior with vinyl siding offers a blend of durability and aesthetic appeal. However, achieving a flawless finish requires meticulous attention to detail. This guide navigates the common pitfalls many homeowners encounter during installation, ensuring your project culminates in a beautiful, long-lasting result. From proper surface preparation to selecting the right fasteners and accommodating expansion and contraction, we’ll equip you with the knowledge to avoid costly mistakes and achieve professional-quality results.
Understanding the nuances of vinyl siding installation is crucial for a successful outcome. This comprehensive guide will delve into the most frequent errors, providing practical solutions and preventative measures. By addressing these potential issues proactively, you can significantly enhance the longevity and visual appeal of your new siding.
Improper Preparation
Proper surface preparation is paramount to a successful vinyl siding installation. Neglecting this crucial step can lead to a range of problems, from unsightly gaps and uneven siding to premature failure and costly repairs. A well-prepared surface ensures the siding adheres correctly, providing a long-lasting, attractive exterior.
Failing to adequately prepare the surface can result in several issues. For example, uneven surfaces can cause the siding to buckle or warp, leading to an unprofessional appearance. Existing damage, such as rotted wood or loose mortar, left unaddressed, will compromise the structural integrity of the siding and lead to premature deterioration. Furthermore, moisture trapped behind improperly prepared siding can promote mold and mildew growth, damaging both the siding and the underlying structure.
Surface Preparation Steps
Thorough surface preparation involves several key steps. First, all loose or damaged materials must be removed. This includes peeling paint, rotting wood, crumbling mortar, and any other debris that could interfere with the siding’s adhesion. Next, the surface should be cleaned to remove dirt, grime, and any loose particles. Power washing is often recommended for this step, but care must be taken to avoid damaging the underlying structure. Finally, any necessary repairs, such as replacing rotted wood or patching damaged areas, should be completed before installing the siding.
Tools and Materials for Surface Preparation
A checklist of essential tools and materials ensures a smooth and efficient preparation process. This includes safety equipment such as safety glasses and work gloves. Cleaning tools are also essential, such as a pressure washer, scrub brushes, and scrapers. Repair materials will vary depending on the substrate, but may include wood filler, caulk, mortar, and patching compounds. Measuring tools such as a tape measure and level are necessary for accurate assessment and repair work.
Siding Preparation Methods by Substrate
The optimal preparation method depends heavily on the substrate material. The following table compares methods for common substrates:
| Substrate | Cleaning Method | Repair Method | Additional Considerations |
|---|---|---|---|
| Wood | Pressure washing (low pressure), scrubbing with detergent | Replace rotted wood, fill cracks and holes with wood filler | Ensure wood is dry before siding installation. Treat for insect infestation if necessary. |
| Brick | Pressure washing (medium pressure), wire brushing | Repair loose or damaged mortar, fill cracks with mortar | Allow ample drying time after cleaning. Address any efflorescence. |
| Concrete/Stucco | Pressure washing (medium pressure), wire brushing | Repair cracks and holes with patching compound | Ensure the surface is sound and free from delamination. |
| Metal | Wire brushing, solvent cleaning | Repair rust and corrosion with appropriate primers and paints | Remove all loose paint or rust before installation. Consider using a corrosion inhibitor. |
Incorrect Measurement and Cutting
Precise measurement and cutting are paramount for a professional-looking vinyl siding installation. Inaccurate cuts lead to gaps, overlaps, and an overall unprofessional appearance, potentially compromising the siding’s weather resistance and structural integrity. Careful attention to detail during this phase significantly impacts the final result.
Accurate measurement and cutting techniques ensure a seamless and aesthetically pleasing finish. Common errors include inaccurate measuring of wall lengths and panel dimensions, improper accounting for expansion and contraction of the material, and incorrect cutting angles for corners and around windows and doors. These errors can result in misaligned panels, gaps between panels and trim, and difficulty fitting pieces together. Improper cuts also increase material waste and may necessitate costly rework.
Measuring and Cutting Techniques for Vinyl Siding
Accurate measurement begins with establishing a baseline. This typically involves using a level and measuring tape to determine the exact length of each wall section requiring siding. Remember to account for any variations in wall surface and ensure your measurements are taken from consistent points. When measuring for individual panels, always add the necessary overlap for proper installation. This overlap typically ranges from 1/4 inch to 1/2 inch depending on the manufacturer’s specifications. Always refer to the manufacturer’s instructions for precise overlap requirements. For example, a panel measured at 12 feet would need an additional 1/2 inch to accommodate the overlap. The resulting cut length would be 12 feet and 1/2 inch. This ensures a clean, uniform look and avoids unsightly gaps.
Cutting Vinyl Siding Panels for Corners
Cutting vinyl siding for corners requires precise miter cuts to achieve a clean, 45-degree angle. Incorrect angles will result in noticeable gaps or overlaps. Using a miter saw set to a precise 45-degree angle ensures accurate cuts. For outside corners, the two panels are typically cut at a 45-degree angle, and for inside corners, the panels should be cut at a 45-degree angle, but the cuts will be reversed. Before cutting, always double-check your measurements and mark the cutting line clearly on the panel. This helps avoid mistakes and ensures accurate cuts. Remember to account for the necessary overlap when making these cuts. Failing to do so can lead to visible gaps or overlaps.
Cutting Vinyl Siding Around Windows and Doors
Accurate measurement and cutting around windows and doors are crucial for a neat finish. These areas often require multiple cuts and careful fitting of panels. Start by measuring the distance between the window frame and the adjacent siding. Then, cut the panels to fit these measurements, allowing for the necessary overlap. When working around windows and doors, you will often need to use a utility knife to make precise cuts, as well as a measuring tape and a speed square to ensure the cuts are square and accurate. Use a sharp utility knife for clean cuts to avoid damaging the vinyl siding. For curved or complex shapes, a jigsaw with a fine-tooth blade may be necessary. Again, precise measurements and careful cutting are essential to avoid gaps or overlaps. Using a template can assist in achieving consistent cuts, especially for complex shapes.
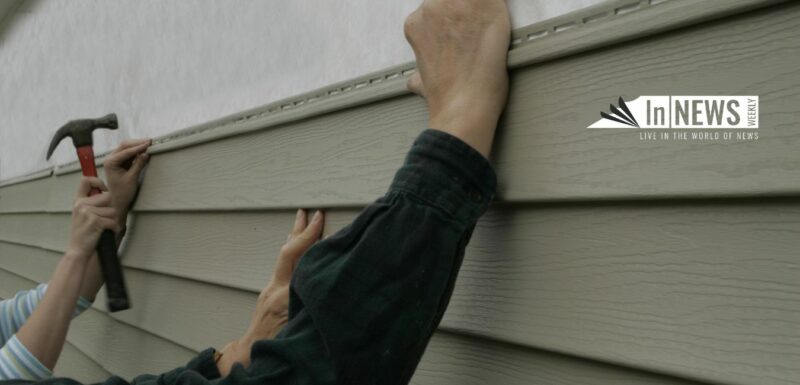
Failure to Use Proper Fasteners
Selecting the right fasteners is crucial for a successful vinyl siding installation. Using inappropriate fasteners can lead to a range of problems, from unsightly gaps and loose panels to damage to the siding itself and even structural issues. The correct fasteners ensure a secure and long-lasting installation that can withstand the elements.
Using the wrong fasteners can result in several problems. Improper fasteners may not provide sufficient holding power, leading to siding that pulls away from the wall, especially in windy conditions. Overly long fasteners can puncture the siding, causing damage that is difficult to repair. Conversely, fasteners that are too short might not penetrate the sheathing adequately, resulting in loose siding. The wrong type of fastener material may also corrode, leading to staining and weakening the connection over time.
Fastener Selection and Application
Choosing the right fasteners depends on several factors, including the type of siding, the wall material, and local climate conditions. Generally, galvanized or stainless steel fasteners are preferred for their corrosion resistance. Aluminum fasteners can also be used but may not be as strong as steel. The length of the fastener should be sufficient to penetrate the sheathing material and provide adequate holding power, while avoiding penetration of the back of the siding. It’s vital to avoid using nails or screws that are too long, as they can puncture the siding and compromise its weather resistance.
Fastener Spacing and Depth
Consistent spacing and proper depth are essential for a secure installation. Fasteners should be spaced according to the manufacturer’s recommendations, typically every 6 to 12 inches. The depth should be such that the fastener head is slightly below the surface of the siding, preventing it from being visible and ensuring a flush finish. Driving fasteners too deep can cause damage to the siding, while driving them too shallow will result in a loose and insecure installation. Using a nail gun can increase the efficiency and accuracy of the fastening process, but consistent monitoring of penetration depth is crucial.
Comparison of Fastener Types
| Fastener Type | Material | Advantages | Suitable Applications |
|---|---|---|---|
| Galvanized Nails | Steel | Cost-effective, readily available, good holding power | Most vinyl siding applications, particularly on wood sheathing |
| Stainless Steel Nails | Stainless Steel | Superior corrosion resistance, ideal for coastal areas or high-humidity environments | All vinyl siding applications, especially in harsh weather conditions |
| Stainless Steel Screws | Stainless Steel | Stronger holding power than nails, suitable for thicker siding or less stable substrates | Applications requiring extra holding power, such as areas exposed to high winds |
| Aluminum Nails | Aluminum | Lightweight, corrosion-resistant (less than stainless steel) | Generally suitable, but may not offer the same holding power as steel fasteners |
Neglecting Expansion and Contraction
Vinyl siding, while durable and aesthetically pleasing, is susceptible to expansion and contraction due to fluctuating temperatures. Understanding and accommodating these movements is crucial for a successful and long-lasting installation. Ignoring this fundamental principle can lead to significant problems down the line, compromising the integrity of your siding and potentially causing costly repairs.
Proper installation techniques account for the natural expansion and contraction of vinyl siding, ensuring a seamless and problem-free finish. Failing to allow for this movement can result in buckling, warping, cracking, and even damage to the underlying structure of your home. The material’s reaction to temperature changes is significant, and overlooking this factor is a common cause of premature siding failure.
Methods for Accommodating Expansion and Contraction
To prevent issues stemming from temperature-induced expansion and contraction, several key methods should be employed during installation. These techniques ensure the siding can move freely without causing stress or damage to itself or the underlying structure.
First, leave appropriate expansion gaps. These gaps, typically recommended to be between 1/8 inch and 1/4 inch, should be maintained between the siding panels and around fixed objects like windows and doors. These gaps allow the material to expand in warmer weather and contract in colder weather without causing stress or buckling. Visualize this gap as a buffer zone that prevents the siding from being compressed or stretched beyond its limits. A common mistake is to install the siding too tightly, eliminating these crucial expansion gaps. This leads to bowing or buckling of the panels as the temperature fluctuates.
Second, use appropriate fastening techniques. While securing the siding is essential, over-fastening can restrict its movement. Fasteners should be driven only to a point where they are snug but not overly tight. This allows the siding to move slightly without pulling the fasteners out or causing damage to the siding itself. The appropriate fastening technique will also vary depending on the type of siding and the climate.
Finally, consider the use of expansion joints. These are vertical gaps incorporated into the siding installation, usually at intervals determined by the manufacturer’s instructions and local climate conditions. They are especially crucial for longer stretches of siding or areas exposed to significant temperature swings. These expansion joints provide a larger area for the material to expand and contract, reducing the stress on individual panels. For example, in a long, uninterrupted wall facing direct sunlight, an expansion joint every 20 feet might be necessary, whereas a shorter wall in a less sunny location might require fewer or even no expansion joints. This demonstrates the importance of considering specific environmental factors.
Improper Installation of J-Channel and Accessories
Proper installation of J-channel, corner posts, and other accessories is crucial for a professional-looking and long-lasting vinyl siding installation. These components provide a clean finish, protect edges, and ensure the overall integrity of the siding system. Neglecting proper installation techniques can lead to unsightly gaps, water damage, and premature failure of the siding.
J-channel, corner posts, and other accessories serve as crucial transition points and edge protection in vinyl siding installations. Correct installation ensures a seamless and weathertight exterior. Conversely, improper installation can compromise the structural integrity and aesthetic appeal of the finished product, leading to potential problems down the line.
J-Channel Installation Around Windows and Doors
Installing J-channel around window and door openings requires precision and attention to detail. The J-channel acts as a finishing trim, creating a neat transition between the siding and the window or door frame. Improper installation can result in gaps that allow water penetration or create an untidy appearance.
A step-by-step guide for installing J-channel around a window or door opening is as follows:
- Measure and Cut: Accurately measure the opening’s perimeter, adding extra length for overlaps and mitered corners. Cut the J-channel to the measured lengths using a sharp utility knife or tin snips. Ensure clean, square cuts for a professional look.
- Secure the J-Channel: Begin by attaching the J-channel to the window or door frame using appropriate fasteners, typically galvanized nails or screws. Space fasteners evenly, ensuring they are not driven too deeply to avoid damaging the J-channel. Start at one corner and work your way around the perimeter.
- Overlap and Secure: For longer openings, overlap the ends of the J-channel by at least 2 inches to ensure a watertight seal. Secure the overlap with fasteners.
- Mitered Corners: For mitered corners, carefully measure and cut the J-channel at a 45-degree angle. Ensure a tight fit at the corner joint to prevent water penetration. Secure with fasteners.
- Caulk and Seal: After installing the J-channel, apply a high-quality exterior-grade caulk to seal any gaps between the J-channel and the window or door frame. This further prevents water intrusion and enhances the overall weather resistance.
Common Mistakes with Corner Posts and Other Accessories
Incorrect installation of corner posts and other accessories, such as starter strips and J-channel, can lead to significant aesthetic and functional problems. For example, using the wrong type of fastener can cause damage to the vinyl, leading to cracking or splitting. Additionally, gaps between accessories and siding panels can allow water infiltration, causing damage to the underlying structure.
Examples of common mistakes include: using nails that are too long or too short, failing to properly align components, and neglecting to caulk seams, leading to gaps and potential water damage. Improperly installed corner posts can lead to uneven siding lines and a less professional appearance. Neglecting to use the correct flashing behind J-channel can lead to water damage around window and door openings. These issues can detract from the overall curb appeal and compromise the longevity of the siding installation.
Ignoring Weather Conditions
Proper vinyl siding installation requires careful consideration of weather conditions. Extreme temperatures and inclement weather can significantly impact the installation process and the longevity of the siding itself. Understanding these impacts and adhering to ideal weather parameters is crucial for a successful and durable outcome.
Ignoring weather conditions during vinyl siding installation can lead to several problems. Extreme heat can cause the vinyl to expand excessively, making it difficult to work with and potentially leading to warping or buckling once it cools. Conversely, extremely cold temperatures can make the vinyl brittle and prone to cracking during installation or later due to contraction. High winds can make handling the siding difficult and increase the risk of damage. Rain or snow can hinder the installation process, causing delays and potentially leading to moisture damage.
Ideal Weather Conditions for Vinyl Siding Installation
Ideal weather conditions for vinyl siding installation generally involve moderate temperatures, low humidity, and calm winds. Temperatures between 40°F and 90°F (4°C and 32°C) are generally considered optimal. Lower temperatures can make the vinyl too brittle, while higher temperatures can cause excessive expansion. Low humidity prevents moisture from becoming trapped behind the siding, which can lead to mold and mildew growth. Calm winds prevent the siding from being blown around during installation, minimizing the risk of damage. It’s also advisable to avoid installing during periods of direct sunlight to prevent overheating of the vinyl.
Decision-Making Process Regarding Weather Suitability for Installation
The decision of whether or not to proceed with vinyl siding installation should be based on a careful assessment of the current and forecasted weather conditions. A simple flowchart can aid in this decision-making process:
[Imagine a flowchart here. The flowchart would begin with a diamond shape: “Is the temperature between 40°F and 90°F (4°C and 32°C)?”. A “yes” branch would lead to another diamond: “Is the wind speed below 15 mph (24 km/h)?”. A “yes” branch would lead to another diamond: “Is the humidity below 70%? A “yes” branch would lead to a rectangle: “Proceed with Installation”. A “no” branch at any point would lead to a rectangle: “Postpone Installation”.]
For example, a contractor planning a siding job in the summer might check the forecast. If temperatures are predicted to reach 95°F (35°C) with high humidity, they would postpone the work to avoid potential issues with expansion and moisture. Conversely, if a winter job is planned and the forecast shows freezing temperatures and snow, the installation would also be postponed until suitable conditions prevail. This careful planning ensures a successful installation and prevents costly repairs later.
Inadequate Caulking and Sealing
Proper caulking and sealing are critical steps in vinyl siding installation, often overlooked but vital for long-term performance and protection of your home. Neglecting this crucial detail can lead to significant problems, including water damage, air infiltration, and reduced energy efficiency. A well-caulked installation ensures a weathertight barrier, safeguarding your home’s structure and interior from the elements.
Caulk acts as a flexible sealant, filling gaps and preventing the passage of water and air. Selecting the right type of caulk is essential for achieving a durable and effective seal. Different caulks possess varying properties, making them suitable for specific applications. Improper selection can lead to premature failure and compromise the integrity of the siding installation.
Caulk Selection for Different Applications
Choosing the appropriate caulk depends on the location and the specific needs of the application. For example, exterior applications exposed to direct sunlight and extreme temperature fluctuations require a caulk with superior UV resistance and flexibility. Interior applications may require a caulk that is paintable and aesthetically pleasing. Common types include silicone, acrylic latex, polyurethane, and butyl rubber. Silicone caulk offers excellent water resistance and durability, making it suitable for exterior applications around windows and doors. Acrylic latex caulk is more flexible and paintable, suitable for interior applications or less demanding exterior areas. Polyurethane caulk offers strong adhesion and is often used for filling larger gaps, while butyl rubber is known for its exceptional sealing properties and is commonly used for flashing around windows and doors. Always consult the manufacturer’s instructions to ensure the correct caulk is selected for the specific application and environmental conditions.
Correct Caulk Application Technique
Proper application technique is as crucial as caulk selection. Before applying caulk, ensure the surfaces are clean, dry, and free of dust or debris. This ensures optimal adhesion. For best results, apply the caulk in a continuous bead, using a caulking gun to maintain a consistent flow. Tool the caulk immediately after application, using a wet finger or a specialized caulking tool, to create a smooth, even finish and to ensure proper adhesion to the surfaces. Avoid creating gaps or excessively thick beads, which can lead to cracking and failure.
Around windows and doors, apply a continuous bead of caulk along the entire perimeter of the frame where it meets the siding. Pay particular attention to the corners and joints. For penetrations such as pipes or vents, caulk around the base of the penetration to create a watertight seal. Ensure that the caulk extends beyond the penetration to create a sufficient seal. For larger gaps or cracks, consider using backer rod to fill the gap before applying the caulk, which will reduce the amount of caulk needed and improve the efficiency of the seal. Allow the caulk to cure completely before exposing it to moisture or extreme temperatures. Proper curing time varies depending on the type of caulk used; consult the manufacturer’s instructions for specific details.
Not Using Starter Strips and Finishing Properly
Proper installation of vinyl siding involves more than just attaching panels to the wall. Paying close attention to detail at the beginning and end of the process, specifically using starter strips and applying finishing trim correctly, is crucial for a professional-looking and long-lasting result. Neglecting these steps can lead to significant aesthetic and structural problems.
Starter strips and finishing trim provide a crucial foundation and a clean, finished edge to your vinyl siding installation. These seemingly small components play a significant role in ensuring the overall integrity and appearance of the project. Failure to use them properly can compromise the weather resistance of the siding and create an unprofessional look.
Starter Strip Installation
Starter strips are installed at the bottom of the wall, providing a level, straight starting point for the first row of siding. This ensures a uniform appearance and prevents the first row from sagging or becoming misaligned. The starter strip acts as a support for the bottom edge of the siding panels, ensuring a clean and even look. It also helps to maintain a consistent gap between the siding and the ground, preventing moisture buildup. Without a starter strip, the first row of siding might be uneven, potentially leading to future problems with alignment and water damage. Imagine trying to build a brick wall without a level first row – the whole structure would be compromised. The starter strip acts as that foundational level row for your vinyl siding.
Finishing Trim Installation
Finishing trim is applied at the top and bottom edges of the siding, along with any corners or other transitions. This trim not only improves the aesthetics of the finished product, but also protects the exposed edges of the siding from the elements. Properly installed finishing trim ensures a neat and professional appearance, sealing gaps and preventing water infiltration. Failure to use finishing trim leaves the edges of the siding vulnerable to damage from moisture, wind, and debris. This could lead to premature deterioration and potential water damage behind the siding.
Visual Representation of Correct Installation
Imagine a house wall. At the very bottom, a thin, horizontal strip—the starter strip—is installed, flush against the house’s foundation. This strip is perfectly level and straight. The first row of vinyl siding is then neatly placed over the starter strip, its bottom edge resting securely on the starter strip. This ensures the first row, and subsequent rows, are uniformly aligned. At the very top of the wall, a matching finishing strip is installed, covering the top edge of the final row of siding. Similarly, finishing trim is used around windows, doors, and corners, creating a clean and finished look, covering any exposed edges of the siding panels. All trim pieces should be neatly mitered or butted together, ensuring a seamless transition. The visual effect is a perfectly straight and level installation, with no gaps or exposed edges. The entire installation looks neat, professional, and weather-tight.
Overlooking Building Codes and Permits
Proper vinyl siding installation isn’t just about aesthetics; it’s about ensuring the longevity and structural integrity of your home. A crucial, often overlooked, aspect is adherence to local building codes and obtaining the necessary permits. Ignoring these regulations can lead to significant problems down the line, impacting both your property value and your safety.
Building codes are sets of regulations designed to ensure the safety, structural soundness, and fire resistance of buildings. They often address various aspects of construction, including siding installation, specifying requirements for materials, installation methods, and overall building performance. Obtaining the necessary permits demonstrates compliance with these regulations and allows local authorities to inspect the work, ensuring it meets the established standards.
Building Code Variations and Their Impact
Building codes vary significantly across different regions, reflecting variations in climate, building materials, and local conditions. For example, in a region prone to high winds, like Coastal County, codes might mandate the use of heavier-gauge siding and more robust fastening methods compared to Inland Valley, a region with milder weather conditions. Coastal County might also have stricter regulations regarding water resistance and wind load capacity for all exterior materials, including siding. In contrast, Inland Valley’s focus might be more on fire resistance due to a higher risk of wildfires, requiring specific fire-retardant treatments or materials. These differences highlight the importance of consulting your local building department to understand the specific requirements for your area before beginning any installation.
Consequences of Non-Compliance
Failure to obtain the necessary permits or to comply with building codes can result in several serious consequences. These include fines, stop-work orders halting the project until violations are corrected, and even the requirement to remove and reinstall the siding if it doesn’t meet code. More severely, non-compliant installations can compromise the structural integrity of your home, increasing vulnerability to damage from weather events like high winds or heavy rain. In the worst-case scenario, such deficiencies might even affect insurance coverage in the event of damage or injury. For example, if a fire starts and investigators find that the siding installation violated fire codes, the insurance company might deny the claim. Moreover, the resale value of your property can be significantly diminished if the siding installation is deemed non-compliant, potentially leading to costly legal disputes with future buyers.
Final Conclusion
Successfully installing vinyl siding involves more than just attaching panels; it’s about understanding the material’s properties and adhering to best practices. By avoiding the common mistakes outlined in this guide – from inadequate preparation and improper fastener selection to neglecting expansion and contraction – you can ensure a beautiful, durable, and long-lasting result. Remember, a little planning and attention to detail can save you time, money, and potential headaches down the line. Invest the time to do it right, and enjoy the rewards of a professionally installed vinyl siding system for years to come.
Leave a Reply