How to Install Vinyl Siding Over Existing Wood Siding: Transforming your home’s exterior with vinyl siding offers a blend of aesthetic appeal and lasting protection. This comprehensive guide walks you through each step, from assessing your existing wood siding to completing the final touches. We’ll cover essential preparations, material selection, installation techniques, and troubleshooting common issues, ensuring a successful and visually stunning renovation project.
This detailed process ensures a professional finish, enhancing your home’s curb appeal while providing long-term protection against the elements. We’ll explore various siding types, address specific challenges like working around windows and doors, and provide crucial safety advice throughout the process. Whether you’re a seasoned DIY enthusiast or a first-timer, this guide empowers you to confidently undertake this rewarding home improvement project.
Assessing Existing Wood Siding
Before installing vinyl siding over existing wood siding, a thorough assessment is crucial to ensure a successful and long-lasting installation. Neglecting this step can lead to future problems, such as moisture damage and premature failure of the vinyl siding. A careful inspection will identify potential issues and allow for necessary repairs before the new siding is applied.
Inspection for Damage, Rot, and Moisture
Inspecting the existing wood siding involves a systematic approach to identify any damage, rot, or moisture problems. Begin by visually examining the entire surface of the siding, paying close attention to areas prone to moisture accumulation, such as near the ground, around windows and doors, and in shaded areas. Look for signs of rot, such as discoloration, soft or spongy areas, and crumbling wood. Check for cracks, splits, loose boards, insect infestation (termite damage is particularly concerning), and any other physical damage. Use a screwdriver or similar tool to gently probe suspicious areas to assess the extent of any rot. The presence of moisture can often be detected by a darker discoloration of the wood or a musty odor. A moisture meter can provide a more precise measurement of moisture content in the wood. High moisture levels indicate a need for significant repair or replacement before installing the vinyl siding.
Identifying Areas Needing Repair
Once areas of damage, rot, or excessive moisture have been identified, it is important to determine the extent of the necessary repairs. Minor damage, such as small cracks or loose boards, can often be repaired by filling cracks with wood filler, securing loose boards with nails or screws, and applying a waterproof sealant. More extensive damage, such as significant rot or insect infestation, may require replacing entire sections of siding. It’s vital to remove all affected wood to ensure that the repair is complete and prevents further damage. Properly repairing damaged areas ensures a solid base for the new vinyl siding and prevents future problems. For example, a section of siding with extensive termite damage should be entirely removed and replaced with new, treated lumber before proceeding.
Determining Structural Soundness
The existing wood siding must provide adequate support for the new vinyl siding. A structurally unsound wall could lead to the vinyl siding failing or becoming damaged. Assess the condition of the sheathing beneath the wood siding. If the sheathing is damaged or deteriorated, it must be repaired or replaced before installing the vinyl siding. Look for signs of sagging, buckling, or water damage to the sheathing. Check the structural integrity of the wall framing. If there are any signs of significant structural damage, consult a structural engineer to determine the necessary repairs before proceeding with the vinyl siding installation. For instance, significant warping of the underlying sheathing may necessitate replacement before installation, ensuring a flat surface for proper vinyl siding adherence.
Preparing the Surface
Proper surface preparation is crucial for a successful vinyl siding installation over existing wood siding. A well-prepared surface ensures proper adhesion, preventing future problems like buckling, warping, or detachment of the new siding. This process involves removing damaged or loose wood siding, thoroughly cleaning the remaining surface, and applying appropriate primers and sealants to create a stable and receptive base for the vinyl siding.
Removing Loose or Damaged Wood Siding
Removing loose or damaged wood siding is the first step in preparing the surface. This ensures a smooth, even surface for the new vinyl siding and prevents irregularities from showing through. Carefully inspect the existing wood siding, identifying any loose boards, rotting sections, or areas showing significant damage.
- Begin by using a pry bar to carefully remove loose or damaged siding boards. Work from the bottom up, starting with the lowest row of siding. Insert the pry bar gently between the siding and the underlying structure, avoiding damage to the remaining siding or house framing.
- For stubborn boards, consider using a hammer and nail puller to remove any remaining nails. Be cautious to avoid damaging the underlying sheathing.
- Once a section of siding is removed, inspect the underlying sheathing for any damage. Replace or repair any damaged sheathing before proceeding. This step is crucial to ensuring a solid base for the new vinyl siding.
- Dispose of the removed siding and debris properly, following local regulations for waste disposal.
Cleaning and Preparing the Surface
After removing loose or damaged siding, thoroughly clean the remaining surface. A clean surface ensures optimal adhesion of the primer and sealant, which are essential for a long-lasting installation.
- Use a stiff-bristled brush or pressure washer to remove dirt, debris, cobwebs, and any loose paint or wood particles from the existing siding. If using a pressure washer, maintain a safe distance to avoid damaging the underlying sheathing or causing water damage.
- Allow the surface to completely dry before proceeding. This is crucial for proper adhesion of the primer and sealant. Moisture can hinder the bonding process, leading to potential problems down the line.
- Inspect the surface for any remaining loose or damaged areas. Address any remaining issues before moving on to the next step. This will ensure a consistent and reliable base for the vinyl siding.
Applying Primers and Sealants
Applying appropriate primers and sealants is vital for creating a stable and receptive surface for the vinyl siding. Primers improve adhesion and sealants prevent moisture from penetrating the wood, protecting it from rot and decay. The specific type of primer and sealant will depend on the condition of the existing wood siding and the climate.
- Apply a high-quality wood primer designed for exterior use. This will create a uniform surface for the vinyl siding to adhere to, improving the overall bond and longevity of the installation. Follow the manufacturer’s instructions for application.
- After the primer has dried completely, apply a weatherproof sealant to all seams and joints in the existing wood siding. This prevents moisture intrusion, protecting the underlying structure and ensuring a longer lifespan for the vinyl siding installation. Again, carefully follow the manufacturer’s instructions for application and drying time.
- Allow the primer and sealant to dry completely before installing the vinyl siding. This will ensure proper adhesion and prevent problems such as bubbling or peeling of the new siding.
Choosing the Right Vinyl Siding
Selecting the appropriate vinyl siding is crucial for a successful and long-lasting installation. The choice involves considering several factors beyond simply aesthetics, ensuring both a visually appealing and structurally sound exterior. Proper selection will contribute significantly to the overall longevity and value of your home improvement project.
Vinyl Siding Profiles
Different vinyl siding profiles offer varied appearances and functionalities. Understanding these differences helps in choosing the best option for your home’s architectural style and personal preference. Common profiles include clapboard (the most traditional style, mimicking traditional wooden clapboards), Dutch lap (featuring a wider, more pronounced overlap), shingle (designed to resemble individual wood shingles), and vertical siding (a modern alternative offering a clean, contemporary look). Clapboard siding is a versatile choice suitable for most homes, offering a classic and timeless appeal. Dutch lap siding provides a more substantial and textured appearance, ideal for homes seeking a bolder aesthetic. Shingle siding, with its layered look, is often used to create a rustic or cottage-style feel. Vertical siding provides a sleek, modern look that complements contemporary architectural styles. The choice depends largely on personal preference and the overall architectural style of the house.
Color and Finish Selection
The color and finish of your vinyl siding significantly impact the curb appeal of your home. Consider the existing architectural style, landscaping, and surrounding neighborhood when making your selection. Lighter colors generally reflect more sunlight, potentially reducing cooling costs, while darker colors can absorb more heat. A variety of finishes are available, including smooth, textured, and wood-grain finishes. A smooth finish provides a clean and modern look, while textured finishes offer a more traditional appearance. Wood-grain finishes mimic the look of natural wood, offering a classic and rustic feel. It’s advisable to obtain samples and view them in different lighting conditions before making a final decision to ensure the chosen color complements your home and personal taste. Consider the long-term impact of the color choice on the overall aesthetic appeal and resale value of your property.
Building Codes and Local Regulations
Compliance with building codes and local regulations is paramount throughout the entire siding installation process. These regulations often specify requirements regarding the type of siding allowed, its installation methods, and fire safety standards. Before purchasing any siding, it is essential to check with your local building department to obtain the necessary permits and understand any specific regulations that apply to your project. Failure to comply with these regulations could result in delays, fines, or even the need to remove and reinstall the siding. Understanding and adhering to these regulations ensures a safe and legally compliant installation. Contacting your local building authority provides a crucial first step towards a successful and compliant siding project.
Installing the Starting Strip and J-Channel
Installing the starting strip and J-channel are crucial first steps in vinyl siding installation, ensuring a straight, level, and professional-looking finish. These components provide a solid foundation for the rest of the siding and create clean transitions around windows and doors. Proper installation requires attention to detail and the use of appropriate tools.
The starting strip, typically a thin piece of vinyl, forms the base for the first row of siding. It’s installed along the bottom edge of the wall, creating a level line to which subsequent siding panels will be attached. The J-channel, a J-shaped piece of vinyl, is used to neatly finish the edges of siding around windows and doors, allowing the siding to overlap the trim and providing a weatherproof seal.
Starting Strip Installation
Begin by establishing a perfectly level baseline along the entire bottom of the wall where the siding will be installed. Use a level and chalk line to mark this line. This is essential for preventing the appearance of a sloping or uneven installation. The starting strip is then nailed directly to this line, ensuring that the top edge of the strip is flush with the chalk line. Use galvanized siding nails spaced approximately 6 to 8 inches apart. Over-nailing can damage the strip, while under-nailing can lead to instability. It’s important to avoid driving the nails too deeply, as this can cause the vinyl to buckle. The nails should be countersunk just enough to hold the strip securely.
J-Channel Installation
J-channel installation around windows and doors requires precise measurement and careful placement. The J-channel should be installed before applying the siding panels to these areas. Begin by measuring the length of the window or door opening. Cut the J-channel to the appropriate length, ensuring a snug fit. The open end of the J-channel should face outward. This allows the siding to slip neatly into the channel and overlap the trim. Use galvanized siding nails to secure the J-channel to the framing, again spacing the nails approximately 6 to 8 inches apart. Ensure the J-channel is plumb and level to create a clean and professional finish. The use of a level is critical in ensuring the correct alignment of the J-channel.
Ensuring Proper Alignment and Levelness
Maintaining proper alignment and levelness throughout the installation process is paramount. Using a level to check the starting strip and J-channel is crucial before proceeding to the next steps. Any discrepancies should be corrected immediately. Regularly checking the alignment of the siding panels as they are installed against the starting strip and J-channel will prevent cumulative errors that could lead to significant problems later. For long stretches of wall, it is advisable to use a laser level to ensure a consistently level baseline. This precision will be especially important in areas with slight slopes or uneven terrain.
Installing Vinyl Siding Panels
Installing vinyl siding panels is the core of the project, requiring precision and attention to detail to ensure a professional-looking and weather-resistant finish. Proper overlapping and fastening are crucial for preventing water damage and maintaining the structural integrity of the siding. This section will guide you through the process step-by-step.
Panel Installation Procedure
Begin by selecting a starting point, typically a corner or a less visible area. Remember to always work from bottom to top, ensuring each panel is properly overlapped and secured. Using the appropriate nails and spacing is essential for preventing damage and ensuring a long-lasting installation.
- Snapping the First Panel: Start with a full-length panel, aligning its bottom edge with the installed starting strip or J-channel. Gently snap the panel into place, ensuring a tight fit. The panel should slide easily into the channel.
- Fastening the First Panel: Use galvanized siding nails, spacing them according to the manufacturer’s recommendations (see table below). Avoid overdriving nails, as this can damage the panel and compromise its weather resistance. Aim for the nailing slots to prevent cracking.
- Installing Subsequent Panels: Overlap each subsequent panel by the recommended amount (typically a few inches, as specified by the manufacturer). Snap the panel into place and fasten it securely using the same nailing technique as the first panel.
- Working Around Obstacles: For windows, doors, and other obstacles, carefully measure and cut the panels to fit. Use a sharp utility knife or a siding cutter for clean cuts. Remember to account for expansion and contraction of the vinyl.
- Finishing the Installation: Once all panels are installed, inspect the work carefully to ensure all overlaps are correct and all nails are securely fastened. Trim any excess siding as needed.
Vinyl Siding Nailing Patterns and Spacing
The following table outlines recommended nailing patterns and spacing for common vinyl siding types. Always refer to your specific siding manufacturer’s instructions for precise details, as these can vary slightly.
| Siding Type | Nail Spacing (inches) | Nailing Pattern | Notes |
|---|---|---|---|
| Standard Lap Siding | 6-8 inches | Staggered, near the top of the panel within the nailing slots | Avoid nailing near the edges. |
| Dutch Lap Siding | 6-8 inches | Staggered, near the top of the panel within the nailing slots | Requires careful alignment of the overlaps. |
| Board and Batten Siding | 8-12 inches | Centered on the vertical boards | Spacing may vary depending on board width. |
| Shake Siding | 6-8 inches | Staggered, near the top edge within the nailing slots | May require specialized nails. |
Cutting and Fitting Panels Around Corners and Obstacles
Precise cuts are necessary to achieve a neat and professional finish around corners and obstacles. Measure twice, cut once, to avoid wasting materials and ensure a perfect fit. Always use sharp tools to prevent damaging the siding.
- Measuring and Marking: Carefully measure the area requiring a cut, taking into account the overlap needed for proper installation.
- Cutting the Panel: Use a sharp utility knife or a specialized siding cutter to make clean, straight cuts. A miter saw can be used for angled cuts around corners.
- Fitting the Panel: Carefully position the cut panel into place, ensuring a snug fit against the adjacent panels and any existing trim.
- Securing the Panel: Fasten the cut panel using the same nailing technique as with full-length panels. Pay close attention to nailing placement to prevent damage.
- Finishing Touches: Inspect the finished corner or obstacle area for any gaps or inconsistencies. Make any necessary adjustments or repairs.
Working Around Windows and Doors
Installing vinyl siding around windows and doors requires careful measurement and precise cutting to ensure a watertight and aesthetically pleasing finish. This section details the techniques and considerations for successfully completing this crucial step in your siding project. Proper installation around these openings prevents water intrusion and enhances the overall look of your home’s exterior.
Successfully installing vinyl siding around windows and doors hinges on accurate measurements and the use of appropriate trim and accessories. The goal is to create a seamless transition between the siding and the window or door frame, maintaining a clean, professional appearance while ensuring a weatherproof seal. This involves using J-channel, window trim, and sometimes, Z-flashing, depending on the specific configuration of your windows and doors.
Measuring and Cutting Vinyl Siding Panels
Accurate measurement is paramount when working around openings. Begin by carefully measuring the distance between the window or door frame and the adjacent siding. This measurement will determine the length of the vinyl siding panel needed. Remember to account for the overlap required for proper installation. Use a sharp utility knife or siding shears for clean, precise cuts. Avoid excessive force, which can damage the vinyl. Always measure twice and cut once to minimize waste and ensure a perfect fit. For particularly complex cuts, consider using a template to guide your cutting. For instance, if you are working with a uniquely shaped window, you can create a template from cardboard to accurately transfer the shape to your vinyl siding.
Using J-Channel and Window Trim
J-channel is a crucial component for creating a neat and watertight seal around windows and doors. It provides a finished edge and allows for easy installation of the siding panels. The J-channel is installed around the perimeter of the window or door opening, ensuring it’s level and plumb. Once the J-channel is secured, you can then install the vinyl siding panels, fitting them snugly into the channel. Window trim is then used to cover the exposed edges of the J-channel and further enhance the aesthetic appeal. This trim is typically installed over the J-channel and creates a clean transition between the siding and the window frame. The process is similar for doors, although you may need to use additional accessories like corner trim depending on the design of your door frame.
Creating a Watertight Seal
A watertight seal is essential to prevent water damage to your home’s interior. To achieve this, ensure that all seams and joints are properly sealed using appropriate sealant. Pay particular attention to the areas where the vinyl siding meets the window or door frame. Apply a high-quality, weather-resistant sealant to these joints to create a continuous barrier against moisture. Ensure that the sealant is compatible with both the vinyl siding and the window/door frame material. Using a caulking gun ensures a consistent and even application. For example, if you’re working with a wooden window frame, you’ll want to choose a sealant specifically designed for wood and vinyl. Regular inspection of these areas after installation and throughout the life of the siding is recommended.
Finishing Touches
Adding the finishing touches to your vinyl siding installation is crucial for achieving a professional and long-lasting result. This final stage involves installing soffit and fascia vinyl, adding corner and trim pieces, and meticulously caulking all seams and joints to prevent water damage. Careful attention to detail during this phase will significantly enhance the overall appearance and durability of your new siding.
Soffit and Fascia Vinyl Installation
Soffit and fascia vinyl are installed to complete the look and protect the underlying structure. Soffit panels, typically installed horizontally, cover the underside of the eaves, providing ventilation and a clean finish. Fascia boards, installed vertically, cover the ends of the rafters. Both are available in various colors and styles to match your chosen siding. Installation generally involves using a starter strip similar to that used for the main siding, followed by overlapping the panels to ensure a watertight seal. Remember to allow for expansion and contraction by leaving small gaps between the panels and using appropriate fasteners. For instance, using galvanized nails spaced approximately 6-8 inches apart is a common practice, avoiding over-fastening which could lead to warping. Proper alignment and cutting of the panels are key to a neat and seamless appearance.
Corner and Trim Piece Installation
Corner and trim pieces provide a finished look and protect vulnerable areas. Corner pieces are designed to neatly cover the outside corners of the house, preventing water penetration. Trim pieces are used around windows, doors, and other architectural features. These pieces are typically installed after the main siding panels are in place, ensuring a smooth transition between the different components. Accurate measurement and precise cutting are essential to achieve a professional finish. For example, using a miter saw for accurate angles will significantly improve the overall aesthetic appeal. Proper alignment is vital to avoid gaps or overlaps. Many manufacturers provide detailed instructions specific to their products, which should be carefully followed.
Caulking and Sealing
Caulking and sealing all joints and seams is paramount to prevent water damage. Water intrusion is a major cause of deterioration in any exterior cladding system. All gaps, especially around windows, doors, and corners, should be carefully filled with high-quality exterior-grade caulk. This should be done immediately after installing the siding and trim pieces. Choose a caulk that is flexible and durable to withstand temperature fluctuations and movement. Apply the caulk in a smooth, continuous bead, ensuring complete coverage of all gaps. Excess caulk should be immediately removed to prevent an unsightly finish. For instance, a paintable caulk allows for matching the color to your siding, creating a seamless and professional finish. Regular inspection and maintenance of caulking will ensure the long-term integrity of your vinyl siding.
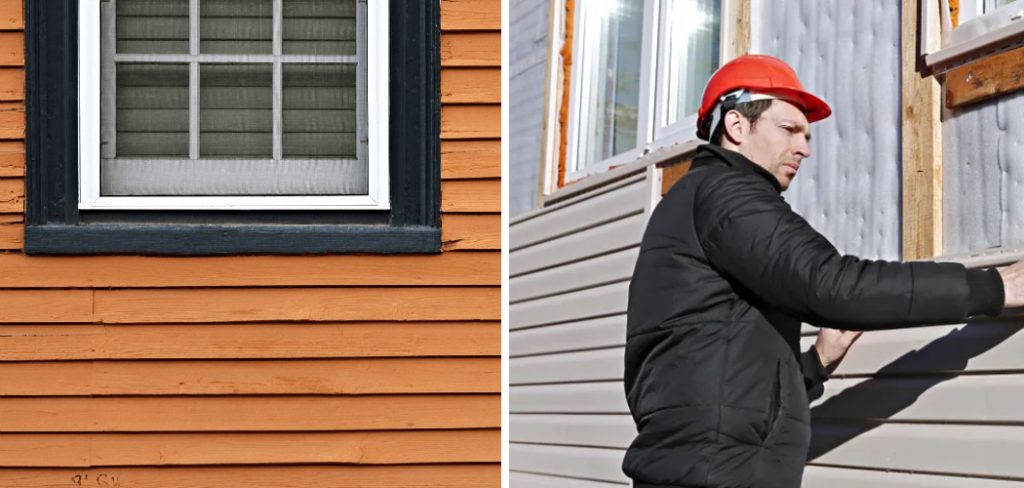
Safety Precautions
Installing vinyl siding, while generally straightforward, involves working at heights and using tools that can pose risks if not handled correctly. Prioritizing safety throughout the project is crucial to prevent injuries and ensure a successful installation. This section details essential safety measures to maintain a safe working environment.
Proper safety measures significantly reduce the likelihood of accidents. Failing to adhere to these guidelines could result in serious injury or property damage. This section outlines vital safety practices, including the use of appropriate personal protective equipment and the safe handling and disposal of construction materials.
Potential Hazards and Safety Measures
Working at heights is an inherent risk in siding installation. Ladders should be used correctly, ensuring they are placed on stable, level ground and extend at least three feet above the roofline. A spotter should be present whenever working on ladders above six feet. Falls are a major concern, so secure footing and proper ladder technique are paramount. Power tools, such as circular saws and nail guns, present cutting and impact hazards. Always use these tools according to manufacturer instructions, ensuring they are properly maintained and in good working order. Eye protection and hearing protection are essential when operating power tools. Sharp objects, such as scrap pieces of siding and exposed nails, pose puncture and laceration risks. Wear work gloves and sturdy footwear to protect hands and feet. Furthermore, be mindful of overhead power lines and maintain a safe distance to prevent electrocution. Always check for underground utilities before digging.
Personal Protective Equipment (PPE)
Appropriate PPE is non-negotiable for siding installation. This includes safety glasses or goggles to protect eyes from flying debris, hearing protection (earplugs or muffs) to mitigate noise from power tools, work gloves to protect hands from cuts and abrasions, and sturdy work boots with steel toes to protect feet from falling objects or punctures. A hard hat should be worn when working at heights to protect against head injuries from falling objects. Depending on the specific tasks, additional PPE might be necessary, such as a dust mask to prevent inhalation of harmful particles during sanding or cutting. The use of proper PPE is not merely a suggestion; it’s a critical aspect of responsible and safe work practices.
Waste Handling and Disposal
Proper waste disposal is essential for environmental protection and compliance with local regulations. Separate construction waste into recyclable materials (e.g., scrap wood, metal) and non-recyclable materials (e.g., broken siding pieces, packaging). Dispose of hazardous materials, such as leftover paint or solvents, according to local guidelines. Never mix hazardous waste with regular trash. Ensure that all waste is properly contained and transported to designated disposal sites or recycling centers. Leaving waste materials scattered on the site can create hazards, potentially leading to injuries or environmental damage. Following proper waste disposal protocols contributes to a cleaner and safer work environment.
Troubleshooting Common Issues
Even with careful planning and execution, problems can arise during vinyl siding installation. Understanding common issues and their solutions is crucial for a successful and long-lasting project. Addressing these problems promptly will prevent further complications and ensure a professional-looking finish.
Buckling and Warping
Buckling and warping of vinyl siding panels are often caused by improper installation, expansion and contraction due to temperature fluctuations, or damage during handling. Buckled panels appear wavy or uneven, while warped panels are distorted in shape. To prevent buckling, ensure proper spacing between panels to allow for thermal expansion. Avoid forcing panels into place, as this can lead to warping. For existing buckling, carefully remove the affected panels and reinstall them correctly, ensuring proper alignment and spacing. If the panel itself is warped beyond repair, replacement is necessary. Remember that vinyl siding expands and contracts with temperature changes, so sufficient expansion gaps are essential. Consider using a pry bar to gently release pressure points causing the buckling, always exercising caution to avoid damage to the panel or underlying structure.
Gaps Between Panels
Gaps between vinyl siding panels are unsightly and can compromise the weatherproofing of your home. These gaps can result from incorrect panel overlap, inadequate expansion space, or damage to the panels. To address gaps, inspect the adjacent panels and ensure they are properly overlapped. The recommended overlap should be clearly defined in the manufacturer’s instructions. If the gap is due to insufficient expansion space, you may need to carefully remove and reposition the panels, ensuring adequate spacing is maintained throughout. If the panels themselves are damaged, they will need to be replaced. Remember to check that the underlying framework is straight and true; uneven framing can also contribute to gaps between panels.
Damaged Panels
Damage to vinyl siding panels can occur during transportation, installation, or due to impacts after installation. Scratches, dents, and cracks can detract from the appearance and compromise the protective qualities of the siding. Minor scratches can often be buffed out with a soft cloth and appropriate vinyl cleaner. Deeper scratches or dents may require replacement of the affected panel. Cracked panels must be replaced to prevent water intrusion. When replacing a damaged panel, ensure a precise fit to maintain the overall aesthetic and weatherproofing of the installation. Using the correct tools and techniques for removal and installation will minimize the risk of further damage.
Conclusion
Successfully installing vinyl siding over existing wood siding significantly enhances your home’s curb appeal and durability. By following the steps outlined in this guide, you can achieve a professional-looking result that adds value and protection to your property. Remember to prioritize safety and attention to detail throughout the process. With careful planning and execution, you can enjoy a beautifully renovated exterior for years to come. The pride of accomplishment will be well worth the effort!
Leave a Reply