Step-by-Step Vinyl Siding Installation Guide for Beginners: Transforming your home’s exterior with vinyl siding is a rewarding DIY project, but it requires careful planning and execution. This comprehensive guide walks you through each stage, from initial measurements and material selection to the final finishing touches. We’ll cover essential tools, techniques for precise cuts and panel alignment, and troubleshooting common installation problems. Whether you’re a seasoned DIY enthusiast or a complete novice, this guide provides the knowledge and confidence to successfully install your new vinyl siding.
This guide is designed to empower beginners with the skills and understanding needed to complete this project successfully. We’ll break down each step into manageable parts, offering clear instructions and helpful tips along the way. By the end, you’ll have a beautiful, durable, and energy-efficient exterior, enhancing your home’s curb appeal and value.
Planning & Preparation
Successful vinyl siding installation begins with meticulous planning and preparation. Taking the time to gather the necessary tools and materials, accurately measure your house, and properly prepare the exterior walls will significantly improve the efficiency and quality of your project, resulting in a professional-looking finish that lasts for years.
Necessary Tools and Materials
A comprehensive list of tools and materials is crucial for a smooth installation. Failing to have everything on hand will lead to delays and potential frustration. The following lists provide a comprehensive overview.
- Measuring Tools: Measuring tape (at least 25 feet), level, chalk line, speed square.
- Cutting Tools: Circular saw with fine-tooth blade (for cutting siding), utility knife, tin snips (for metal flashing).
- Fastening Tools: Hammer, nail gun (recommended for efficiency), drill with appropriate drill bits (for starter holes in some cases).
- Other Tools: Safety glasses, work gloves, ladder (appropriate for the height of your house), pry bar, caulking gun.
- Siding Materials: Vinyl siding panels (calculate the required amount based on your measurements, adding extra for waste), J-channel, starter strip, corner trim, J-trim, window and door trim, flashing (for windows and doors), fasteners (nails or screws).
- Underlayment (optional but recommended): Housewrap or building paper to provide an extra layer of protection against moisture and improve insulation.
Calculating Siding Requirements
Accurate measurement is paramount to avoid material shortages or excessive waste. Begin by measuring the total area of each wall, including windows and doors. Remember to account for overlaps and waste (typically 5-10%). Consult your siding manufacturer’s instructions for specific overlap requirements. For example, if a wall measures 20 feet wide and 10 feet high, the total area is 200 square feet. Adding 10% for waste results in a requirement of 220 square feet of siding. Always round up to the nearest whole panel quantity to ensure you have enough material.
Site Preparation Checklist
Thorough site preparation is essential for a successful installation. Overlooking this step can lead to complications later on. This checklist will help you ensure your site is ready.
- Clear the area around the house of any debris, vegetation, or obstructions.
- Inspect the existing exterior walls for any damage and make necessary repairs (e.g., rotted wood, loose mortar).
- Ensure the existing wall sheathing is sound and properly fastened.
- If necessary, install housewrap or building paper as a moisture barrier.
- Ensure adequate access to the walls via scaffolding or ladders.
- Check local building codes and obtain necessary permits if required.
Preparing the House Exterior Wall
Proper wall preparation is key to a long-lasting siding installation. This involves removing any existing siding, repairing damaged areas, and ensuring a smooth, level surface.
- Remove Existing Siding: Carefully remove any existing siding, paying attention to not damage the underlying sheathing. Dispose of the old siding responsibly.
- Repair Damaged Areas: Repair any damaged areas of the wall sheathing, including rotted wood or loose mortar. Replace damaged sections with new lumber and secure it firmly.
- Leveling and Straightening: Ensure the wall surface is relatively level and straight. Use shims as needed to correct any unevenness. This is crucial for a neat and professional-looking finish.
- Install Housewrap or Building Paper (Optional): If using housewrap or building paper, install it according to the manufacturer’s instructions, ensuring proper overlap and sealing at seams.
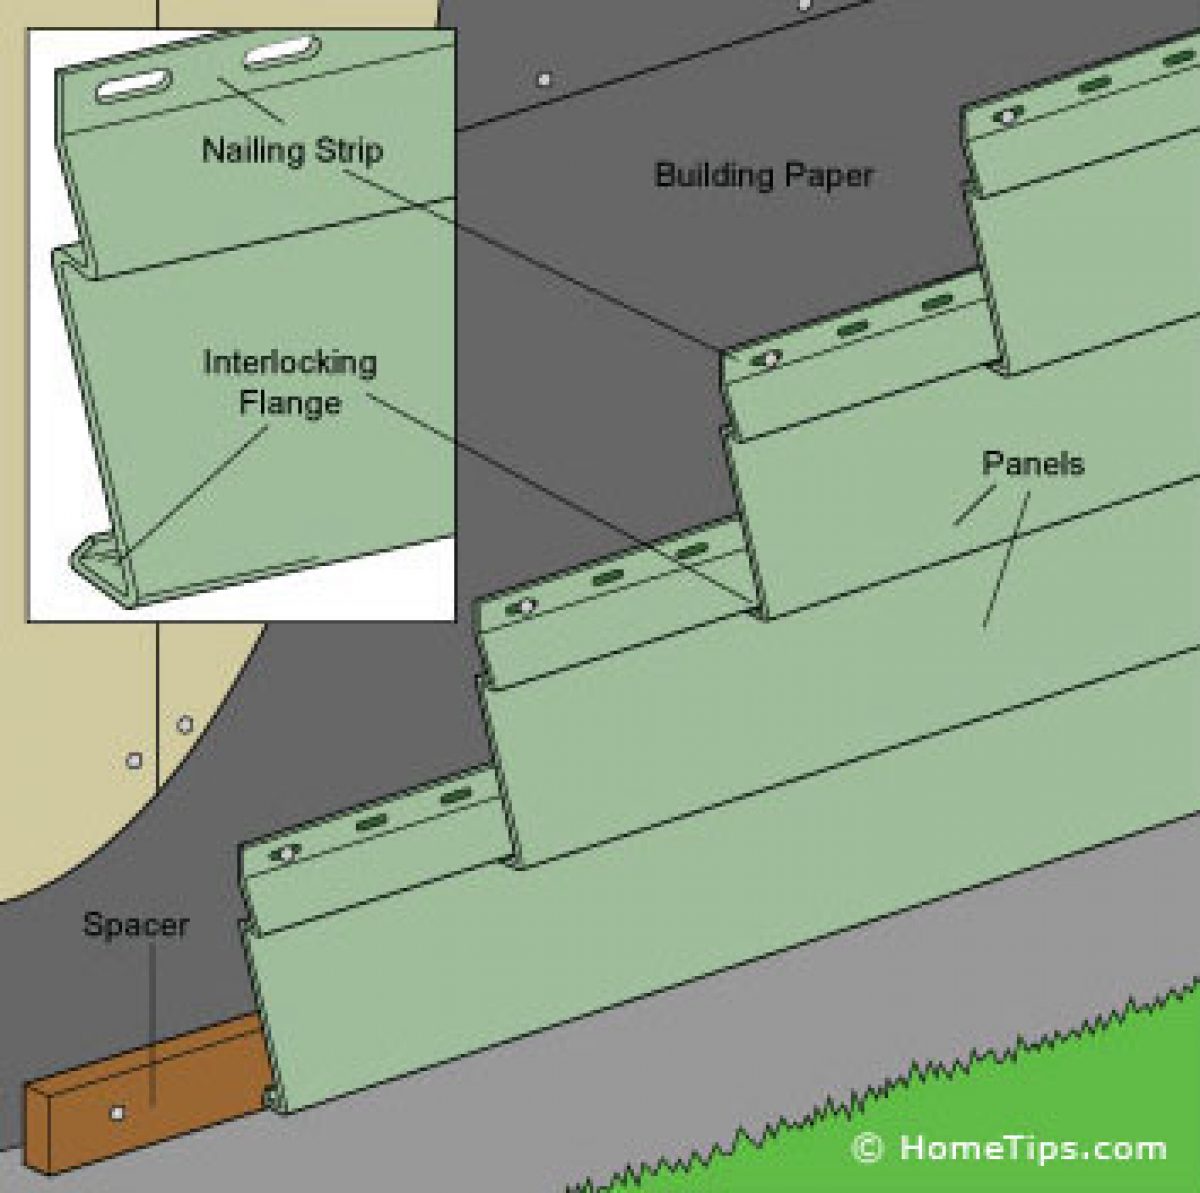
Installing Starter Strips & J-Channel
Installing starter strips and J-channel is a crucial step in vinyl siding installation, ensuring a neat, straight, and properly aligned finished product. These components provide a foundation for the rest of the siding and protect the edges of your home’s exterior. Proper installation will prevent future issues like water damage and unsightly gaps.
Starter Strip Installation
Starter strips are the first pieces of siding installed, forming the base for the remaining rows. They are typically installed horizontally along the bottom edge of the wall, providing a consistent starting point for the siding panels. This ensures a straight and level bottom edge to the entire siding installation. The strips are typically nailed into the wall framing, ensuring a secure foundation. Using a level throughout this process is crucial to maintaining a straight line. Incorrect installation can lead to misalignment and gaps in the finished siding. Nails should be spaced appropriately according to manufacturer’s instructions to avoid splitting the strip.
J-Channel Installation Around Windows and Doors
J-channel is an L-shaped piece of vinyl used to create a neat and weatherproof finish around windows and doors. It provides a clean transition between the siding and these openings, preventing water infiltration. The channel is installed so that the siding can be easily slipped into the open flange of the J-channel. Accurate measurement and cutting are essential for a proper fit. The J-channel should be securely fastened to the framing, using appropriate nails or screws. It is crucial to ensure the J-channel is plumb and level to avoid issues with the siding alignment. Failure to properly secure the J-channel can lead to gaps and potential water damage.
Alignment and Securing
Proper alignment and secure fastening of both starter strips and J-channel are paramount for a successful siding installation. Using a level at every stage is essential to ensure straight lines. Nails or screws should be driven in straight and at the recommended spacing to avoid damaging the vinyl. Over-driving fasteners can cause cracking or warping, while under-driving can result in loose and insecure components. The use of a nail gun can significantly speed up this process while ensuring consistent penetration depth. Regularly checking the alignment throughout the installation process will help catch any errors early on.
Comparison of Starter Strips and J-Channels
| Feature | Starter Strip Types | J-Channel Types |
|---|---|---|
| Material | Vinyl, Aluminum | Vinyl, Aluminum |
| Purpose | Provides a starting point for siding installation | Creates a weatherproof transition around openings |
| Installation | Nailed directly to the wall framing | Nailed or screwed to the framing |
| Color Options | Various colors to match siding | Various colors to match siding |
Installing the First Course of Siding
Installing the first course of vinyl siding is crucial for establishing a straight and level foundation for the rest of your project. This initial row sets the alignment for all subsequent rows, so precision is key. Careful measurement and attention to detail at this stage will significantly impact the overall appearance and integrity of your finished siding.
The first course typically begins at the bottom of the wall, aligning with the already installed starter strip and J-channel. The process involves fitting the siding panels snugly into the starter strip, ensuring proper overlap and locking mechanisms are engaged. This section will guide you through this process, providing tips for handling corners and other potential obstacles.
Measuring and Cutting the First Panel
Begin by measuring the length of the wall section where you’ll install the first course. Subtract approximately 1/4 inch to allow for expansion and contraction. This ensures a snug fit without causing the siding to buckle under temperature changes. Cut the vinyl siding panel to this measured length using a sharp utility knife or tin snips. Ensure a clean, straight cut for a professional finish. Imagine a perfectly straight line across the bottom of a long panel; this is the visual goal of the cut.
Installing the First Panel
Carefully slide the bottom edge of the cut panel into the starter strip, ensuring it sits flush against the bottom edge of the strip. The panel should slide easily; if it’s tight, you may need to slightly adjust your cut. Once in place, gently press the top edge of the panel into the locking mechanism of the panel above it. You will hear a distinct “click” as the panels lock together. This locking mechanism provides the necessary stability and weather resistance. Visualize the panel securely fastened, held in place by the interlocking system.
Overlapping and Securing Subsequent Panels
For subsequent panels, maintain a consistent overlap. The top edge of each panel should overlap the bottom edge of the panel above it by approximately 1 inch. This overlap provides both aesthetic appeal and crucial protection against water intrusion. This consistent overlap creates a neat and unified look. The panels should interlock seamlessly, creating a strong and weather-resistant barrier. Each subsequent panel should be installed in the same manner, sliding the bottom edge into the starter strip and locking the top edge into the previous panel.
Working Around Corners and Obstacles
When approaching corners, use a miter saw to cut the panels at a 45-degree angle. This allows for a clean, seamless fit at the corner. You’ll need to measure carefully to ensure accurate cuts and a proper fit. Visualize the two angled panels meeting perfectly at the corner, forming a neat and even 90-degree angle. For obstacles like windows or doors, measure carefully and cut the panels to fit precisely around these elements. Use a utility knife to carefully cut around the obstacle, ensuring a clean fit and maintaining the proper overlap. Consider pre-drilling pilot holes before fastening the siding to avoid cracking.
Installing Subsequent Courses of Siding
Installing subsequent courses of vinyl siding builds upon the foundation established with the starter strip and first course. Maintaining consistent overlap and proper alignment is crucial for a professional-looking and weather-resistant finish. This section details the process, addresses common challenges, and explores various cutting and fitting techniques.
Each subsequent course of siding is installed in the same manner as the first, ensuring a consistent 1/2 inch to 1 inch overlap with the course below. This overlap provides weather protection and prevents water penetration. Begin by aligning the bottom edge of the new panel with the top edge of the previously installed course, ensuring the panels are flush against the J-channel or starter strip at the edges. Secure the panel using appropriate nails, spaced according to manufacturer recommendations. Remember to avoid over-driving nails, as this can damage the siding and compromise its weather resistance.
Challenges in Installing Subsequent Courses and Their Solutions
Common problems encountered during vinyl siding installation often involve panel alignment, cutting around obstacles, and managing expansion and contraction. Misalignment can result in an uneven or unprofessional appearance, while improper cutting can lead to gaps or damage. Expansion and contraction of the siding due to temperature fluctuations must be accommodated to avoid buckling or warping.
For example, aligning panels around windows and doors requires precise measurements and careful cutting. Using a sharp utility knife or a siding shear ensures clean cuts. For expansion and contraction, it’s vital to leave the recommended expansion gaps specified by the manufacturer. These gaps prevent stress build-up, which could cause damage during temperature fluctuations. If panels become slightly warped due to heat, gentle manipulation and applying slight pressure often helps them settle back into place. In cases of severe warping, replacing the affected panel is the best solution.
Cutting and Fitting Siding Panels
Two primary methods exist for cutting vinyl siding: using a sharp utility knife and employing a specialized siding shear. A utility knife provides precise cuts for intricate work, such as fitting around corners or windows. Siding shears, on the other hand, offer faster cuts for straight lines and are less prone to chipping the siding material. The choice of method depends on the specific application and the installer’s preference.
When cutting with a utility knife, score the vinyl siding deeply multiple times before snapping it along the score line. This helps prevent chipping or cracking. Using a siding shear requires a firm grip and a smooth, controlled motion. Regardless of the method, always measure twice and cut once to minimize waste and ensure a proper fit. Accurate cutting is essential for a professional finish.
Proper Siding Panel Alignment
Visualizing proper alignment is crucial for successful installation. Imagine a perfectly straight vertical line running down the wall, representing the edge of each siding panel. Each subsequent panel should perfectly align with this imaginary line, maintaining a consistent overlap with the previous panel. The bottom edge of each panel should sit directly on top of the previous panel, maintaining the consistent overlap for weather protection.
Imagine a brick wall, with each brick representing a course of siding. Each course (brick) rests evenly upon the course below it. The vertical lines of the bricks (siding panels) remain perfectly straight and aligned. Any misalignment, like a crooked brick, will detract from the overall appearance. This visual analogy highlights the importance of consistent vertical alignment and even overlap.
Installing Around Windows and Doors
Installing vinyl siding around windows and doors requires careful measurement and precise cutting to achieve a clean, professional finish. This section details the process, offering tips to overcome common challenges and ensure a seamless integration of siding with these architectural features.
The key to successful installation around windows and doors lies in the proper use of J-channel and trim. J-channel provides a clean, finished edge and allows for expansion and contraction of the siding. Trim pieces, often matching the siding color, conceal the edges of the siding and provide a decorative finish. Accurate measurements are paramount to avoid gaps or overlaps that compromise the aesthetic appeal and weather resistance of the installation.
J-Channel and Trim Installation Around Openings
Before installing siding around windows and doors, J-channel is typically installed. This is fastened to the window or door frame, creating a channel for the siding to fit into. The J-channel should be plumb and level, ensuring a straight, even line for the siding. After the J-channel is secured, trim pieces are often added for a more polished look. These trim pieces are typically nailed or screwed into place, covering the edges of the J-channel and the siding. The process is similar for both windows and doors, but the size and shape of the J-channel and trim pieces will vary depending on the dimensions of the opening.
Mitering Corners for a Neat Finish
When installing siding around corners of windows and doors, mitering the siding is crucial for a professional appearance. Mitering involves cutting the siding at a 45-degree angle to create a tight, seamless joint. This requires precise measuring and cutting, often using a miter saw for accuracy. Improper mitering can lead to gaps or unsightly overlaps. Accurate measurements are essential, and test cuts on scrap pieces are recommended before cutting the actual siding to ensure the correct fit.
Handling Complex Window and Door Configurations
Complex window and door configurations, such as those with multiple panes or unusual shapes, may require more intricate cutting and fitting techniques. For example, a bay window might require multiple pieces of J-channel and siding to be precisely cut and fitted together. In these cases, it is helpful to create a template from cardboard or another material to ensure accurate measurements and cuts before working with the actual siding. Careful planning and meticulous execution are key to success in these situations. Consider using a combination of J-channel, trim, and possibly even custom-cut pieces of siding to achieve a seamless and visually appealing finish.
Measuring and Cutting Siding for Precise Fitting
Accurate measurement is the cornerstone of successful siding installation around openings. Begin by measuring the precise dimensions of the window or door opening, including any existing trim. Add a small amount of extra length to account for potential expansion and contraction of the siding. Use a sharp utility knife or a miter saw to cut the siding to the measured length. Always measure twice and cut once to avoid wasting materials and ensure a perfect fit. For complex configurations, consider creating a template from cardboard or paper before cutting the actual siding.
Installing Soffit and Fascia
Installing soffit and fascia completes the exterior look of your home while playing a crucial role in protecting your roof and ensuring proper ventilation. These elements add a finished aesthetic and contribute significantly to the overall longevity and health of your home’s structure. This section will guide you through the process of installing these essential components.
Soffit and Fascia Installation Process
Soffit and fascia installation typically follows the completion of the siding. First, the soffit boards, which are installed horizontally under the eaves, are attached to the soffit framing. This framing should already be in place, supporting the weight of the soffit and providing a secure attachment point. Once the soffit is installed, the fascia boards, which are vertical boards covering the ends of the rafters, are installed. These boards are usually wider than the soffit and provide a clean, finished edge to the roofline. Proper alignment and consistent spacing are crucial for a professional look. Overlap joints should be staggered to prevent water penetration. Finally, all seams and joints should be caulked to ensure a watertight seal.
The Importance of Proper Ventilation
Proper attic ventilation is essential to prevent the buildup of moisture, which can lead to mold, mildew, and structural damage. Soffit and fascia boards contribute significantly to this ventilation. Soffit vents allow air to enter the attic, while ridge vents or gable vents allow the hot, moist air to escape. This continuous airflow helps regulate attic temperature and humidity levels, prolonging the life of your roof and preventing costly repairs. Without adequate ventilation, moisture can condense on the underside of your roof decking, leading to rot and the potential for significant damage.
Cutting and Securing Soffit and Fascia Boards
Soffit and fascia boards are typically cut using a circular saw or miter saw. Accurate measurements are crucial to ensure a proper fit. For mitered corners, a miter saw is recommended for clean, precise cuts. When cutting, always wear appropriate safety gear, including safety glasses and hearing protection. Soffit boards are usually secured with nails or screws, driven into the supporting framing. Fascia boards are similarly secured, often using longer fasteners to penetrate the rafter ends securely. Countersinking fasteners prevents them from protruding and creating potential damage or safety hazards. Remember to pre-drill pilot holes for screws to prevent splitting the wood.
Tools and Materials for Soffit and Fascia Installation
Proper preparation is key to a successful installation. The following tools and materials are essential for installing soffit and fascia:
- Measuring tape
- Circular saw or miter saw
- Safety glasses
- Hearing protection
- Drill with appropriate drill bits
- Hammer or impact driver
- Nails or screws
- Caulk gun and exterior-grade caulk
- Soffit and fascia boards
- J-channel (if necessary)
- Level
Finishing Touches and Clean Up
With the main siding installation complete, the final steps involve meticulous attention to detail to ensure a professional and long-lasting finish. This phase focuses on sealing gaps, cleaning up the worksite, and preparing for the long-term maintenance of your new siding. Proper finishing touches significantly impact the overall aesthetic appeal and the longevity of your investment.
Caulking and Sealing Gaps
After installing the siding, inspect all seams, joints, and areas where the siding meets other building components (such as windows, doors, and fascia). Any gaps or openings should be carefully caulked to prevent water penetration and drafts. Use a high-quality exterior-grade caulk that is compatible with vinyl siding and the surrounding materials. Apply the caulk in a smooth, even bead, ensuring complete coverage of the gap. Allow the caulk to cure completely according to the manufacturer’s instructions before proceeding to the next step. This step is crucial for maintaining the weather resistance and energy efficiency of your home’s exterior. For example, a gap left uncaulked around a window could allow water to seep in, leading to rot and damage to the window frame and surrounding wall.
Cleaning Up the Work Area
Maintaining a clean work area throughout the installation process is important, but a final thorough clean-up is essential. Remove all debris, including scraps of siding, nails, and packaging materials. Sweep or blow away any loose debris from the ground and surrounding areas. Dispose of all waste properly, following local regulations for construction debris disposal. A clean site not only improves the appearance of your home but also minimizes the risk of accidents or injuries. For instance, discarded nails left on the ground could pose a safety hazard to people walking around the property.
Maintaining Newly Installed Vinyl Siding
Vinyl siding requires minimal maintenance. Regularly inspect the siding for any damage, such as cracks, dents, or loose pieces. Clean the siding periodically using a garden hose and a soft-bristled brush to remove dirt and grime. Avoid using harsh chemicals or abrasive cleaners that could damage the siding’s finish. For more stubborn stains, a mild detergent solution can be used. Remember to rinse thoroughly with clean water after cleaning. Annual inspections and prompt attention to any issues will help extend the life of your vinyl siding. For example, a small crack left unrepaired could lead to larger problems over time.
Post-Installation Inspection and Maintenance Checklist
A comprehensive post-installation checklist ensures that all aspects of the installation have been completed correctly and provides a framework for ongoing maintenance.
- Inspect all seams and joints for proper caulking and sealing.
- Verify that all siding pieces are securely fastened and aligned.
- Check for any damage to the siding, such as cracks, dents, or scratches.
- Examine the areas around windows and doors for proper sealing and flashing.
- Ensure that all fasteners are flush with the siding and not protruding.
- Clean the entire area of debris and dispose of waste properly.
- Schedule a yearly inspection to check for any signs of damage or deterioration.
- Clean the siding at least twice a year using a garden hose and soft brush.
- Address any minor repairs promptly to prevent further damage.
- Consult a professional for major repairs or replacements.
Troubleshooting Common Problems
Even with careful planning and execution, minor issues can arise during vinyl siding installation. Understanding common problems and their solutions will help ensure a professional-looking and long-lasting finish. This section addresses typical challenges and provides practical solutions for rectification.
Addressing problems promptly is crucial to prevent larger, more costly repairs later. Early detection and repair will minimize disruption and maintain the overall aesthetic appeal of your project.
Misaligned Panels
Misaligned panels are a common issue, often stemming from inaccurate measurements or improper installation of starter strips and J-channels. They can result in unsightly gaps or overlaps between panels. Careful planning and precise measuring are crucial preventative measures.
To correct misalignment, carefully remove the affected panel(s). Check for obstructions, ensuring the underlying structure is level and the fastening points are correctly positioned. Reinstall the panel, ensuring it’s properly aligned with adjacent panels before securing it. If the misalignment is significant, you may need to adjust the underlying framing or furring strips to achieve a level surface.
Gaps Between Panels
Gaps between panels can be caused by several factors, including expansion and contraction of the siding due to temperature changes, improper panel overlap, or inadequate fastening. These gaps compromise the weatherproofing and aesthetic appeal of the installation.
Small gaps can often be filled with paintable caulk designed for exterior use. Larger gaps may require replacing the affected panels. Ensure proper overlap is maintained during installation to minimize the occurrence of gaps. Using expansion screws and accounting for thermal expansion are preventative measures.
Damaged Panels
Scratches, dents, or cracks in the vinyl siding are unfortunately common occurrences. These damages can be caused during handling, installation, or by accidental impact after installation.
Minor scratches can often be buffed out with a vinyl siding cleaner and a soft cloth. For more significant damage, the affected panel may need to be replaced. When replacing a damaged panel, ensure that the replacement panel is the same color and style as the existing siding. Use care when handling panels to prevent damage during installation.
Preventing Common Problems
Proactive measures significantly reduce the likelihood of encountering installation issues. Accurate measurements, proper planning, and attention to detail during each step of the installation process are essential.
Using the correct tools, ensuring a level surface, and understanding the expansion and contraction properties of vinyl siding are crucial. Taking your time and double-checking your work at each stage will greatly improve the final result and minimize the need for repairs.
Safety Precautions
Vinyl siding installation, while seemingly straightforward, presents several potential hazards if proper safety precautions aren’t followed. Failing to prioritize safety can lead to injuries ranging from minor cuts and bruises to more serious falls and electrical shocks. This section details crucial safety measures to ensure a safe and successful installation.
Potential Safety Hazards
Working at heights, handling sharp tools, and potential exposure to electrical wiring are primary concerns during vinyl siding installation. Falls from ladders or scaffolding are a significant risk, especially when working on multi-story buildings. Sharp tools like utility knives and snips can easily cause cuts and lacerations. Furthermore, accidental contact with electrical wiring can result in serious injury or even death. Improper handling of materials can also lead to strains and sprains.
Safety Precautions and Best Practices
Prioritizing safety is paramount throughout the entire installation process. This includes careful planning, proper use of equipment, and consistent adherence to safety guidelines. Before beginning any work, thoroughly inspect the work area for potential hazards, such as exposed wires or unstable structures. Always use appropriate personal protective equipment (PPE) and ensure that the work area is well-lit and free from obstructions. Maintaining a clean and organized workspace minimizes tripping hazards.
Appropriate Safety Equipment
The use of appropriate safety equipment is non-negotiable. This includes:
- Safety Glasses or Goggles: Protect eyes from flying debris and dust generated during cutting and installation.
- Work Gloves: Prevent cuts and abrasions from sharp tools and siding edges. Consider gloves with cut-resistant properties for added protection.
- Hearing Protection: Reduce noise exposure from power tools like circular saws or nail guns.
- Ladder or Scaffolding: Ensure stability and safe access to heights. Always follow manufacturer instructions for safe setup and use. Consider using a spotter when working at significant heights.
- Hard Hat: Protect the head from falling objects, especially on larger projects or when working near others.
- Dust Mask: Reduce inhalation of dust and particles generated during cutting and installation. A respirator is recommended for prolonged exposure.
- Steel-Toed Boots: Protect feet from dropped objects or accidental impacts.
Safety Checklist
Before starting any work, complete this checklist to ensure a safe working environment:
- Inspect the work area for potential hazards (exposed wires, unstable structures, etc.).
- Gather all necessary safety equipment (safety glasses, gloves, hearing protection, etc.).
- Ensure proper ladder or scaffolding setup and stability.
- Verify that the work area is well-lit and free from obstructions.
- Inform others of the work being performed and establish clear communication protocols.
- Have a first-aid kit readily available.
- Understand and follow all manufacturer instructions for tools and equipment.
Ultimate Conclusion
Installing vinyl siding may seem daunting at first, but with careful planning and a methodical approach, as outlined in this Step-by-Step Vinyl Siding Installation Guide for Beginners, the process becomes surprisingly manageable. By following the steps meticulously, paying attention to detail, and prioritizing safety, you can achieve professional-looking results that significantly enhance your home’s aesthetic appeal and protect it from the elements for years to come. Remember, taking your time and double-checking your work at each stage will yield the best results. Enjoy the transformation!
Leave a Reply