Tag: Exterior Renovation

  • Best Tools for DIY Vinyl Siding Installation

    Best Tools for DIY Vinyl Siding Installation

    Best Tools for DIY Vinyl Siding Installation: Transforming your home’s exterior with new vinyl siding is a rewarding project, but success hinges on having the right tools. This guide provides a comprehensive overview of essential tools, from measuring and cutting instruments to fastening devices and safety equipment, ensuring a smooth and efficient installation. We’ll explore premium options, highlight key features, and emphasize the importance of quality tools for a professional-looking finish that enhances your home’s curb appeal and value.

    This detailed exploration covers everything from selecting the appropriate vinyl siding type and preparing your home’s surface to mastering precise cutting techniques and navigating tricky areas like corners and windows. We’ll also guide you through the installation process, emphasizing safety precautions and troubleshooting common problems. With our step-by-step instructions, budgeting tips, and a comprehensive FAQ section, you’ll be well-equipped to tackle this DIY project with confidence.

    Essential Tools for Vinyl Siding Installation

    Successful vinyl siding installation hinges on using the right tools. The proper tools ensure efficient work, a professional finish, and minimize the risk of damage to the siding itself. Investing in high-quality tools, while initially more expensive, ultimately saves time and money by preventing costly mistakes and ensuring a long-lasting installation.

    Essential Tools Categorized by Function

    Choosing the right tools is paramount for a smooth and efficient vinyl siding installation. The following table categorizes essential tools based on their function, highlighting brand recommendations and key features. Remember that the specific needs may vary slightly depending on the project’s size and complexity.

    Tool Name Tool Type Purpose Brand Recommendations
    Measuring Tape Measuring Accurate measurement of walls and siding panels for cutting and placement. A long tape measure (at least 25 feet) is essential for large projects. Stanley, Lufkin
    Chalk Line Measuring/Marking Creates straight lines for accurate siding alignment, ensuring a neat and professional look. Johnson Level & Tool, Empire
    Circular Saw with Fine-Tooth Blade Cutting Precisely cuts vinyl siding panels to size. A fine-tooth blade minimizes chipping and ensures clean cuts. DeWalt, Makita
    Jigsaw Cutting Useful for intricate cuts around windows, doors, and corners where a circular saw may be difficult to maneuver. Bosch, Ryobi
    Utility Knife Cutting Used for trimming and smaller cuts. A sharp blade is crucial for clean cuts. Olfa, Stanley
    Tin Snips Cutting Specifically designed for cutting metal, useful for cutting flashing and other metal components around windows and doors. Malco, Wiss
    Power Drill with Drill Bits Fastening Drills pilot holes for screws and nails, ensuring the siding is securely fastened without splitting. DeWalt, Milwaukee
    Impact Driver Fastening Provides powerful torque for driving screws quickly and efficiently, especially useful with longer screws. Milwaukee, Makita
    Nail Gun (Optional, but Recommended for Larger Projects) Fastening Significantly speeds up the fastening process, especially for larger projects. Requires proper safety precautions. Senco, Hitachi
    Level Alignment Ensures the siding is installed level and plumb, crucial for a professional and aesthetically pleasing finish. Johnson Level & Tool, Stabila
    Safety Glasses Safety Protects eyes from flying debris during cutting and fastening. 3M, DEWALT
    Work Gloves Safety Protects hands from cuts and splinters. Carhartt, Mechanix Wear
    Ladder Accessibility Provides safe access to higher areas during installation. Ensure it is appropriately sized and stable. Werner, Little Giant
    Caulk Gun Finishing Applies caulk to seal gaps and joints, preventing water infiltration. DeWalt, DAP
    Putty Knife Finishing Used for smoothing caulk and removing excess material. Marshalltown, Goldblatt

    Importance of High-Quality Tools

    Using high-quality tools is not merely a matter of preference; it directly impacts the final outcome. Premium tools, such as those from brands like DeWalt and Milwaukee, offer superior durability, precision, and ease of use. This translates to cleaner cuts, faster installation times, and a more professional-looking finished product. Investing in robust tools reduces the likelihood of tool failure mid-project, saving both time and frustration. Furthermore, the precision offered by high-quality tools minimizes the risk of damaging the vinyl siding, a costly mistake to rectify.

    Choosing the Right Vinyl Siding

    Selecting the appropriate vinyl siding is crucial for a successful DIY installation and a long-lasting, aesthetically pleasing exterior. The choice involves considering several factors beyond just the initial cost, encompassing durability, visual appeal, and the overall style of your home. Making informed decisions in these areas will ensure a satisfying outcome.

    Choosing the right vinyl siding involves careful consideration of various factors, including the type of siding, its color and texture, and the manufacturer’s warranty. Understanding these aspects will lead to a successful project that enhances your home’s curb appeal and protects it for years to come.

    Vinyl Siding Types: A Comparison

    Different types of vinyl siding offer distinct advantages and disadvantages. The three most common types—clapboard, shingle, and shake—each provide unique aesthetic qualities and levels of durability. Careful consideration of these factors will help you select the best option for your home.

    • Clapboard: This classic style mimics traditional wood clapboard siding. It’s known for its clean lines and versatile appearance, suitable for a wide range of architectural styles. Clapboard siding generally offers good durability and is relatively easy to install. Cost is typically moderate.
    • Shingle: Shingle siding offers a more textured and dimensional look, often resembling wood or slate shingles. It can add visual interest and depth to a home’s exterior. Durability is generally good, though some shingle styles might be more susceptible to damage from high winds. Cost can vary depending on the complexity of the shingle design.
    • Shake: Shake siding replicates the look of wood shakes, providing a rustic and natural appearance. It offers a more rugged texture than clapboard or shingle. Durability can be slightly lower than clapboard due to the increased surface area, making it potentially more susceptible to wind damage. The cost is typically higher than clapboard but can be comparable to more intricate shingle designs.

    Siding Color and Texture Selection

    The color and texture of your vinyl siding significantly impact your home’s overall aesthetic. Harmonizing these elements with your home’s architectural style and surrounding landscape is essential for a cohesive and visually appealing result.

    Consider the following factors when choosing siding color and texture:

    * House Style: A traditional home might benefit from classic clapboard in a neutral color, while a modern home might suit sleek, textured panels in a bold color.
    * Surrounding Environment: Consider the colors of your landscaping, neighboring homes, and the overall tone of your neighborhood. A color that clashes with its surroundings will detract from the home’s overall appeal.
    * Light Exposure: Darker colors absorb more heat, potentially increasing energy costs in warmer climates. Lighter colors reflect sunlight and can help keep the home cooler. The direction your house faces also impacts the amount of sun exposure.
    * Personal Preference: Ultimately, the best color and texture are those that you find aesthetically pleasing.

    Manufacturer Warranties and Certifications

    Checking for manufacturer warranties and certifications is paramount before purchasing vinyl siding. These assurances provide peace of mind and protect your investment.

    Reputable manufacturers offer warranties covering defects in materials and workmanship. Look for warranties that cover a substantial period, typically 20-30 years or more. Certifications, such as those from organizations like the Vinyl Siding Institute (VSI), indicate that the product meets specific quality standards. These certifications ensure the siding is manufactured to high standards and will perform as expected. Choosing products with such warranties and certifications minimizes the risk of premature failure and provides recourse if problems arise.

    Preparing the Surface for Installation

    Proper surface preparation is paramount for a successful and long-lasting vinyl siding installation. A well-prepared surface ensures the siding adheres correctly, preventing issues like warping, buckling, or premature failure. Neglecting this crucial step can lead to costly repairs and significantly shorten the lifespan of your new siding. This section details the necessary steps to prepare your existing wall surface.

    Addressing existing wall problems before installing vinyl siding is essential for a successful project. Ignoring these issues can lead to problems down the road, compromising the longevity and aesthetics of your new siding. Careful inspection and remediation will ensure a smooth and trouble-free installation.

    Surface Preparation Steps

    The following steps outline the process of preparing your wall for vinyl siding installation. Each step plays a vital role in achieving a high-quality, durable finish.

    1. Cleaning the Surface: Thoroughly clean the existing wall surface to remove dirt, loose paint, cobwebs, and any other debris. Power washing is often effective but use caution to avoid damaging the underlying structure. For stubborn stains, consider using a suitable cleaning solution appropriate for the existing wall material (e.g., wood, brick, concrete). Allow the surface to completely dry before proceeding.
    2. Repairing Damage: Inspect the wall for any damage, such as cracks, holes, loose mortar (in brick or masonry walls), or rotting wood. Repair all damage using appropriate materials. For instance, cracks in wood can be filled with wood filler, while holes can be patched with cement or specialized repair compounds. Ensure repairs are level with the surrounding surface and allowed to fully cure before further steps.
    3. Addressing Moisture Issues: Check for signs of moisture penetration, such as water stains, mold, or mildew. Address any moisture problems before installing siding. This might involve repairing damaged flashing, sealing cracks, or addressing underlying water intrusion issues. In cases of significant water damage, professional assistance might be required.
    4. Removing Obstructions: Remove any obstructions from the wall, such as old siding, loose trim, or protruding nails. Carefully remove any loose or damaged materials to ensure a clean and level surface for the new siding. Ensure all nails and fasteners are removed to prevent damage to the new siding during installation.

    Identifying and Addressing Common Wall Surface Problems

    Various wall surface problems can negatively impact vinyl siding installation. Recognizing and correctly addressing these issues is critical for a successful outcome. Ignoring these issues can lead to problems with adhesion, warping, and premature failure of the siding.

    • Loose or Rotting Wood: Replace any rotten or damaged wood immediately. Failure to do so will lead to the decay spreading behind the new siding, causing significant problems.
    • Cracked or Damaged Stucco: Repair any cracks or damaged areas of stucco using a suitable patching compound. Ensure the repair is smooth and level with the surrounding surface.
    • Uneven Surfaces: Uneven surfaces can lead to gaps and inconsistencies in the siding installation. Use shims or other leveling techniques to create a smooth, consistent surface before installation.
    • Insect Infestation: Address any evidence of insect infestation before proceeding with the installation. This might involve treatment with insecticides or other pest control measures. Allow sufficient time for treatment to be effective before starting the siding installation.

    Measuring and Cutting Vinyl Siding Panels

    Precise measurement and cutting are crucial for a professional-looking vinyl siding installation. Inaccurate cuts lead to gaps, misaligned panels, and an overall unprofessional appearance. This section details the process of accurately measuring and cutting vinyl siding panels to ensure a seamless and aesthetically pleasing finish.

    Accurate measurement begins with careful planning. Before cutting any panels, thoroughly measure each wall section, noting any obstructions like windows, doors, and corners. Remember to account for overlaps and expansion gaps. Always measure twice and cut once to minimize waste and ensure a perfect fit. Use a tape measure that’s long enough to span the entire length of the panels you’ll be cutting. A metal tape measure is preferred for its durability and accuracy.

    Cutting Vinyl Siding Panels

    Vinyl siding is relatively easy to cut, but precision is key. The most common tools used for cutting are a sharp utility knife, a circular saw with a fine-tooth blade, or a miter saw. A utility knife is ideal for shorter cuts and intricate details, while a circular or miter saw is better for longer, straighter cuts. Regardless of the tool used, always support the panel firmly to prevent chipping or bending.

    Use a sharp blade to ensure a clean cut. A dull blade can cause the vinyl to tear or chip, resulting in an uneven finish.

    When using a circular saw, ensure the blade is set to the correct depth to avoid cutting through the entire panel. A miter saw is particularly useful for making precise angle cuts, especially for corners and mitered joints. Remember to always wear appropriate safety gear, including safety glasses and gloves, when using power tools.

    Handling Tricky Areas: Corners, Windows, and Doors

    Corners, windows, and doors require special attention. For exterior corners, use J-channels or corner posts to create a clean, finished look. Measure carefully to ensure the siding fits snugly against the corner post. Around windows and doors, use appropriate trim pieces, such as window and door starter strips, to ensure a professional and weathertight seal.

    For inside corners, carefully measure and cut the siding panels to fit snugly, ensuring a tight seal. Use a caulking gun to seal any gaps for added weather protection.

    When cutting around windows and doors, it’s crucial to measure the openings precisely. Use a pencil to mark the cut lines directly onto the vinyl siding, ensuring accurate placement of the trim. Remember to account for expansion and contraction of the siding due to temperature changes, leaving appropriate gaps. Always pre-drill pilot holes before driving screws into the siding to prevent splitting. This is especially important when working with harder vinyl types.

    Installing Vinyl Siding Panels

    Installing vinyl siding panels is the culmination of your preparation and planning. This process requires careful attention to detail to ensure a professional-looking and weather-resistant finish. Remember to always consult the manufacturer’s instructions for your specific siding product, as techniques may vary slightly.

    Starting the Installation

    Begin installation at the bottom of the wall, starting with a starter strip. This strip provides a level base for the subsequent panels and ensures a straight, even line across the entire installation. It is typically installed horizontally along the foundation or bottom trim. Ensure it is perfectly level and securely fastened using appropriate fasteners. The starter strip will create a clean bottom edge to your siding and hide the lower edge of the first panel.

    Installing Subsequent Panels

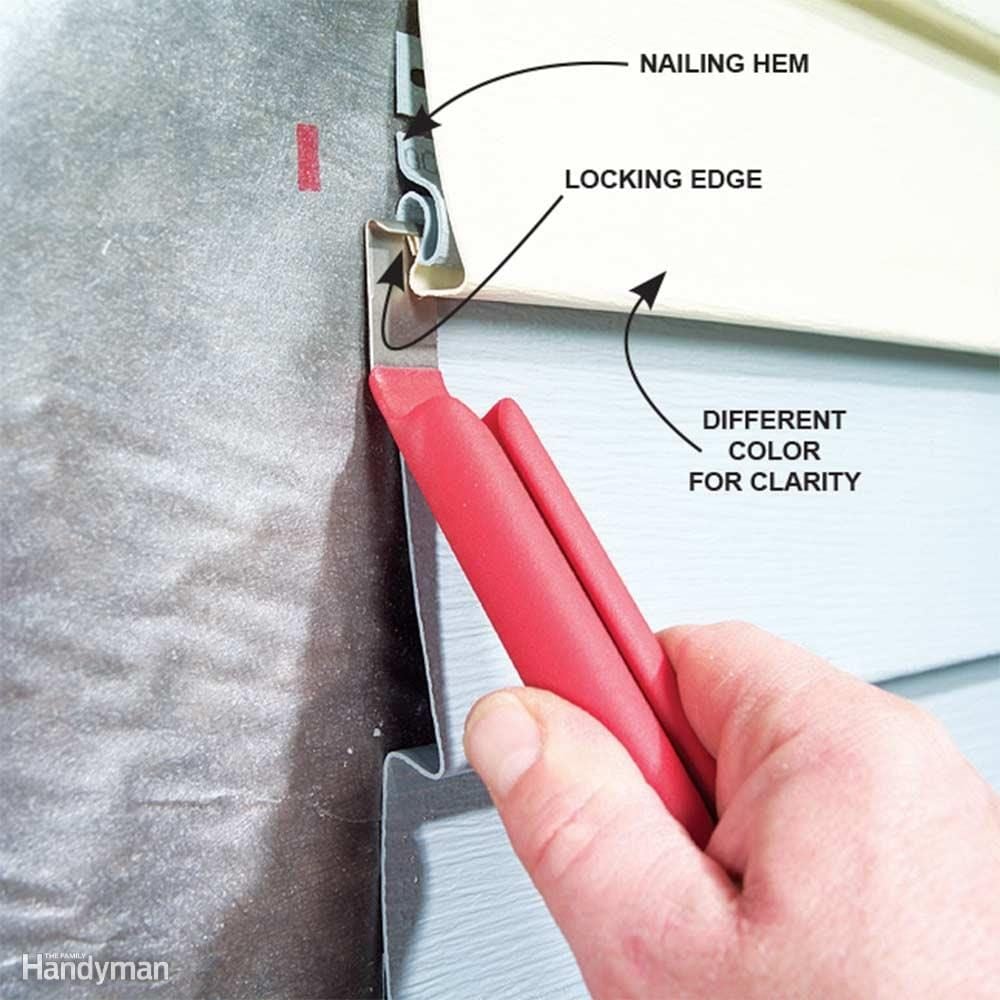
    Once the starter strip is in place, begin installing the first course of siding panels. Slide the bottom edge of the panel into the starter strip, ensuring a tight fit. Each panel should overlap the previous one, with the top edge of the lower panel slightly overlapping the bottom edge of the upper panel. This overlap creates a weather-tight seal and adds to the strength of the siding system. Fasten each panel using appropriate nails or screws, typically near the top and bottom edges of the panel, avoiding the locking mechanism to prevent damage. The fasteners should be driven in straight and firmly, but not so tightly that they distort the panel. Avoid overdriving the fasteners, as this could lead to cracking or damage to the vinyl siding.

    Panel Overlap and Alignment

    Maintaining consistent overlap and alignment is crucial for a professional finish. Each panel should overlap the previous one by the manufacturer’s specified amount, usually about an inch. This ensures a watertight seal and prevents water penetration behind the siding. Regularly check the alignment of the panels using a level to ensure vertical and horizontal straightness. Use a measuring tape to verify consistent panel spacing and overlap. Minor adjustments can be made by carefully sliding the panels into place. Significant misalignment may require removing and reinstalling the panel.

    Fastening Techniques

    Vinyl siding should be fastened securely but gently. Use galvanized nails or screws specifically designed for vinyl siding. Avoid using standard nails, as they can damage the vinyl. Drive the fasteners in at an angle slightly away from the panel’s locking mechanism, usually about a quarter of an inch from the edge. This prevents the panel from being damaged by the fastener and allows for expansion and contraction of the vinyl due to temperature changes. The fasteners should be just snug, allowing for slight movement. Over-tightening can cause warping or cracking of the panels.

    Working Upwards and Finishing

    Continue installing panels in horizontal courses, working your way upwards. Always maintain consistent overlap and alignment. Pay close attention to corners and windows, using appropriate J-channels, corner posts, and trim pieces to create a neat and finished look. These accessories are essential for a professional-looking installation. As you approach the top of the wall, use appropriate finishing pieces to complete the installation and provide a neat and weather-resistant top edge. Remember to always consult the manufacturer’s instructions for specific details on finishing and trim pieces.

    Working with J-Channels, Corners, and Trim

    Proper installation of J-channels, corners, and trim pieces is crucial for achieving a professional and weathertight vinyl siding installation. These components not only provide a finished look but also protect the underlying structure from moisture and damage. Careful attention to alignment, sealing, and accurate cutting is essential for a successful outcome.

    J-Channel Installation

    J-channels are used to create a clean, finished edge at the start and end of siding rows, around windows and doors, and at other transitions. Begin by ensuring the J-channel is properly aligned and plumb. Use a level to check its verticality and make any necessary adjustments. Secure the J-channel to the framing using appropriate fasteners, ensuring they are spaced evenly and don’t penetrate the channel too deeply. Apply a bead of high-quality exterior-grade sealant along the top edge of the J-channel before installing the siding to create a weatherproof seal. This prevents water from penetrating behind the siding. Overlap the J-channel slightly at corners to ensure a continuous seal.

    Corner Installation

    Vinyl siding corners provide a neat and finished look at exterior corners. Similar to J-channels, corners should be plumb and aligned before fastening. Start by positioning the corner at the desired location, ensuring it is aligned with the previously installed siding or framing. Secure the corner using appropriate fasteners, ensuring even spacing and avoiding over-penetration. Apply sealant to the edges of the corner piece for added weather protection, creating a waterproof barrier. The corner should be tightly fitted to the adjacent siding to prevent gaps.

    Trim Installation

    Various trim pieces, such as window and door trim, are used to create a finished and aesthetically pleasing look around openings. These trim pieces should be carefully measured and cut to ensure a precise fit. Accurate cutting is critical to avoid gaps and ensure a seamless transition between the siding and the trim. The trim should be installed using appropriate fasteners and sealed with exterior-grade sealant to prevent water intrusion. Remember to maintain consistent spacing between fasteners for a secure and even installation.

    Comparison of Trim Types

    The following table compares different types of vinyl siding trim:

    Trim Type Use Characteristics
    J-Channel Starting and ending rows, around openings Provides a finished edge and allows for expansion and contraction
    Corner Trim Exterior corners Creates a neat and weathertight corner
    Window and Door Trim Around windows and doors Provides a finished look and protects the openings
    Soffit and Fascia Trim Under eaves and around the roofline Provides a finished look and protects the underlying structure

    Cutting and Fitting Trim Pieces

    Accurate cutting of trim pieces is essential for a professional-looking installation. Use a sharp utility knife or a miter saw to ensure clean, precise cuts. For mitered corners, use a miter box or miter saw to achieve accurate 45-degree angles. Dry-fit the pieces before applying sealant and fasteners to ensure a proper fit. Remember to account for expansion and contraction of the vinyl material. Use a caulking gun to apply a bead of sealant along the joints to ensure a watertight seal. Overlapping joints should be sealed to prevent moisture penetration.

    Finishing Touches and Inspections

    Completing your vinyl siding installation involves more than just attaching the panels. Careful attention to detail in the final stages ensures a professional-looking and long-lasting result. This includes sealing gaps and seams, thoroughly cleaning the installation area, and performing a comprehensive inspection to identify and rectify any flaws. Proper maintenance after installation is also crucial for preserving the siding’s appearance and structural integrity.

    The final steps are critical for achieving a watertight and aesthetically pleasing finish. Caulking properly seals gaps and prevents water damage, while cleaning removes any debris left over from the installation process. A thorough inspection allows for the prompt identification and correction of any mistakes, preventing larger issues down the line. Finally, establishing a regular maintenance schedule will help to prolong the life of your new vinyl siding.

    Caulking and Cleaning

    After installing all siding panels, trim, and accessories, it’s essential to caulk any gaps or seams to prevent water infiltration. Use a high-quality exterior-grade caulk in a color that matches your siding. Apply a thin, even bead of caulk to all joints, paying particular attention to areas around windows, doors, and corners. Allow the caulk to fully cure according to the manufacturer’s instructions before proceeding. Once the caulking is dry, thoroughly clean the entire siding surface. A soft brush and mild detergent solution are typically sufficient to remove any dirt, dust, or construction debris. Rinse thoroughly with clean water and allow the siding to dry completely.

    Inspection Checklist

    A systematic inspection is crucial to ensure the quality of your installation. This checklist helps identify potential problems early on, allowing for prompt correction and preventing future issues.

    • Panel Alignment: Check for any misaligned or overlapping panels. They should be straight and evenly spaced.
    • Caulk Integrity: Examine all caulked seams for gaps or cracks. Ensure complete coverage and proper adhesion.
    • Fastener Visibility: Verify that all fasteners are properly concealed and not visibly protruding.
    • Trim and Accessory Installation: Inspect all J-channels, corners, and trim for proper alignment and secure fastening.
    • Water Drainage: Ensure that water will properly drain away from the house. Check for any potential areas of water accumulation.
    • Overall Appearance: Step back and visually inspect the entire installation for any inconsistencies or imperfections.

    Vinyl Siding Maintenance

    Regular maintenance is key to preserving the beauty and longevity of your vinyl siding. A simple maintenance routine can prevent costly repairs and extend the lifespan of your investment. This includes regular cleaning and prompt attention to any damage.

    • Regular Cleaning: Wash your siding at least once or twice a year using a garden hose and a soft brush or sponge. A mild detergent can be used for stubborn stains. Avoid high-pressure washers, as they can damage the siding.
    • Prompt Repair: Address any damage, such as cracks or dents, immediately. Minor repairs can often be done with vinyl repair kits available at home improvement stores.
    • Preventative Measures: Trim overhanging tree branches to prevent them from scratching the siding. Keep gutters clean to prevent water damage.

    Safety Precautions During Installation

    Vinyl siding installation, while seemingly straightforward, presents several potential hazards if proper safety precautions aren’t observed. Adhering to safety guidelines is crucial not only for preventing injuries but also for ensuring a successful and efficient installation process. Ignoring safety can lead to serious accidents, delays, and increased costs.

    Safety during vinyl siding installation hinges on a combination of careful planning, the use of appropriate personal protective equipment (PPE), and a thorough understanding of potential risks. This section details essential safety measures to protect yourself and others throughout the project.

    Personal Protective Equipment (PPE) Usage

    Appropriate personal protective equipment is paramount to minimizing the risk of injury during vinyl siding installation. This equipment acts as a crucial barrier against potential hazards, protecting your body from harm.

    • Safety Glasses or Goggles: These protect your eyes from flying debris, such as small pieces of siding or sharp metal scraps from cutting tools. The impact of even a small piece of debris can cause serious eye damage.
    • Work Gloves: Gloves protect your hands from cuts, splinters, and abrasions that can occur when handling sharp materials or rough surfaces. They also offer protection against chemicals present in some cleaning agents used for surface preparation.
    • Hearing Protection: Power tools, such as circular saws and nail guns, generate significant noise levels. Prolonged exposure to loud noise can lead to hearing loss. Ear plugs or muffs are essential for protecting your hearing.
    • Respiratory Protection: If working in confined spaces or with materials that produce dust or fumes, a respirator is necessary to prevent inhalation of harmful particles. This is especially important when cutting or sanding materials.
    • Footwear: Steel-toed boots provide protection against dropped objects and punctures. They also offer better stability on ladders and scaffolding.

    Potential Hazards and Mitigation Strategies

    Several hazards are inherent in vinyl siding installation. Understanding these risks and implementing appropriate mitigation strategies is vital for a safe working environment.

    • Falls from Heights: Working at heights, especially on ladders or scaffolding, is a significant risk. Always use properly secured ladders and scaffolding, ensuring they are rated for the weight capacity and working height. Maintain three points of contact when climbing or working on ladders.
    • Cuts and Punctures: Sharp edges of siding panels, cutting tools, and nails pose a risk of cuts and punctures. Always handle these materials carefully, using appropriate tools and gloves. Dispose of sharp waste properly.
    • Electrocution: Contact with electrical wires or power lines is a serious hazard. Before beginning work, locate and mark all underground and overhead utility lines. Maintain a safe distance from any power lines.
    • Exposure to the Elements: Work in extreme weather conditions can lead to heatstroke, hypothermia, or other weather-related illnesses. Avoid working in extreme heat or cold; schedule work during moderate weather conditions.
    • Back Injuries: Lifting and carrying heavy materials can strain your back. Use proper lifting techniques and consider using mechanical lifting aids for heavier items.

    Working Safely with Power Tools

    Power tools are commonly used during vinyl siding installation. Safe operation of these tools is crucial to prevent injuries. Always ensure tools are properly maintained and in good working order before use.

    • Proper Tool Usage: Follow the manufacturer’s instructions for each tool. Use the correct blades, bits, and other accessories for the specific material being worked with.
    • Secure Work Area: Ensure the work area is clear of obstructions and well-lit. Use clamps or other devices to secure materials during cutting or other operations.
    • Disconnecting Power: Always disconnect power tools before making adjustments or changing blades.
    • Regular Maintenance: Regularly inspect power tools for damage or wear and tear. Replace worn parts promptly.

    Troubleshooting Common Installation Problems

    Even with careful planning and execution, problems can arise during vinyl siding installation. Understanding these common issues and their solutions is crucial for a successful project. This section outlines some frequently encountered problems and provides practical steps for resolving them, ensuring a professional-looking and durable finish.

    Panel Gaps

    Uneven gaps between vinyl siding panels are a common aesthetic issue. These gaps can result from improper measuring, cutting, or installation techniques. Large gaps compromise the weatherproofing of the siding.

    Problem Solution
    Uneven gaps between panels, exceeding manufacturer’s recommendations. Carefully re-measure and cut panels to ensure proper fit. Check for consistent spacing using spacers. If necessary, remove and reinstall affected panels, ensuring proper overlap and alignment with the locking mechanism.
    Gaps at panel ends, particularly noticeable near corners. Ensure proper alignment of J-channels and corner pieces. Check that panels are fully seated and locked into place. If gaps persist, consider using additional trim pieces to conceal them.
    Gaps appearing after temperature fluctuations. This is often due to inadequate expansion and contraction allowance. Ensure proper spacing is maintained to accommodate temperature changes. Consult the manufacturer’s instructions for recommended expansion gaps.

    Panel Misalignment

    Misaligned panels can significantly detract from the overall appearance of the siding. This often stems from errors in initial measurement or during the installation process itself.

    Problem Solution
    Panels not aligned vertically or horizontally. Carefully check the alignment of each panel before securing it. Use a level to ensure straight lines. If misalignment occurs, remove and reinstall the affected panel(s). Work systematically to ensure correct alignment across the entire wall.
    Panels overlapping unevenly. Ensure proper overlap of each panel, following manufacturer’s guidelines for overlap measurements. This is crucial for water runoff and preventing leaks.
    Panels buckling or warping. This can be caused by improper installation, forcing panels into place, or exposure to extreme temperatures. Ensure panels are properly aligned and seated. If warping is significant, the panel may need replacement.

    Nail Holes and Damage

    Visible nail holes or damaged panels detract from the finished look. Proper nailing techniques are essential to avoid these issues.

    Problem Solution
    Visible nail holes. Use appropriately sized nails and a nail punch to set nails below the surface of the siding. Fill nail holes with vinyl caulk that matches the siding color.
    Scratches or dents in the siding. Minor scratches can often be buffed out with a soft cloth. For more significant damage, the affected panel may need replacement.

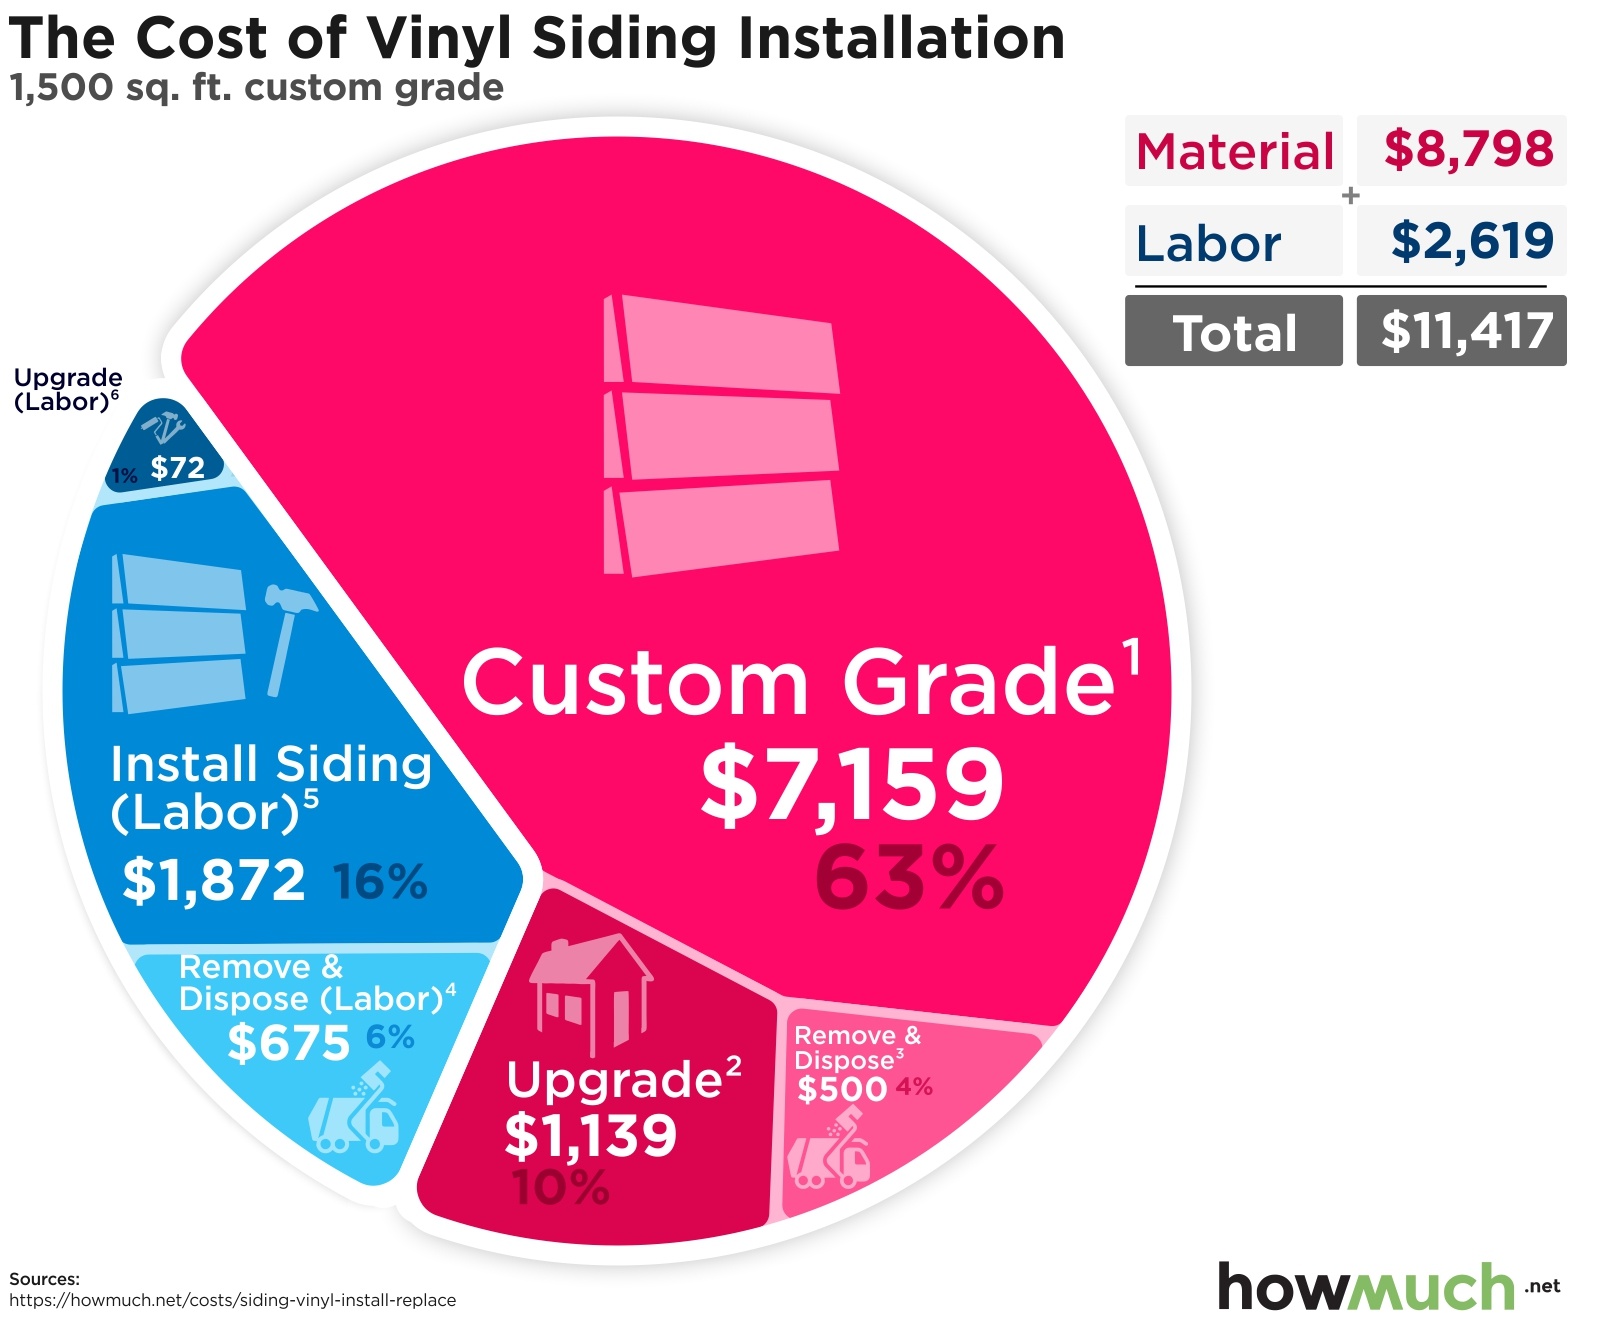
    Budgeting for a DIY Vinyl Siding Project

    Undertaking a DIY vinyl siding project can significantly reduce costs compared to hiring professionals, but careful budgeting is crucial for success. This section outlines creating a realistic budget, strategies for saving money, and methods for accurately estimating material needs. Failing to plan properly can lead to unexpected expenses and project delays.

    Sample Budget Breakdown for a Typical DIY Vinyl Siding Project

    A comprehensive budget should account for all project expenses. The following is a sample breakdown for a 1500 square foot house, remembering that prices can vary significantly based on location, material choices, and project complexity.

    Expense Category Estimated Cost Notes
    Vinyl Siding Panels $3,000 – $6,000 Cost varies greatly depending on quality, style, and color.
    Underlayment/Sheathing $500 – $1,000 Essential for moisture protection and insulation.
    J-Channels, Corners, and Trim $500 – $1,000 These finishing pieces are vital for a professional look.
    Fasteners (Nails, Screws) $100 – $200 Choose high-quality fasteners for durability.
    Caulk and Sealant $50 – $100 Necessary for weatherproofing.
    Tools (Rental or Purchase) $100 – $500 Consider renting specialized tools if you won’t use them frequently.
    Safety Equipment $50 – $100 Prioritize safety with proper gear like gloves, safety glasses, and a ladder.
    Permits (if required) $0 – $500 Check local building codes for permit requirements.
    Total Estimated Cost $4,300 – $8,300 This is a broad estimate; actual costs may vary.

    Strategies for Saving Money

    Several strategies can help reduce costs without compromising quality.

    Purchasing materials in bulk often results in lower per-unit costs. Consider buying from wholesale suppliers or during sales periods. Opting for a less expensive, yet still durable, vinyl siding grade can also save money. Careful planning and precise measurements minimize material waste, further reducing expenses. Finally, enlisting the help of friends or family for certain tasks can reduce or eliminate labor costs.

    Estimating Material Quantities

    Accurate material estimation is vital to avoid overspending or running short.

    Begin by carefully measuring the total surface area of the walls to be sided. Consider using online calculators or consulting with a building supply store for assistance. Account for windows, doors, and other openings, subtracting their areas from the total wall area. Manufacturers usually provide coverage information per square foot on their packaging; this information will assist in calculating the number of panels needed. Always add extra material (approximately 10-15%) to account for cuts, mistakes, and potential damage.

    To estimate siding quantity: Total wall area (square feet) x 1.10 (10% waste factor) = Estimated quantity of siding panels (square feet)

    Ultimate Conclusion

    Successfully installing vinyl siding requires careful planning, the right tools, and a methodical approach. By investing in high-quality tools, understanding the installation process, and following safety precautions, you can achieve a professional-looking result that adds value and curb appeal to your home. Remember, proper preparation and attention to detail are key to a long-lasting, beautiful finish. Now, go forth and transform your home’s exterior!

  • Cost Breakdown for Professional Vinyl Siding Installation

    Cost Breakdown for Professional Vinyl Siding Installation

    Cost Breakdown for Professional Vinyl Siding Installation unveils the multifaceted costs associated with upgrading your home’s exterior. This comprehensive guide delves into the various expenses involved, from material selection and labor costs to permits, waste disposal, and unforeseen contingencies. Understanding these cost components empowers homeowners to make informed decisions and effectively budget for their vinyl siding project, ensuring a smooth and successful renovation.

    We’ll explore the intricacies of material pricing, considering factors such as siding grade, color, and profile. Labor costs, influenced by regional rates and project complexity, will be thoroughly examined. Furthermore, we’ll cover often-overlooked expenses like permits, waste removal, and the importance of contingency planning. By the end, you’ll possess a clear understanding of the financial landscape of a professional vinyl siding installation.

    Material Costs

    The cost of vinyl siding installation is significantly influenced by the materials used. Understanding the price variations between different grades, styles, and manufacturers is crucial for accurate budgeting. This section provides a detailed breakdown of these material costs.

    Vinyl Siding Material Costs

    The price of vinyl siding varies considerably depending on several factors. These factors include the thickness of the siding, its color, the manufacturer’s reputation, and the chosen profile. Thicker siding generally offers superior durability and longevity, justifying its higher price. Certain colors, particularly those requiring more complex pigmentation, may also command a premium. Reputable manufacturers often invest in higher-quality materials and advanced manufacturing processes, resulting in a higher price point but also superior performance and warranty coverage. Finally, the style of siding (clapboard, shake, shingle) also affects cost.

    Material Unit Cost (per sq ft) Quantity (sq ft) Total Cost
    Standard Grade Clapboard Siding (White) $1.50 500 $750
    Premium Grade Clapboard Siding (Custom Color) $2.50 500 $1250
    Shake Style Siding (Medium Grade) $2.00 500 $1000
    Shingle Style Siding (Premium Grade) $3.00 500 $1500
    J-Channel & Accessories $0.50 per linear ft 100 $50
    Starter Strip & Finishing Pieces $0.75 per linear ft 100 $75

    Note: These are example prices and can vary significantly based on location, supplier, and current market conditions. It’s crucial to obtain quotes from multiple suppliers for accurate pricing.

    Siding Thickness and Color Impact

    Vinyl siding thickness is measured in mils (thousandths of an inch). Thicker siding (e.g., 0.046 inches or 46 mils) generally offers better impact resistance, durability, and less warping in extreme temperatures compared to thinner siding (e.g., 0.040 inches or 40 mils). This increased durability justifies the higher cost per square foot. Similarly, custom colors often involve more complex manufacturing processes, resulting in a higher price than standard colors like white or beige. For instance, a deep, rich color might require more pigment, increasing the manufacturing cost.

    Vinyl Siding Profile Comparison

    Different siding profiles offer distinct aesthetic appearances. Clapboard siding, the most common type, features overlapping horizontal panels creating a classic look. Shake and shingle profiles mimic the appearance of natural wood, providing a more textured and rustic feel. Shake siding tends to be more expensive than clapboard due to its more intricate design and manufacturing process. Shingle siding, with its individual overlapping pieces, often commands the highest price due to its complex design and higher material usage. The choice of profile significantly influences the overall project cost.

    Labor Costs

    Labor costs represent a significant portion of the overall expense for professional vinyl siding installation. Understanding these costs, including the factors that influence them, is crucial for accurate budgeting and project planning. This section will detail typical hourly rates, factors affecting those rates, and a sample project timeline illustrating labor hour allocation.

    Hourly Rates for Vinyl Siding Installers

    Hourly rates for professional vinyl siding installers vary considerably depending on geographic location, experience level, and the specific demands of the project. In less populated areas, rates might range from $30 to $50 per hour, while metropolitan areas or regions with a high cost of living can see rates between $50 and $80 per hour, or even higher for highly specialized installers. These figures represent averages and can fluctuate based on market conditions and individual installer pricing. For instance, a contractor in a rural area of the Midwest might charge $40 per hour, while a contractor in a high-demand coastal city could charge $75 or more.

    Factors Influencing Labor Costs

    Several key factors significantly impact the overall labor costs associated with vinyl siding installation. Experience level is paramount; highly skilled and experienced installers command higher hourly rates due to their efficiency, expertise in handling complex situations, and the quality of their workmanship. Project complexity also plays a vital role. Simple installations on straightforward structures will require fewer labor hours compared to complex projects involving intricate designs, multiple angles, or extensive repairs and prep work. Additional factors include the size of the project (square footage of siding to be installed), the type of siding being installed (some specialized siding requires more intricate installation), and the need for additional services such as demolition, removal of old siding, or window and door trim installation. Finally, the prevailing market rates and local economic conditions influence what contractors are able to charge.

    Sample Project Timeline

    The following is a sample project timeline illustrating labor hours allocated to different stages of a typical vinyl siding installation project for a single-story, 1,500 square foot home. This is an estimate, and actual hours can vary.

    Project Stage Estimated Labor Hours
    Preparation and Site Assessment 8
    Removal of Old Siding (if applicable) 16
    Sheathing Repair and Preparation 12
    Installation of New Vinyl Siding 48
    Trim and Finishing Work 16
    Cleanup and Final Inspection 8
    Total Estimated Labor Hours 108

    Preparation and Removal Costs

    Preparing the exterior walls for new vinyl siding installation is a crucial step that significantly impacts both the final look and the longevity of the project. This phase involves removing existing siding (if necessary) and ensuring the underlying wall surface is properly prepared for the new siding. Costs associated with this stage vary depending on the complexity of the job and the condition of the existing wall.

    The cost of preparing the wall surface includes labor and materials. Labor costs will depend on the contractor’s hourly rate and the time required for the preparation work. Material costs will vary based on the type and quantity of materials used for repairs, cleaning solutions, and any necessary underlayment. For example, repairing damaged sheathing might involve the cost of plywood, while cleaning might require specialized solutions and pressure washing equipment.

    Existing Siding Removal Costs

    Removing existing siding adds complexity and cost to the project. The cost depends on several factors including the type of siding being removed (wood, aluminum, vinyl, etc.), its condition (loose, damaged, or intact), and the accessibility of the walls. Removing wood siding, for instance, is often more labor-intensive and costly than removing vinyl siding due to the weight and potential for damage to the underlying structure. Furthermore, disposal fees for the removed siding will add to the overall cost. A typical range for removal could be between $1 and $3 per square foot, but this can significantly increase depending on the aforementioned factors. A large, two-story house with extensive wood siding removal could easily cost several thousand dollars more than a smaller house with easily removable vinyl siding.

    Wall Surface Preparation Costs

    Preparing the wall surface for new siding involves several steps that contribute to the overall cost. These steps may include cleaning the existing wall to remove dirt, debris, and loose paint; repairing damaged sheathing, replacing rotten wood, and addressing any insect infestation; and installing house wrap or other underlayment to improve insulation and moisture protection. The cost will vary greatly depending on the extent of repairs needed. Minor cleaning might only cost a few hundred dollars, while extensive repairs to water-damaged sheathing could run into the thousands.

    Cost Comparison of Preparation Methods

    The following table provides a cost comparison for different preparation methods, assuming a 1000 square foot wall area. These are estimates and actual costs may vary significantly depending on location, labor rates, and the specific conditions of the project.

    Preparation Method Cleaning Only Minor Repairs (Sheathing Repair) Major Repairs (Sheathing Replacement)
    Estimated Cost $500 – $1000 $1500 – $3000 $3000 – $6000+

    Permits and Inspections

    Securing the necessary permits and passing inspections are crucial steps in any vinyl siding installation project. These processes ensure compliance with building codes and regulations, protecting both the homeowner and the contractor. Failure to obtain proper permits can result in significant fines, delays, and even the forced removal of the installed siding. Understanding the associated costs and procedures is vital for accurate budgeting and project planning.

    Permitting and inspection costs vary considerably depending on location, project scope, and the specific requirements of local authorities. These costs are often unavoidable and should be factored into the overall project budget from the outset.

    Permit Fees

    Permit fees for vinyl siding installation differ significantly across various jurisdictions. For example, a small residential project in a rural area might incur a permit fee of around $100-$300, while a larger project in a major city could cost several hundred dollars or more. Factors influencing the fee include the size of the house, the complexity of the project (e.g., requiring significant structural changes), and the specific requirements of the local building department. Some municipalities may also charge additional fees for plan review or other administrative processes. To obtain an accurate estimate, it is essential to contact the local building department directly and inquire about their specific requirements and associated fees. For instance, a project in a historic district might have significantly higher permit fees and stricter review processes compared to a project in a standard residential area.

    Inspection Costs and Potential Delays

    Inspection costs are typically included within the overall permit fee, although some jurisdictions might charge separate inspection fees. The number of required inspections depends on the project’s complexity and local regulations. Typically, inspections occur at various stages of the project, such as after the preparation of the existing wall, during installation, and after the completion of the siding installation. Delays can arise due to failed inspections, requiring corrective work and rescheduling of the inspection. These delays can impact the overall project timeline and potentially incur additional labor costs. For example, if an inspector finds a significant code violation, the contractor may need to undertake extensive repairs, causing delays of several days or even weeks. Additional fees may arise from needing to reschedule inspections or pay for reinspections.

    Permit and Inspection Checklist

    A typical vinyl siding installation project often requires the following permits and inspections:

    Before initiating any work, it is vital to contact your local building department to confirm the specific requirements and obtain the necessary documentation. This checklist serves as a general guide and may not encompass all situations.

    • Building Permit Application: This typically includes detailed plans and specifications of the project.
    • Pre-Installation Inspection: This verifies that the house is properly prepared for the installation.
    • During-Installation Inspection: This monitors the installation process for code compliance.
    • Final Inspection: This is conducted once the installation is complete and confirms that the work meets all applicable codes and regulations.

    Trims and Accessories

    Trims and accessories are crucial components in a professional vinyl siding installation, significantly impacting the overall aesthetic appeal and longevity of the project. Choosing the right trims and accessories, and understanding their associated costs, is essential for accurate budgeting. These elements not only enhance the visual finish but also provide crucial protection against the elements.

    The cost of trims and accessories can vary widely depending on several factors, including material type, finish, and the complexity of the project’s design. Higher-quality materials, such as those with enhanced durability and UV resistance, will generally command a higher price. Similarly, more intricate designs or custom-made pieces will increase the overall expense. Understanding these cost drivers is vital for effective project management and client communication.

    Types of Trims and Accessories and Associated Costs

    A wide range of trims and accessories are typically required for a complete vinyl siding installation. The specific items and quantities will depend on the project’s size and design, but common examples include J-channel, corner trims, starter strips, window and door trims, soffit and fascia trims, and various flashing components. Prices are typically quoted per linear foot or per piece, and can vary based on material and manufacturer.

    • J-Channel: Used to finish the edges of siding and provide a clean, neat look. Costs range from $0.50 to $2.00 per linear foot.
    • Corner Trim: Provides a neat and weatherproof finish at outside corners. Costs range from $1.00 to $3.00 per linear foot.
    • Starter Strip: Provides a base for the first row of siding. Costs range from $0.25 to $1.00 per linear foot.
    • Window and Door Trims: Frame windows and doors, enhancing aesthetics and providing weather protection. Costs vary greatly depending on size and style, ranging from $2.00 to $10.00 per linear foot or more for pre-fabricated units.
    • Soffit and Fascia Trims: Used to finish the underside of the eaves and the vertical boards along the roofline. Costs range from $1.00 to $4.00 per linear foot.
    • Flashing: Essential for waterproofing around windows, doors, and other penetrations. Costs vary based on type and size, but typically range from $1.00 to $5.00 per piece.

    Material and Finish Price Differences

    The choice of material significantly impacts the cost of trims and accessories. Vinyl trims are the most common and economical option, but higher-end materials like aluminum or composite materials offer enhanced durability and longevity. Different finishes, such as textured or smooth, can also affect the price. For instance, a wood-grain finish might cost more than a plain white finish. Color matching can also increase costs, particularly if custom colors are required.

    For example, a basic vinyl J-channel might cost $0.75 per linear foot, while a higher-end aluminum J-channel with a powder-coated finish could cost $2.50 per linear foot or more. Similarly, simple vinyl corner trim might cost $1.50 per linear foot, whereas a more elaborate, textured vinyl corner trim could cost $3.00 per linear foot.

    Calculating Total Trim and Accessory Costs

    Calculating the total cost requires careful measurement and estimation of the quantities needed for each trim type. This involves measuring the perimeter of the house, the lengths of window and door trims, and the areas requiring soffit and fascia trims. Then, multiply the linear footage or quantity of each item by its respective unit cost. Add the costs of all items to arrive at the total cost for trims and accessories.

    For example: Total Cost = (J-Channel Linear Feet x J-Channel Cost per Foot) + (Corner Trim Linear Feet x Corner Trim Cost per Foot) + … + (Flashing Quantity x Flashing Cost per Piece)

    For a medium-sized house (approximately 1500 square feet) with standard window and door configurations, a reasonable estimate for trim and accessory costs might range from $500 to $2000, depending on the chosen materials and finishes. Larger, more complex projects will naturally require more materials and incur higher costs.

    Waste Removal Costs

    Proper disposal of waste materials is a crucial, and often overlooked, component of a professional vinyl siding installation project. Failing to account for these costs can lead to unexpected expenses and project delays. This section details the various costs associated with removing old siding and construction debris.

    Waste removal costs depend heavily on the size of the project, the amount of waste generated, and the chosen disposal method. Factors such as accessibility of the property and local regulations also play a significant role. Generally, larger projects with more extensive demolition will incur higher waste removal expenses.

    Dumpster Rental Costs

    Renting a dumpster provides a convenient and efficient method for disposing of large quantities of waste. The cost of dumpster rental varies based on the dumpster size (measured in cubic yards), rental duration, and location. Smaller dumpsters (e.g., 10-20 cubic yards) are suitable for smaller projects, while larger projects may require 30-40 cubic yard dumpsters or even larger. Rental costs typically range from $300 to $800 or more, depending on the factors mentioned above. Additional fees may apply for exceeding the weight limit or for specific types of waste. For example, a homeowner undertaking a relatively small siding replacement on a single-story house might expect to pay between $400-$600 for a 20-yard dumpster rental for a week. A larger, multi-unit building project could easily require a 40-yard dumpster for several weeks, resulting in costs exceeding $1000.

    Self-Hauling Costs

    Self-hauling involves transporting the waste to a local landfill or recycling center yourself. This option can be more cost-effective if you have access to a suitable truck or trailer. However, it’s labor-intensive and requires time and effort. You’ll need to consider fuel costs, the time spent hauling the waste, and potential landfill disposal fees. These fees vary depending on the type and weight of the waste. For example, a homeowner might spend $50-$100 on fuel and several hours of their time hauling several smaller loads to the local dump, whereas a larger project could necessitate multiple trips and significantly more time. The potential savings are less pronounced for large projects where the cost of time and effort could outweigh the potential cost savings compared to dumpster rental.

    Hazardous Waste Disposal Costs

    Certain materials generated during siding removal, such as asbestos-containing materials (if present in older homes) or certain types of paints, require specialized handling and disposal. These materials are considered hazardous waste and incur significantly higher disposal costs. Professional hazardous waste removal companies must handle these materials, and their fees can range from several hundred to several thousand dollars, depending on the quantity and type of hazardous waste. It is crucial to identify and properly manage hazardous waste to avoid legal penalties and environmental hazards. Before starting any demolition or removal work, it’s strongly recommended to have a professional inspection to determine if any hazardous materials are present. Failing to do so can lead to unforeseen and substantial additional costs.

    Underlayment and Insulation Costs

    Installing underlayment and insulation beneath your new vinyl siding offers significant benefits beyond just aesthetics. These materials contribute to improved energy efficiency, enhanced soundproofing, and a longer lifespan for your siding. Understanding the costs associated with these materials is crucial for accurate budgeting.

    Underlayment and insulation choices significantly impact both the initial cost and the long-term value of your siding installation. The selection should consider factors such as climate, budget, and desired level of insulation. Different materials offer varying levels of thermal resistance (R-value), moisture protection, and cost-effectiveness.

    Types of Underlayment and Their Costs

    Underlayment serves as a protective barrier between the house’s sheathing and the vinyl siding. It protects against moisture intrusion, helps create a more even surface for siding installation, and can even add a small degree of insulation. Common types include felt paper, polyethylene sheathing, and breathable housewraps.

    Felt paper is the least expensive option, typically costing between $0.10 and $0.20 per square foot. However, it offers minimal protection against moisture and is less durable than other options. Polyethylene sheathing, while more expensive (ranging from $0.25 to $0.50 per square foot), provides better moisture resistance. Breathable housewraps, such as Tyvek, offer superior moisture management, allowing water vapor to escape while preventing liquid water from entering. These typically cost between $0.40 and $0.80 per square foot. For a 2,000 square foot house, the underlayment cost could range from $200 to $1600, depending on the chosen material.

    Types of Insulation and Their Costs

    Insulation placed beneath the siding improves energy efficiency by reducing heat transfer. Common types include rigid foam insulation (like XPS or EPS) and fiberglass batts. Rigid foam boards offer superior R-value per inch, making them ideal for colder climates. They typically range from $0.50 to $2.00 per square foot, depending on thickness and R-value. Fiberglass batts are less expensive (generally $0.25 to $1.00 per square foot) but require more space and may not provide as high an R-value.

    For example, using 1-inch XPS foam board with an R-value of 5 on a 2,000 square foot house would cost between $1000 and $4000, while using fiberglass batts with a similar R-value could cost between $500 and $2000. The actual cost will depend on the chosen R-value and the thickness of the insulation.

    Cost Estimate for a Typical House

    Let’s consider a 2,000 square foot house. Choosing a mid-range option, such as polyethylene sheathing ($0.35/sq ft) for underlayment and 1-inch XPS foam board ($1.00/sq ft) for insulation, we can estimate the costs:

    Material Quantity (sq ft) Cost per sq ft Total Cost
    Polyethylene Sheathing 2000 $0.35 $700
    1-inch XPS Foam Board 2000 $1.00 $2000

    Total estimated cost for underlayment and insulation: $2700. This is an approximation, and the actual cost can vary based on material selection, regional pricing, and labor costs. It’s crucial to obtain multiple quotes from contractors to ensure accurate budgeting.

    Contingency Costs

    Including a contingency in your vinyl siding installation budget is crucial for mitigating the risk of unexpected expenses and ensuring the project stays within a manageable financial framework. Unforeseen issues are common in construction, and having a buffer built into the budget prevents cost overruns and potential project delays.

    Unforeseen expenses can significantly impact the final cost of a vinyl siding project. These unexpected costs can stem from various sources, potentially derailing the project’s timeline and budget if not properly accounted for.

    Potential Unforeseen Expenses

    Several factors can lead to unforeseen expenses during a vinyl siding installation. These can range from minor issues to major complications requiring significant additional resources. Proper planning and a well-defined contingency budget can help mitigate the impact of these unexpected events.

    • Unexpected Underlying Issues: Discovering rotted or damaged sheathing beneath the existing siding that requires extensive repair or replacement before new siding can be installed.
    • Material Shortages or Price Fluctuations: A sudden increase in the cost of vinyl siding or related materials due to market fluctuations or supply chain disruptions. This can be particularly problematic if the project is already underway.
    • Complex Installation Challenges: Encountering unexpected difficulties during installation, such as unusually difficult-to-access areas or unforeseen structural issues requiring specialized labor or equipment.
    • Weather Delays: Unexpected weather conditions, such as prolonged rain or extreme temperatures, can cause significant delays and necessitate additional labor costs.
    • Damage During Installation: Accidental damage to existing property during the removal of old siding or the installation of new siding, requiring repairs.
    • Permitting Issues: Delays or additional fees associated with obtaining necessary permits or inspections.

    Contingency Percentage Calculation

    A reasonable contingency for a vinyl siding project typically ranges from 5% to 15% of the total estimated cost. The appropriate percentage depends on several factors, including the complexity of the project, the condition of the existing structure, and the overall experience of the contractor. A more complex project or one with potential for unforeseen issues warrants a higher contingency percentage.

    A simple formula for calculating contingency is: Contingency Amount = Total Estimated Cost x Contingency Percentage

    For example, for a $10,000 vinyl siding project, a 10% contingency would be $1,000. This would provide a buffer to absorb unexpected costs. A more conservative approach, especially for older homes or projects with many unknowns, might involve a 15% contingency, resulting in a $1,500 buffer in this example. Conversely, a straightforward project with a reputable contractor and a well-documented scope of work might justify a lower contingency of 5%, or $500 in this case.

    Transportation Costs

    Getting materials to your job site is a crucial, yet often overlooked, part of the overall cost of vinyl siding installation. These costs, while seemingly minor, can add up, especially for larger projects or those located in remote areas. Understanding these costs beforehand helps in accurate budgeting and project planning.

    Transportation costs encompass the expenses associated with delivering all necessary materials—vinyl siding panels, trim, underlayment, insulation, and fasteners—from the supplier’s warehouse or distribution center to your property. This typically involves hiring a truck or utilizing a delivery service.

    Factors Affecting Material Transportation Costs

    Several factors significantly influence the final transportation cost. The most prominent are the distance between the supplier and the job site, and the current price of fuel. Longer distances naturally mean higher fuel consumption and increased driver time, leading to higher charges. Fluctuations in fuel prices directly impact transportation expenses, making it essential to obtain up-to-date quotes close to the project start date. Other factors include the volume of materials transported (requiring larger trucks and potentially multiple trips), traffic congestion, and any access restrictions at the job site (requiring specialized vehicles or additional handling).

    Sample Cost Breakdown for Material Transportation

    Let’s consider a medium-sized project requiring approximately 1,500 square feet of vinyl siding and related materials. We’ll assume a distance of 50 miles between the supplier and the job site, with current fuel prices at $4.00 per gallon. A typical delivery truck might achieve 10 miles per gallon.

    Cost Item Estimated Cost
    Fuel Cost (100 miles round trip @ 10 mpg @ $4/gallon) $40
    Driver’s Wages (assuming 2 hours round trip at $30/hour) $60
    Truck Rental/Delivery Fee (if applicable) $100 – $200
    Total Estimated Transportation Cost $200 – $240

    Note: This is a simplified example. Actual costs can vary depending on the factors mentioned earlier. It’s always best to obtain multiple quotes from different suppliers and delivery services to ensure you’re getting the most competitive price. For instance, a project requiring more materials or located in a more remote area with difficult access might significantly increase these costs. Conversely, a project closer to the supplier might drastically reduce them. It’s advisable to include a contingency in your budget to account for potential unexpected transportation expenses.

    Financing Options

    Securing financing for your vinyl siding installation project can significantly impact your overall budget and timeline. Understanding the available options and their associated costs will help you make an informed decision. We’ll explore several common financing methods, comparing their interest rates and repayment terms to assist you in choosing the best fit for your needs.

    Available Financing Options for Vinyl Siding Installation

    Several options exist for financing your vinyl siding project. These typically include home equity loans, personal loans, and credit cards. Each method presents a unique set of advantages and disadvantages regarding interest rates, repayment periods, and application processes. Choosing the right option depends on your credit score, the project’s cost, and your personal financial situation.

    Comparison of Financing Methods

    The following table compares three common financing methods for home improvement projects like vinyl siding installation. Note that interest rates and monthly payments are estimates and can vary based on your creditworthiness, the lender, and the loan amount. It’s crucial to obtain personalized quotes from multiple lenders before making a final decision.

    Loan Type Typical Interest Rate Range (APR) Typical Repayment Term Example Monthly Payment (for a $10,000 loan)
    Home Equity Loan 5% – 8% 5 – 15 years $70 – $180
    Personal Loan 7% – 15% 1 – 5 years $200 – $350
    Credit Card 15% – 25% Variable, often dependent on minimum payment $300 – $500+

    Factors Influencing Interest Rates and Repayment Terms

    Several factors significantly impact the interest rate and repayment terms offered by lenders. Your credit score is a primary determinant; a higher credit score typically qualifies you for lower interest rates. The loan amount also plays a role; larger loans might attract slightly higher rates. Finally, the lender’s policies and current market conditions influence the overall terms. For example, a lender might offer more favorable rates during periods of lower interest rate environments. It is always recommended to shop around and compare offers from multiple lenders to secure the most competitive terms.

    Total Project Cost Calculation

    Calculating the total cost for your vinyl siding installation project requires a systematic approach, ensuring all expenses are accounted for. This involves summing up the individual cost components detailed previously, allowing for a comprehensive budget and informed decision-making. A well-structured budget minimizes surprises and ensures the project stays within financial parameters.

    This section provides a step-by-step guide to calculating your total project cost and presents examples illustrating potential costs for various projects. Accurate estimation is crucial for successful project planning and execution.

    Step-by-Step Project Budget Creation

    Creating a comprehensive budget is essential for managing your vinyl siding installation project effectively. The following steps outline the process:

    1. Gather Cost Estimates: Obtain detailed quotes for each component: materials, labor, preparation, permits, trims, waste removal, underlayment, insulation, contingency, and transportation. It’s advisable to get at least three quotes for each to compare pricing and identify potential discrepancies.
    2. Compile Cost Data: Organize all your cost estimates in a spreadsheet or similar document. Clearly label each cost category for easy reference and summation.
    3. Calculate Subtotal Costs: Sum the individual costs for each category (e.g., total material cost, total labor cost). This provides a clear picture of the expense breakdown.
    4. Calculate the Total Project Cost: Add all the subtotal costs together to arrive at the overall project cost. This represents the estimated total expense for the entire vinyl siding installation.
    5. Review and Adjust: Carefully review the total cost to ensure accuracy. Consider if any adjustments are needed based on unforeseen circumstances or changes in scope.

    Examples of Total Project Costs

    The total cost of a vinyl siding installation project varies considerably depending on factors such as house size, complexity of the design, material choices, and regional labor rates. Below are examples to illustrate the potential range:

    It is important to note that these are estimates and actual costs may vary. Factors such as the condition of the existing siding, the presence of difficult-to-access areas, and the need for specialized equipment can significantly impact the final cost.

    • Small House (1,000 sq ft), Simple Design:
      • Materials: $5,000
      • Labor: $6,000
      • Preparation & Removal: $1,000
      • Permits & Inspections: $500
      • Trims & Accessories: $500
      • Waste Removal: $200
      • Underlayment & Insulation: $1,000
      • Contingency: $500
      • Transportation: $200
      • Total: $15,400
    • Medium House (1,800 sq ft), Moderate Complexity:
      • Materials: $9,000
      • Labor: $11,000
      • Preparation & Removal: $2,000
      • Permits & Inspections: $750
      • Trims & Accessories: $1,000
      • Waste Removal: $400
      • Underlayment & Insulation: $2,000
      • Contingency: $1,000
      • Transportation: $400
      • Total: $27,550
    • Large House (3,000 sq ft), Complex Design:
      • Materials: $15,000
      • Labor: $18,000
      • Preparation & Removal: $3,000
      • Permits & Inspections: $1,000
      • Trims & Accessories: $1,500
      • Waste Removal: $600
      • Underlayment & Insulation: $3,000
      • Contingency: $1,500
      • Transportation: $600
      • Total: $45,200

    Closure

    Ultimately, understanding the cost breakdown for professional vinyl siding installation is key to a successful home improvement project. By carefully considering all aspects—materials, labor, permits, and contingencies—homeowners can create a realistic budget and avoid unexpected expenses. This detailed analysis empowers you to make informed choices, ensuring a beautiful and long-lasting vinyl siding upgrade that enhances both your home’s curb appeal and its value.