Tag: Home Improvement

  • Comparing Siding Replacement Estimates from Different Contractors

    Comparing Siding Replacement Estimates from Different Contractors

    Comparing Siding Replacement Estimates from Different Contractors is a crucial step in any home renovation project. This process involves careful analysis of various factors, from pricing structures and labor costs to material quality and contractor reputation. Understanding these nuances can save homeowners significant time and money, ultimately ensuring a successful and satisfying outcome. This guide will walk you through a comprehensive comparison process, enabling informed decision-making.

    By systematically examining the details presented in multiple estimates, homeowners can identify the best value proposition. This includes evaluating not only the upfront costs but also considering long-term factors such as material durability, warranty coverage, and the contractor’s overall experience and reliability. Making a well-informed choice contributes to a positive renovation experience and a lasting investment in your home.

    Understanding the Estimates

    Carefully reviewing multiple siding replacement estimates is crucial for making an informed decision. By comparing pricing structures, labor costs, and materials, you can identify the best value for your investment. This analysis focuses on three hypothetical estimates to illustrate the comparison process. Remember to replace these examples with your actual estimates.

    Pricing Structures Comparison

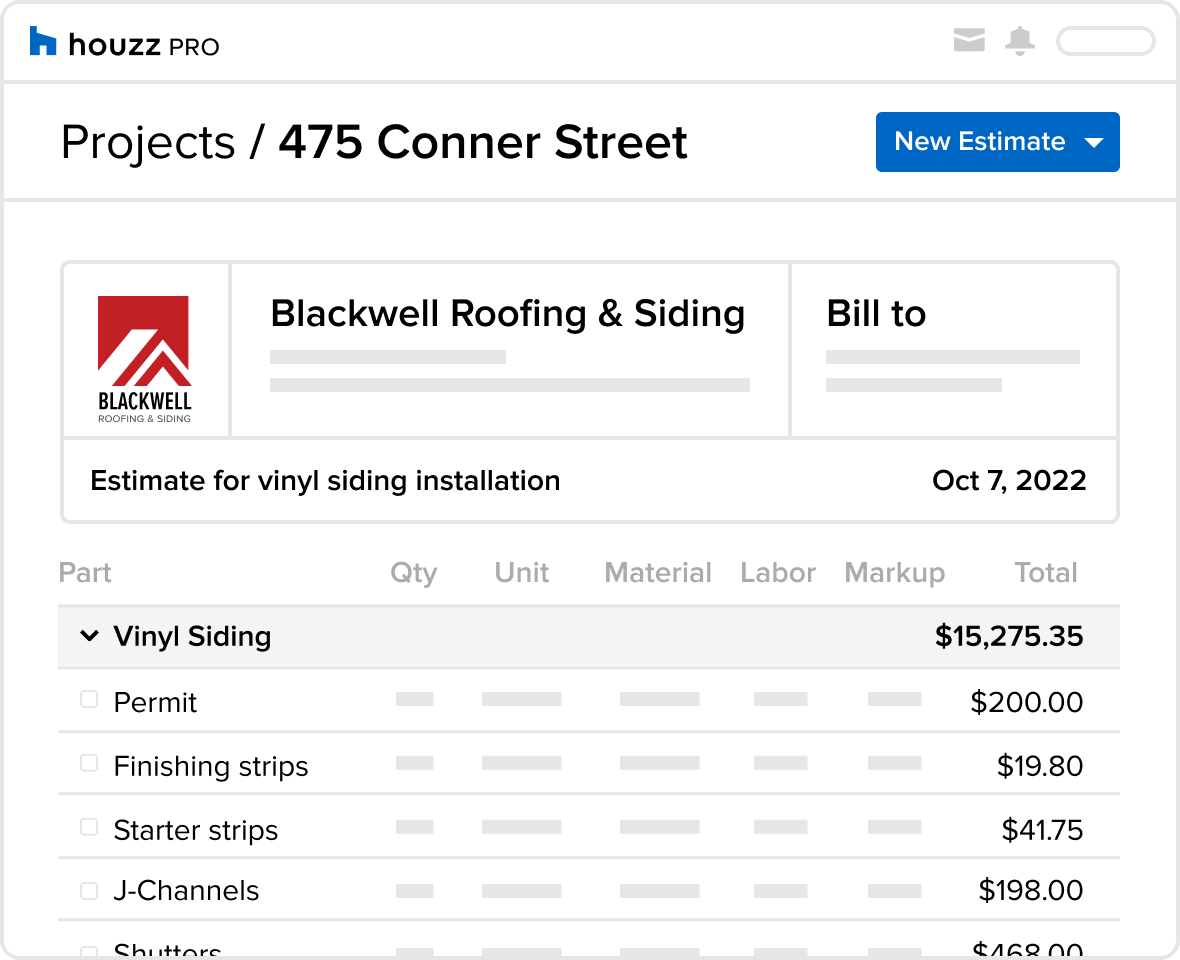
    Three distinct pricing structures were observed in the hypothetical estimates. Contractor A provided a fixed-price quote, offering a single, all-inclusive price encompassing labor and materials. Contractor B offered a detailed breakdown of costs, separating labor, materials, and permitting fees. Contractor C used a square-foot pricing model, multiplying the area of the house needing siding by a per-square-foot cost, with separate line items for materials and labor. The fixed-price quote from Contractor A simplifies comparison but lacks transparency, while the detailed breakdown from Contractor B facilitates a comprehensive analysis. Contractor C’s approach is common but might not account for complexities in the project, potentially leading to unforeseen costs.

    Labor Cost Breakdown

    The labor cost breakdown varied significantly across the three estimates. Contractor A’s fixed-price quote included labor but didn’t specify the hourly rate or number of labor hours. Contractor B detailed labor costs as $15 per square foot, totaling $3,000 for a 200-square-foot project. This included preparation, installation, and cleanup. Contractor C estimated labor at $10 per square foot, totaling $2,000 for the same project, reflecting a potential difference in labor efficiency or skill level. These discrepancies highlight the importance of understanding the scope of work included in each labor cost.

    Materials Used and Cost Impact

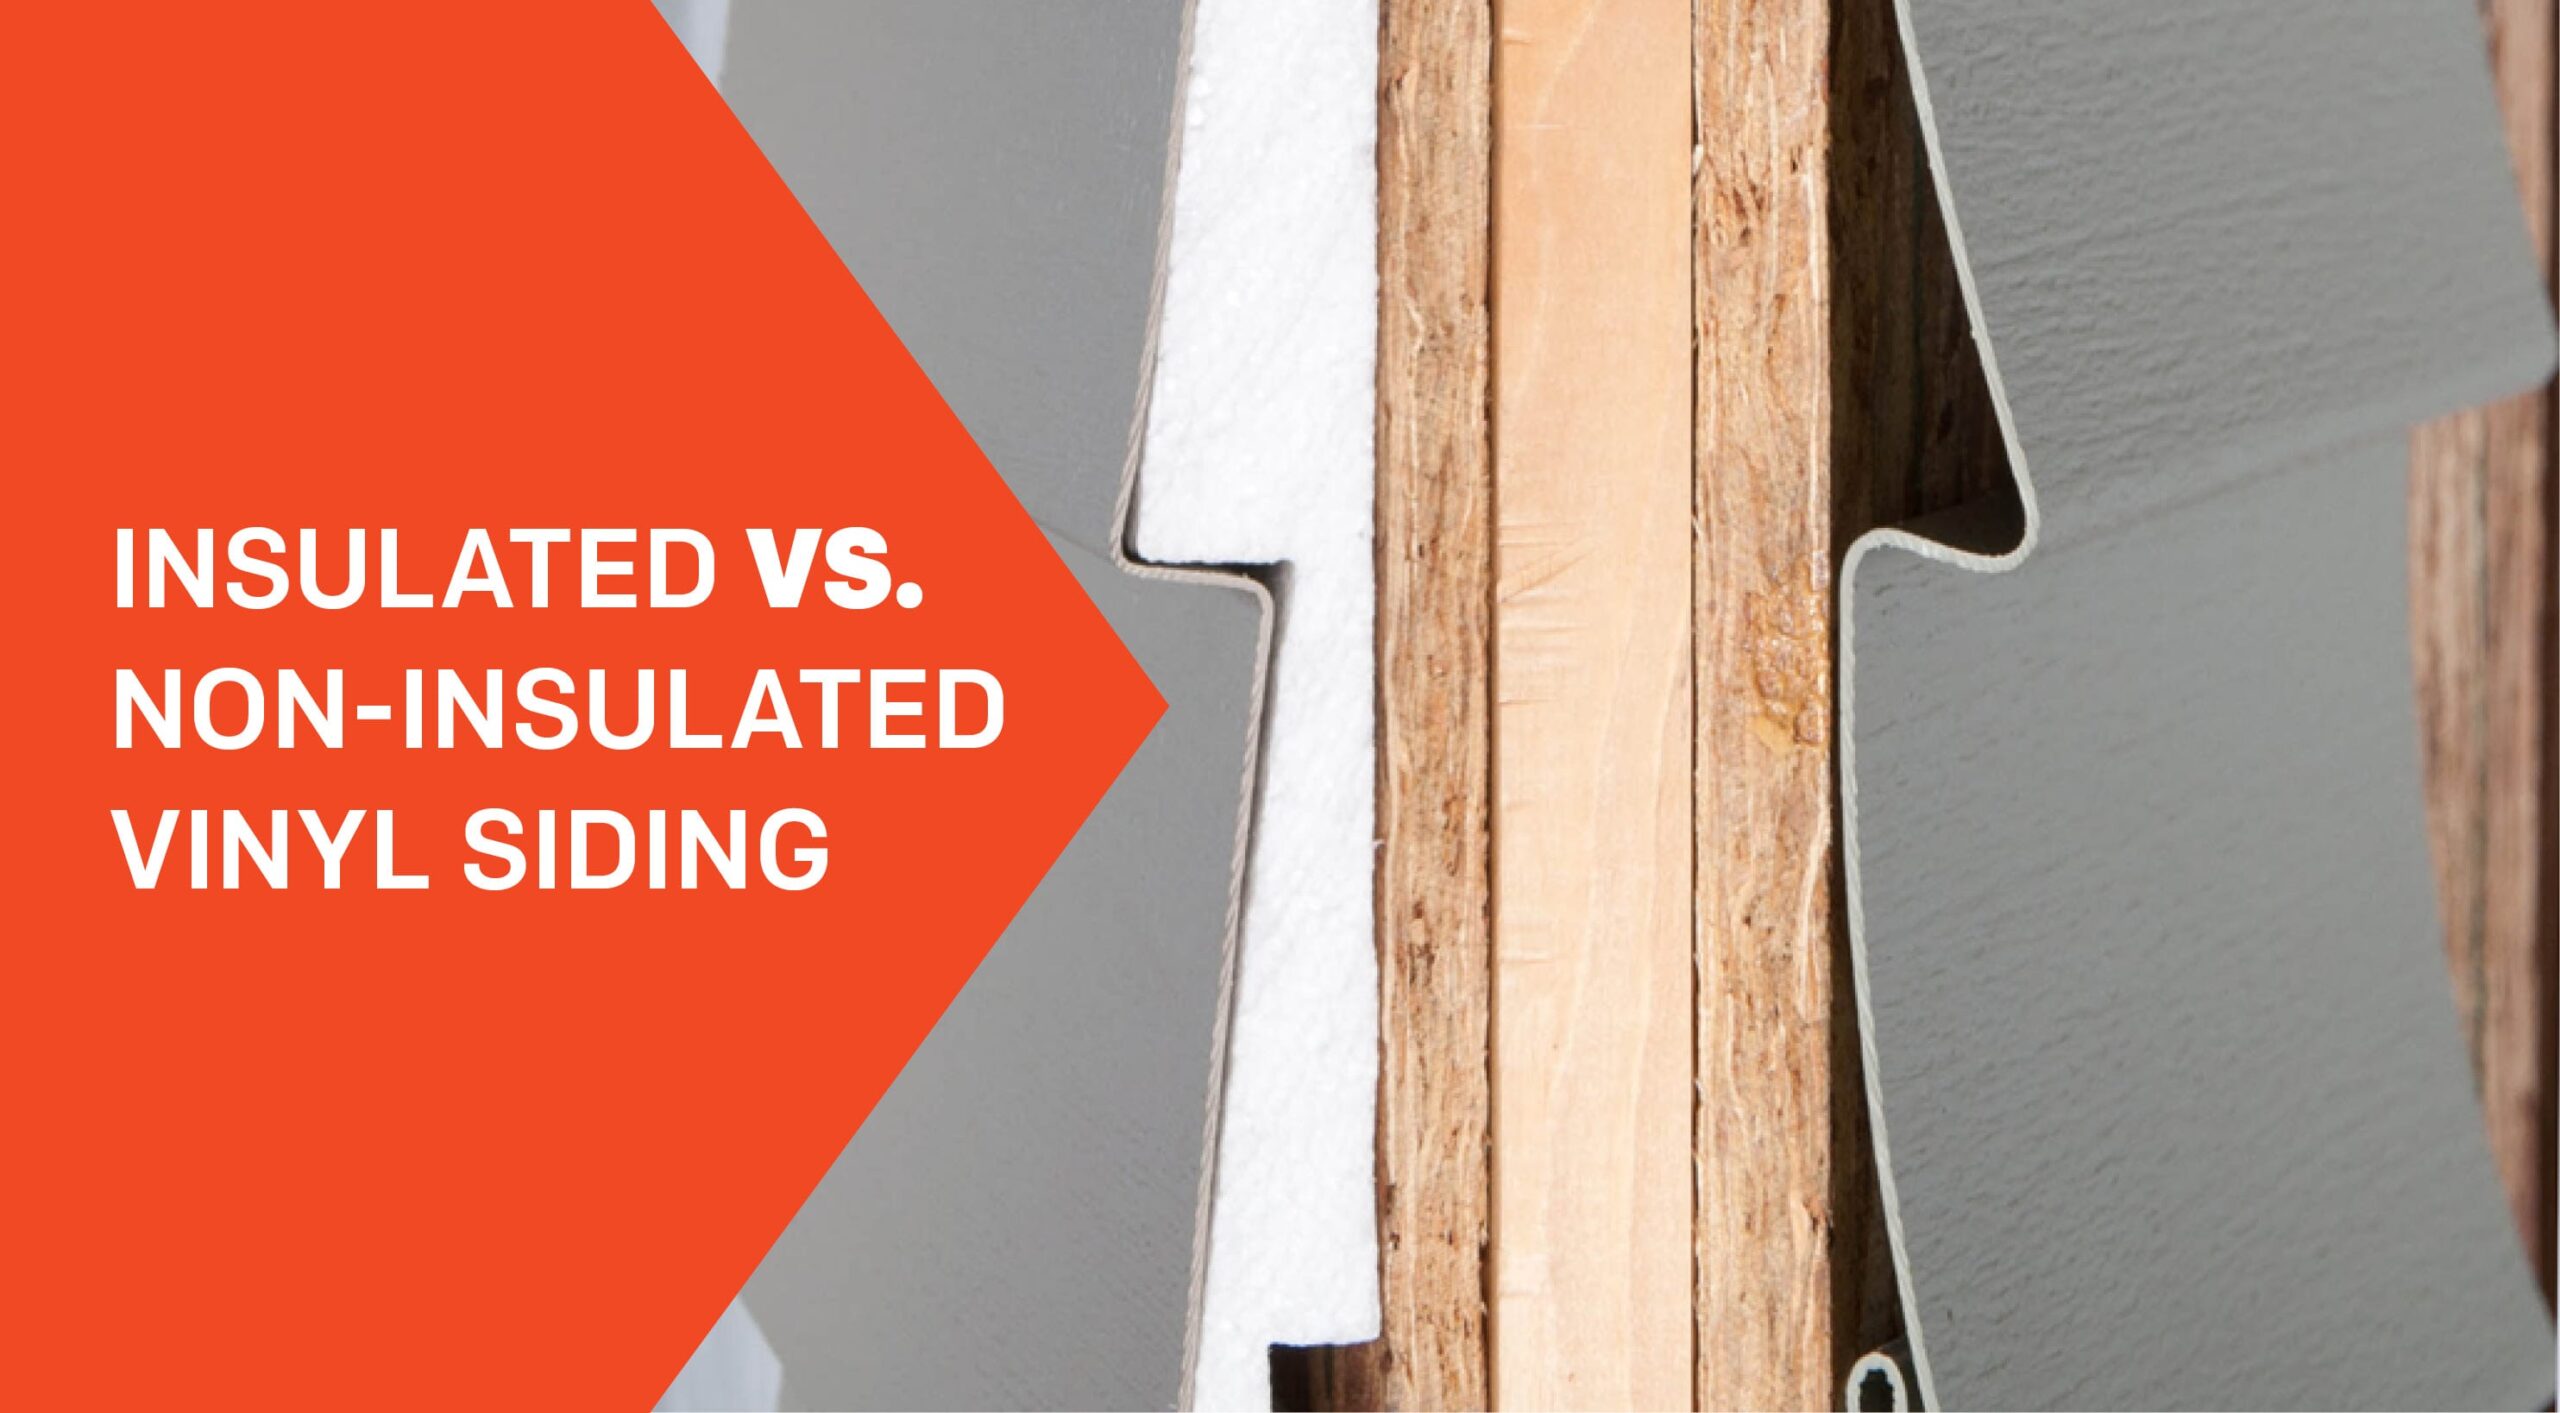
    The estimates revealed differences in the types of siding materials proposed. Contractor A suggested using vinyl siding, a relatively inexpensive option, while Contractor B proposed fiber cement siding, a more durable but pricier choice. Contractor C recommended a premium cedar wood siding, leading to the highest material cost. The type of siding significantly impacts the overall cost. Vinyl siding (Contractor A) cost $5,000, fiber cement (Contractor B) $8,000, and cedar wood (Contractor C) $12,000 for the same 200-square-foot project. This difference reflects the varying durability, aesthetic appeal, and maintenance requirements of each material. Consider the long-term cost implications when comparing materials beyond initial price.

    Analyzing Labor Costs

    Labor costs represent a significant portion of your siding replacement project’s total expense. A thorough comparison of labor costs across different contractor estimates is crucial for making an informed decision. This analysis should consider not only the hourly rates and total labor hours but also the experience and qualifications of the work crews and the warranties offered on their workmanship.

    Understanding the breakdown of labor costs allows for a more accurate assessment of value and helps identify potential discrepancies or areas of concern among competing bids. Factors such as crew size, projected project duration, and the complexity of the job all influence the final labor costs.

    Hourly Rates and Total Labor Hours

    Each contractor’s estimate should clearly detail the hourly rate charged for labor and the estimated number of hours required to complete the project. For example, Contractor A might quote $50 per hour for a crew of three workers, totaling 100 labor hours, while Contractor B might propose $60 per hour for a two-person crew, requiring 150 labor hours. Direct comparison reveals that Contractor A’s total labor cost ($15,000) is less than Contractor B’s ($9,000). However, a further investigation into the specifics of the work is necessary. Are the differing labor hours justified by the scope of work or project complexity? Does the higher hourly rate of Contractor B reflect a more skilled or experienced crew? These are important questions to consider.

    Experience Level of Work Crews

    The experience level of the installation crew significantly impacts the quality of the work and the overall project timeline. Look for details in the estimates about the crew’s experience with similar projects, their certifications (if applicable), and the average tenure of workers within the company. A contractor with a highly experienced and well-trained crew might justify a higher hourly rate due to increased efficiency and reduced risk of errors or rework. For example, Contractor C might highlight their team’s average of 10 years of experience in siding installation and their certifications from the relevant industry associations, indicating a higher level of expertise. Conversely, Contractor D might mention a younger, less experienced crew, potentially leading to a lower hourly rate but also a higher risk of mistakes or delays.

    Labor Warranties and Guarantees

    Scrutinize the warranties offered on the labor itself. A reputable contractor will typically provide a warranty covering their workmanship for a specific period, typically one to two years. This warranty should clearly outline what is covered (e.g., defects in installation, material failures due to installation errors), the duration of coverage, and the process for filing a claim. The length and comprehensiveness of the labor warranty can be a valuable indicator of the contractor’s confidence in their work and their commitment to customer satisfaction. For instance, Contractor E might offer a two-year warranty on all labor, while Contractor F might only offer a one-year warranty, suggesting a potential difference in confidence in their work or a less robust commitment to rectifying potential problems.

    Material Specifications

    Careful consideration of the siding materials proposed by each contractor is crucial for long-term value and aesthetic appeal. This section will compare the types and qualities of materials, manufacturer warranties, and the expected longevity and maintenance requirements of each option. This analysis will help you make an informed decision based on your budget and long-term goals.

    Siding Material Comparison

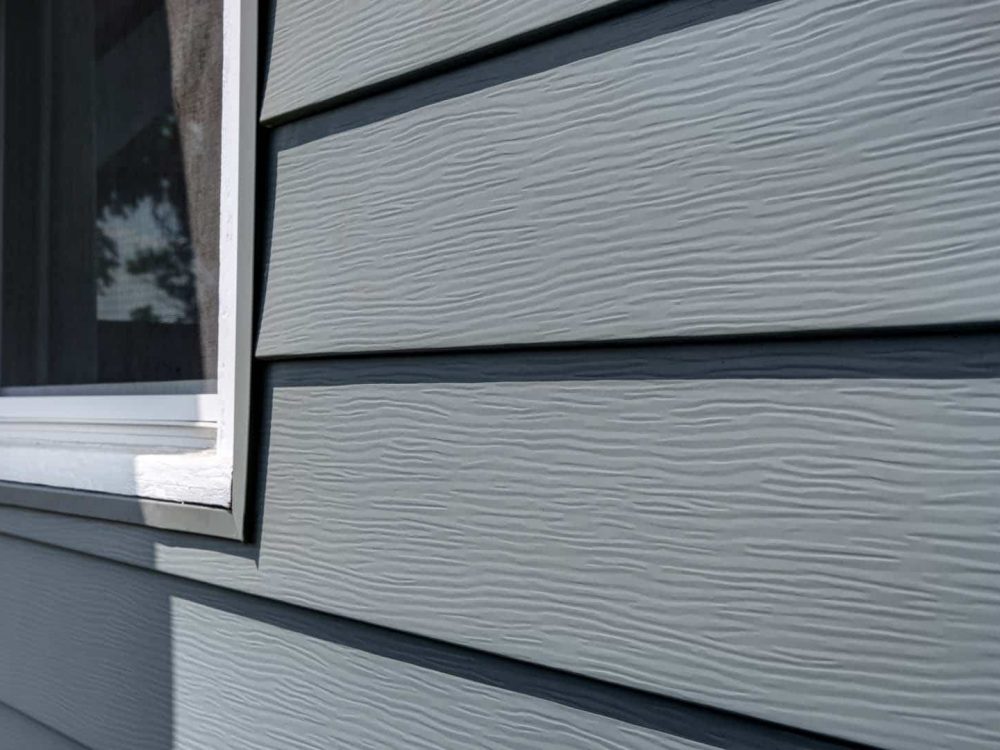
    Each contractor’s estimate should clearly specify the type of siding material being offered. Common options include vinyl, fiber cement, wood, and engineered wood. Vinyl siding is generally the most affordable, while fiber cement and wood offer superior durability and aesthetic appeal, but at a higher cost. Engineered wood siding combines the aesthetics of natural wood with enhanced durability and resistance to rot and insects. Direct comparison of the proposed materials – their manufacturer, specific product line, and color – is essential. For instance, one contractor might propose CertainTeed Monogram vinyl siding, while another might offer James Hardie fiber cement siding. These differences impact not only cost but also the overall look and longevity of your home’s exterior.

    Manufacturer Warranties

    The warranty offered by the siding manufacturer is a critical aspect to consider. Warranties typically cover defects in materials and workmanship, but the length and specific terms can vary significantly. Carefully review each warranty to understand its limitations. Some warranties might cover only the materials, while others might include labor. For example, a CertainTeed vinyl siding warranty might offer a 30-year limited warranty against defects, while a James Hardie fiber cement siding warranty could provide a 30-year non-prorated warranty against defects. Note that the contractor’s own warranty on installation will also be important, independent of the manufacturer’s warranty.

    Siding Material Longevity and Maintenance

    The longevity and maintenance requirements of different siding materials differ considerably. This table summarizes the typical lifespan and maintenance needs of common siding options:

    Siding Material Typical Lifespan (Years) Maintenance Requirements Cost Considerations
    Vinyl 20-40 Minimal; occasional cleaning Low initial cost, potentially higher replacement cost over time
    Fiber Cement 50+ Moderate; periodic painting or staining Higher initial cost, lower long-term replacement cost
    Wood 20-50 (depending on species and treatment) High; regular painting, staining, and potential repairs High initial cost, potentially high maintenance costs
    Engineered Wood 30-50 Moderate; periodic cleaning and occasional repainting Medium initial cost, moderate maintenance costs

    Payment Terms and Financing Options

    Choosing the right siding contractor often involves careful consideration of not only the quality of materials and workmanship but also the payment structure. Understanding the payment terms and financing options offered by different contractors is crucial for budgeting and ensuring a smooth project completion. This section will compare the various payment schedules and financing options to help you make an informed decision.

    Payment schedules vary significantly among contractors. Some may require a large upfront deposit, while others might prefer staged payments tied to project milestones. Understanding these differences is vital for managing your cash flow effectively. Financing options, if available, can ease the financial burden of a large home improvement project. However, it’s important to compare interest rates and repayment terms to choose the most suitable option.

    Payment Schedules

    Contractors typically outline their payment schedules in the contract. These schedules often involve a down payment, progress payments at various stages of the project (e.g., after material delivery, after completion of framing, after installation), and a final payment upon project completion and your satisfaction. For example, one contractor might require 20% upfront, 30% upon completion of the framing, 30% upon installation, and 20% final payment. Another might opt for a 50% deposit and the remaining 50% upon completion. It’s vital to compare these structures and ensure they align with your budget and payment capabilities.

    Financing Options

    Several contractors offer financing options, often partnering with financial institutions to provide loans specifically for home improvement projects. These loans typically come with interest rates and repayment terms. For instance, a contractor might offer a 0% interest loan for 12 months, or a loan with a fixed interest rate over several years. It’s important to review the terms and conditions of any financing offer, including the Annual Percentage Rate (APR), any associated fees, and the total cost of the loan over its lifespan. Always compare these offers from different contractors and with other financing options available to you independently.

    Upfront Costs and Deposits

    The upfront cost, usually a deposit or down payment, serves as a commitment from the homeowner and often covers initial materials procurement or project preparation. The percentage of the total project cost required as a deposit varies greatly. A high deposit may indicate a contractor’s confidence in their work, but it can also place a significant burden on the homeowner’s finances. Lower deposits might seem attractive but could indicate a less established contractor or a higher risk of project delays. Thoroughly review the contract to understand what the deposit covers and what recourse you have if the project is not completed as agreed.

    Late Payment Penalties

    Most contractor contracts stipulate penalties for late payments. These penalties can range from late fees (a fixed amount or a percentage of the outstanding balance) to interest charges or even suspension of work until the outstanding payment is received. Understanding the specific late payment penalties outlined in each contract is crucial to avoid unexpected financial repercussions. For example, a contract might state a late payment fee of $50 per day or an interest rate of 1.5% per month on overdue payments. It is advisable to plan carefully to avoid any late payment situations.

    Contractor Experience and Reputation

    Choosing a contractor for your siding replacement is a significant investment, and their experience and reputation play a crucial role in ensuring a successful project. Thoroughly investigating a contractor’s history and client feedback is essential to making an informed decision. This section compares the experience and reputation of the contractors you’ve received estimates from.

    This analysis considers several key factors to assess the reliability and trustworthiness of each contractor. We will examine their years of experience in siding installation, relevant certifications and licenses, and the feedback provided by previous clients. A comprehensive review of these factors allows for a more objective comparison.

    Contractor Experience and Certifications

    The following table summarizes the years of experience and relevant certifications held by each contractor. This information is crucial in determining their level of expertise and adherence to industry best practices. Note that the presence of certifications does not guarantee superior workmanship, but it indicates a commitment to professional standards.

    Contractor Name Years of Experience Certifications/Licenses
    ABC Siding Solutions 15 years Certified Residential Contractor (CRC), Licensed in [State]
    XYZ Home Improvements 8 years Licensed in [State]
    123 Exterior Renovations 20 years Certified Siding Installer (CSI), Licensed in [State], A+ rating with the Better Business Bureau

    Online Reviews and Customer Testimonials

    Examining online reviews and testimonials offers valuable insights into past client experiences. These reviews provide a firsthand account of the contractor’s professionalism, workmanship, communication, and overall project management. While individual experiences can vary, a consistent pattern of positive or negative feedback can be indicative of a contractor’s reliability.

    Below is a summary of online reviews for each contractor. Note that the number of reviews and the overall rating are taken from [Platform Name, e.g., Google Reviews, Yelp] as of [Date].

    • ABC Siding Solutions: Average rating of 4.5 stars out of 5 based on 75 reviews. Positive comments frequently mentioned excellent communication and attention to detail. Negative comments were rare and generally related to minor scheduling delays.
    • XYZ Home Improvements: Average rating of 3.8 stars out of 5 based on 30 reviews. Positive comments praised the competitive pricing. Negative comments cited occasional communication issues and minor quality control problems.
    • 123 Exterior Renovations: Average rating of 4.8 stars out of 5 based on 150 reviews. Consistently high praise for professionalism, quality of work, and customer service. Few negative comments were reported, mostly addressing minor issues promptly resolved.

    Contractor Pros and Cons

    Based on the analysis of experience, certifications, and online reviews, the following summarizes the advantages and disadvantages of each contractor:

    • ABC Siding Solutions:
      • Pros: Solid experience, good communication, generally positive reviews.
      • Cons: Occasional minor scheduling delays reported.
    • XYZ Home Improvements:
      • Pros: Competitive pricing.
      • Cons: Communication issues and minor quality control problems reported in some reviews.
    • 123 Exterior Renovations:
      • Pros: Extensive experience, multiple certifications, overwhelmingly positive reviews, excellent reputation.
      • Cons: None significant reported.

    Project Timeline and Scheduling

    The project timeline is a critical factor when comparing siding replacement estimates. A shorter timeline might seem appealing, but it’s crucial to understand the implications of rushed work versus a more deliberate approach. Contractors’ schedules should align with your availability and any other relevant factors, such as weather conditions.

    Understanding the proposed timelines from different contractors allows for a comprehensive comparison, enabling you to choose the contractor best suited to your needs and preferences. Delays can significantly impact your budget and overall project satisfaction. Careful consideration of potential delays is essential for a smooth and successful siding replacement.

    Estimated Project Timelines

    Each contractor’s estimate should clearly outline the expected project duration, broken down into phases if possible (e.g., demolition, installation, cleanup). Compare these timelines directly. For example, Contractor A might estimate completion in 7 days, while Contractor B proposes 10 days. These differences may be due to various factors including crew size, project complexity, and scheduling efficiency. A detailed breakdown of each phase’s duration can provide a more nuanced understanding.

    Potential Delays and Unforeseen Circumstances

    Several factors can cause delays. Unexpected weather conditions (heavy rain, extreme heat, or snow) can significantly impact outdoor work. Discovering unforeseen issues during demolition, such as rotted wood or damaged sheathing, may require additional time for repairs. Supply chain disruptions could delay the arrival of materials. Finally, unforeseen scheduling conflicts within the contractor’s team could also lead to delays. A reputable contractor will proactively communicate potential delays and offer solutions to mitigate their impact. For example, a delay caused by material shortage might be offset by prioritizing other tasks.

    Project Timeline Comparison Chart

    Contractor Total Project Time (Days) Demolition (Days) Installation (Days) Cleanup (Days)
    Contractor A 7 1 5 1
    Contractor B 10 2 7 1
    Contractor C 9 1.5 6.5 1
    Contractor D 12 2 8 2

    Permits and Licenses

    Obtaining the necessary permits and ensuring your contractor is properly licensed and insured are crucial steps in a successful siding replacement project. These aspects significantly impact the legality, safety, and overall quality of the work. A thorough comparison of these elements across different contractor estimates is essential before making a final decision.

    Permit costs and licensing information should be clearly outlined in each estimate. The absence of these details can indicate a potential lack of professionalism or even illegal operation. Understanding the implications of missing permits and licenses is vital to avoid future complications and potential legal liabilities.

    Permit Costs and Inclusion

    Each estimate should explicitly state the costs associated with obtaining the necessary permits. These costs can vary depending on your location, the scope of the project, and the specific permits required. For example, a larger project involving significant structural changes might require more permits and incur higher costs compared to a smaller, simpler job. Compare the breakdown of permit fees provided by each contractor. Discrepancies should prompt further investigation to ensure accuracy and transparency. Some contractors may include permit fees in their overall price, while others may list them separately. Clarify this detail with each contractor to avoid unexpected expenses.

    Contractor Licensing and Insurance

    Verify that each contractor holds the necessary licenses and insurance to perform the work. This typically includes a general contractor’s license and liability insurance. Request copies of these documents to confirm their validity and coverage. Estimates should clearly state the contractor’s licensing information and insurance policy details, including the policy number and the insurance company’s contact information. The absence of proper licensing and insurance exposes you to significant risks, including potential liability for accidents or damages during the project. Insufficient insurance coverage could leave you financially responsible for unforeseen events.

    Obtaining Necessary Permits

    The process of obtaining building permits generally involves submitting an application to your local building department along with detailed plans and specifications for the project. This application often requires information about the materials being used, the scope of work, and the contractor’s licensing information. The building department will review the application and plans to ensure compliance with local building codes and regulations. Once approved, you will receive a permit that allows the contractor to legally commence the work. The timeline for permit approval can vary depending on the complexity of the project and the efficiency of the local building department. In some cases, the contractor may handle the permit application process, while in others, the homeowner may be responsible. Clarify who is responsible for obtaining the permits and the associated timeline with each contractor. Delays in obtaining permits can significantly impact the project timeline, so factor this into your decision-making process.

    Warranties and Guarantees

    Understanding the warranties offered by different siding contractors is crucial for protecting your investment. A comprehensive warranty provides peace of mind and safeguards against potential defects or issues that may arise after installation. Comparing warranties allows you to make an informed decision based on the level of protection each contractor provides.

    Thoroughly reviewing the warranty documents provided by each contractor is essential. Pay close attention to the specific terms, conditions, and limitations of each warranty to ensure you understand the extent of coverage. Note that warranties often vary in their length and the types of issues they cover.

    Warranty Duration and Coverage

    The duration of warranties varies significantly between contractors and even between the materials and labor components of the project. Some manufacturers offer lifetime warranties on their siding products, while others provide shorter, limited warranties, typically ranging from 10 to 20 years. Labor warranties usually cover a shorter period, often ranging from 1 to 5 years. It’s vital to note whether these warranties are transferable to future homeowners if you plan to sell your property in the near future. For example, Contractor A might offer a 25-year warranty on their vinyl siding and a 2-year warranty on their labor, while Contractor B might offer a 15-year warranty on their fiber cement siding and a 1-year warranty on their labor.

    Warranty Limitations and Exclusions

    Warranties are not always absolute. Many contain specific limitations and exclusions that restrict their coverage. Common exclusions include damage caused by acts of God (such as hurricanes or floods), improper maintenance by the homeowner, or damage resulting from modifications or alterations made to the siding after installation. Some warranties might also exclude certain types of defects, such as minor cosmetic imperfections. For example, a warranty might cover major structural defects but exclude minor scratches or discoloration. Carefully reviewing these limitations is essential to avoid misunderstandings or disputes later. Understanding these limitations will help you assess the true value and protection offered by each warranty.

    Comparison of Contractor Warranties

    To facilitate comparison, consider creating a table summarizing the key features of each contractor’s warranty. This table could include columns for contractor name, material used, material warranty duration, material warranty exclusions, labor warranty duration, and labor warranty exclusions. This organized comparison will highlight the differences and allow for a clearer understanding of the overall value proposition of each contractor’s offer. For instance, a table might show that Contractor A’s warranty covers material defects for 25 years and labor for 2 years, excluding damage from extreme weather events, while Contractor B’s warranty covers material defects for 15 years and labor for 1 year, with similar exclusions.

    Cleanup and Waste Disposal

    Careful consideration of cleanup and waste disposal procedures is crucial when comparing siding replacement estimates. Contractors should detail their methods for managing debris and ensuring a clean worksite throughout and after the project. Differences in these approaches can significantly impact the overall cost and the level of disruption to your property.

    Waste and debris removal methods vary considerably between contractors. Some may use dumpsters placed strategically on your property, while others might opt for smaller, more frequent pickups. The frequency of waste removal directly affects the cleanliness of your property during the project. Furthermore, the method of disposal itself—landfill versus recycling—can impact both cost and environmental responsibility. It is important to ascertain whether the contractor’s methods align with your preferences and local environmental regulations.

    Waste Removal Methods

    Contractors should clearly outline their plan for handling construction debris. This should include details on the type of containers used (dumpsters, smaller bins), the frequency of removal, and the disposal method employed. For example, one contractor might describe using a large dumpster for the duration of the project, while another might detail a system of daily or bi-daily smaller container removal. This information allows for a direct comparison of approaches and associated costs. Inquire about the contractor’s commitment to recycling and responsible waste management practices. A responsible contractor will clearly state their commitment to minimizing environmental impact.

    Responsibility for Cleanup

    The contract should explicitly state the contractor’s responsibility for cleanup and waste disposal. This typically includes the removal of all construction debris, including scrap siding, packaging materials, and leftover building supplies. However, it’s important to clarify whether the contractor is responsible for cleaning areas beyond the immediate project site, such as driveways or walkways. Some contractors may offer additional cleaning services at an extra cost. A clear understanding of these responsibilities prevents misunderstandings and potential disputes after the project’s completion. A detailed breakdown of these responsibilities should be included in the written contract.

    Addressing Project-Related Damage

    Any damage incurred during the siding replacement process should be addressed by the contractor. This might include damage to landscaping, gutters, or other exterior features. Reputable contractors will have procedures in place to document, assess, and repair any accidental damage. The contractor’s estimate should ideally include a contingency for unforeseen damage, or at least clearly outline the process for handling such situations. For instance, a contractor might provide photographic documentation of existing conditions before commencing work, serving as a baseline for comparison after project completion. If damage does occur, a responsible contractor will promptly address it to the homeowner’s satisfaction.

    Total Project Cost and Value

    Comparing siding replacement estimates requires a thorough analysis of the total project cost and the value each proposal offers. This involves not only looking at the bottom line price but also understanding what contributes to that price and the long-term benefits each option provides. A lower upfront cost might seem attractive, but it could ultimately prove more expensive if the materials are inferior or the warranty inadequate.

    The total cost encompasses materials, labor, permits, and any other associated fees. The value proposition, however, considers the quality of materials, the experience and reputation of the contractor, the length and comprehensiveness of the warranty, and the overall expected lifespan of the new siding. By carefully weighing these factors, you can determine which estimate offers the best combination of cost and value.

    Comparative Analysis of Estimates

    To effectively compare, organize the information from each estimate into a clear format. This will help you easily identify key differences and advantages. Consider creating a table like the one below, which summarizes the key aspects of each estimate received. Remember to replace the example data with your own.

    Contractor Total Cost Material Type Warranty Length
    ABC Siding $15,000 Vinyl Siding – Premium Grade 25 Years
    XYZ Construction $12,000 Vinyl Siding – Standard Grade 10 Years
    123 Home Improvements $18,000 Fiber Cement Siding 30 Years

    Value Proposition Assessment

    Each estimate’s value proposition depends on individual priorities. For example, ABC Siding offers a premium-grade vinyl siding with a long warranty, suggesting higher quality and longer lifespan, justifying the higher price. XYZ Construction’s lower price reflects the use of standard-grade vinyl siding and a shorter warranty, implying a potentially shorter lifespan and higher risk of future repairs. 123 Home Improvements offers a higher initial investment but uses durable fiber cement siding with an extended warranty, indicating superior long-term value despite the higher upfront cost. The choice depends on your budget and your desired balance between initial cost and long-term durability.

    End of Discussion

    Ultimately, comparing siding replacement estimates requires a multifaceted approach. By carefully considering the elements discussed – pricing, labor, materials, contractor reputation, timelines, and warranties – homeowners can make a confident and informed decision. Choosing the right contractor and siding materials will not only enhance your home’s curb appeal but also ensure long-term value and peace of mind. Remember, a thorough comparison empowers you to make the best choice for your home and budget.

  • How Insulated Siding Improves Home Comfort and Efficiency

    How Insulated Siding Improves Home Comfort and Efficiency

    How Insulated Siding Improves Home Comfort and Efficiency: Investing in insulated siding offers a multifaceted approach to enhancing your home’s energy performance and overall living experience. This upgrade not only contributes significantly to reduced energy bills but also creates a more comfortable and quieter living environment. We’ll explore the various types of insulated siding, their installation, maintenance, and the long-term benefits they provide, including increased home value and curb appeal.

    From understanding the composition of different insulated siding materials to analyzing the return on investment, this comprehensive guide equips homeowners with the knowledge needed to make informed decisions about improving their home’s comfort and efficiency. We will delve into the science behind how insulated siding minimizes heat transfer, reduces drafts, and even dampens noise pollution. We’ll also examine the environmental considerations and the long-term cost-effectiveness compared to traditional siding options. By the end, you’ll have a clear understanding of whether insulated siding is the right choice for your home.

    Introduction to Insulated Siding

    Insulated siding offers a compelling alternative to traditional siding, enhancing both the aesthetic appeal and energy efficiency of your home. It combines the protective outer layer of traditional siding with an integrated layer of insulation, creating a more comfortable and cost-effective living environment. This integrated design streamlines installation and reduces the need for separate insulation measures, resulting in a more efficient and streamlined construction process.

    Insulated siding materials typically consist of an outer layer designed for weather resistance and aesthetic appeal, a core layer providing insulation, and sometimes a backing layer for added protection and structural support. The outer layer is often made of materials like vinyl, fiber cement, or engineered wood, each offering unique benefits in terms of durability, maintenance, and appearance. The core insulation is commonly made of rigid foam insulation, such as expanded polystyrene (EPS) or extruded polystyrene (XPS), known for their excellent thermal resistance. These materials contribute significantly to the overall energy efficiency of the siding system.

    Insulated Siding Types

    The choice of insulated siding depends on several factors, including budget, aesthetic preferences, and the specific climate. Different types of insulated siding offer varying levels of performance and longevity.

    • Vinyl Insulated Siding: This is a popular choice due to its affordability, low maintenance, and wide range of colors and styles. The vinyl outer layer is durable and easy to clean, while the foam core provides effective insulation. Vinyl insulated siding is often a good option for homeowners seeking a balance between cost and performance.
    • Fiber Cement Insulated Siding: Offering superior durability and fire resistance compared to vinyl, fiber cement insulated siding is a more premium option. It’s known for its long lifespan and ability to withstand harsh weather conditions. However, it is typically more expensive than vinyl siding and requires more careful installation.
    • Engineered Wood Insulated Siding: Engineered wood siding combines the natural beauty of wood with enhanced durability and moisture resistance. The insulation core helps to prevent moisture damage and improve energy efficiency. This type of siding often provides a more sophisticated aesthetic appeal but may require more maintenance than vinyl.

    Insulated Siding vs. Traditional Siding

    A key difference lies in the integrated insulation. Traditional siding requires separate installation of insulation, often within the wall cavity. This can lead to thermal bridging—heat loss through areas where the insulation is not continuous—and potential gaps in the insulation layer. Insulated siding, on the other hand, eliminates this issue by incorporating insulation directly within the siding panel.

    Feature Insulated Siding Traditional Siding
    Insulation Integrated within siding panel Installed separately in wall cavity
    Installation Often faster and simpler More complex, requiring separate insulation installation
    Energy Efficiency Generally higher due to reduced thermal bridging Can be less efficient due to potential thermal bridging and installation inconsistencies
    Maintenance Varies depending on material; generally low to moderate Varies depending on material; may require more frequent repainting or repairs
    Cost Generally more expensive upfront Typically less expensive upfront, but may have higher long-term energy costs

    Energy Efficiency Benefits

    Insulated siding offers significant advantages in improving a home’s energy efficiency, leading to both increased comfort and lower energy bills. By creating an effective barrier against heat transfer, it helps maintain a consistent indoor temperature year-round, reducing the strain on your heating and cooling systems.

    Insulated siding reduces heat transfer in both summer and winter months. During summer, the insulating layer prevents the outside heat from penetrating the walls, keeping the interior cooler and reducing the workload on your air conditioning system. Conversely, in winter, the insulation minimizes heat loss from the interior, helping to keep your home warmer and reducing the demand on your heating system. This two-way protection translates directly into substantial energy savings.

    Impact on Energy Bills

    The impact of insulated siding on energy bills is demonstrably positive. By reducing the energy needed to heat and cool your home, you can expect a noticeable decrease in your monthly utility costs. The exact amount of savings will vary depending on factors such as climate, home size, existing insulation, and the type of insulated siding installed. However, studies consistently show significant reductions in energy consumption. For example, a study by the Oak Ridge National Laboratory indicated that homes with insulated siding experienced an average reduction of 15-25% in heating and cooling costs compared to homes with traditional siding. This translates to substantial savings over the lifespan of the siding.

    Energy Savings Data

    Several studies and real-world examples support the energy-saving claims of insulated siding. Independent testing by organizations like the National Fenestration Rating Council (NFRC) provides data on the thermal performance of various siding materials. This data is often expressed in terms of R-value, which measures the material’s resistance to heat flow. A higher R-value indicates better insulation. For instance, a typical insulated vinyl siding might have an R-value of 4 or higher, significantly exceeding the R-value of traditional wood or aluminum siding. This improved R-value directly contributes to lower energy consumption and reduced utility bills. Homeowners who have installed insulated siding often report savings ranging from 10% to 30% on their annual energy bills, depending on factors such as climate and home size. These savings not only offset the initial cost of installation but also provide long-term financial benefits.

    Improved Home Comfort

    Insulated siding significantly enhances your home’s comfort by creating a more stable and pleasant indoor environment. This improvement stems from its ability to regulate temperature, reduce drafts, and minimize external noise intrusion.

    Insulated siding minimizes temperature fluctuations by acting as a barrier against heat transfer. In the summer, it prevents the sun’s heat from penetrating the walls, keeping your home cooler and reducing the strain on your air conditioning system. Conversely, during winter, it effectively insulates your home, retaining heat and reducing the amount of energy needed to maintain a comfortable temperature. This results in a more consistent internal temperature, regardless of external weather conditions. The improved thermal mass provided by the siding helps to moderate temperature swings, preventing sudden temperature drops or spikes.

    Reduced Drafts and Air Leaks

    Drafts and air leaks are common culprits behind discomfort in homes, leading to uneven temperatures and energy waste. Insulated siding effectively seals gaps and cracks in your exterior walls, preventing cold air from entering in winter and warm air from escaping in summer. This creates a tighter building envelope, minimizing drafts and improving the overall comfort level within your home. The reduction in air infiltration also contributes to better indoor air quality by preventing the entry of pollutants and allergens from the outside.

    Noise Reduction

    Noise pollution is a significant factor affecting home comfort. Insulated siding plays a crucial role in sound dampening, reducing the amount of external noise that penetrates your home. The added insulation layer acts as a sound barrier, absorbing and deflecting sound waves, creating a quieter and more peaceful indoor environment. This is particularly beneficial for homes located near busy roads, airports, or other noisy areas.

    Noise Level (dB) Without Insulated Siding With Insulated Siding
    Traffic Noise 75-85 60-70
    Construction Noise 90-100 75-85
    Neighbor Noise 55-65 40-50

    Installation Process and Considerations

    Insulated siding installation is a multifaceted process requiring careful planning and execution. While it can be a DIY project for experienced homeowners, professional installation is often recommended, especially for larger homes or complex designs. Understanding the process, potential challenges, and necessary precautions is crucial for a successful outcome.

    The typical installation of insulated siding involves several key steps, beginning with the preparation of the existing exterior walls. This includes removing old siding, repairing any damaged areas, and ensuring the underlying structure is sound. Next, the installation of furring strips or other fastening systems provides a level surface for the new siding and helps to create a proper air gap for insulation. The insulated siding panels are then installed, overlapping appropriately and secured using appropriate fasteners. Finally, trim pieces and accessories are installed to complete the project, ensuring a clean and professional finish. This process varies slightly depending on the specific type of insulated siding used, but the core steps remain consistent.

    Potential Installation Challenges and Solutions

    Several challenges can arise during insulated siding installation. These can range from unforeseen structural issues to difficulties with fitting panels around complex architectural features. Careful planning and preparation can mitigate many of these problems. For instance, improperly prepared surfaces can lead to uneven siding and compromised insulation. Solutions include addressing structural issues before starting installation and using appropriate shims and fasteners to ensure a level surface. Working with difficult angles or curves requires precise measurements and cuts, which may necessitate specialized tools and techniques. In such cases, utilizing pre-fabricated components or seeking professional assistance may prove advantageous.

    DIY Installation Step-by-Step Guide

    For homeowners considering a DIY approach, careful planning and preparation are paramount. A step-by-step guide, coupled with a realistic assessment of one’s skills, is essential. Attempting installation without sufficient knowledge or experience can lead to costly mistakes and potentially compromise the integrity of the home’s exterior.

    1. Thorough Assessment and Planning: Carefully measure the area requiring siding and purchase sufficient materials. This includes siding panels, fasteners, trim, and any necessary underlayment. Account for waste and potential errors. Consider creating detailed diagrams to visualize the installation process.
    2. Surface Preparation: Remove existing siding, ensuring a clean and level surface. Repair any damaged areas of the underlying wall structure. This might involve patching holes, replacing rotten wood, or addressing any other structural issues. A properly prepared surface is critical for a successful installation.
    3. Installation of Furring Strips (if necessary): Install furring strips to create a level surface and air gap behind the siding. Ensure they are properly spaced and securely fastened to the wall. This step improves insulation and ventilation.
    4. Siding Panel Installation: Begin installing the siding panels from the bottom, working upwards. Follow the manufacturer’s instructions carefully regarding overlap and fastening. Ensure proper alignment and spacing between panels. Utilize appropriate tools to ensure accurate cuts and clean lines.
    5. Trim and Accessory Installation: Install trim pieces around windows, doors, and corners, ensuring a neat and professional finish. This adds to the overall aesthetic appeal and protects the edges of the siding.
    6. Final Inspection: Once the installation is complete, conduct a thorough inspection to ensure all panels are securely fastened and there are no gaps or visible imperfections. Address any issues before the project is considered finished.

    Maintenance and Longevity

    Insulated siding, while offering significant long-term benefits, requires some maintenance to ensure its continued performance and aesthetic appeal. Understanding these requirements and the lifespan of different materials will help homeowners make informed decisions and maximize their investment. Proper care can significantly extend the life of your siding and prevent costly repairs down the line.

    Proper maintenance significantly impacts the longevity and performance of insulated siding. Regular cleaning and prompt attention to any damage are key to preserving its energy efficiency and aesthetic value. Neglecting maintenance can lead to premature deterioration and compromise the investment.

    Insulated Siding Maintenance Requirements

    Regular cleaning is crucial to maintain the appearance and performance of insulated siding. This typically involves washing the siding with a mild detergent and water solution using a soft brush or sponge. Power washing should be avoided as it can damage the siding’s surface. Annual inspections are recommended to check for any signs of damage, such as cracks, dents, or loose panels. Promptly addressing any damage will prevent further deterioration and potential water intrusion. For example, a small crack left unrepaired can allow moisture to penetrate, leading to rot or mold growth. Additionally, it’s advisable to trim back any overhanging branches that might scratch or damage the siding during storms.

    Lifespan and Durability of Insulated Siding Types

    The lifespan of insulated siding varies depending on the material used, the quality of installation, and the level of maintenance provided. Vinyl insulated siding, for example, is known for its durability and can last for 30-50 years with proper care. Fiber cement insulated siding, while more expensive initially, offers an even longer lifespan, often exceeding 50 years. Aluminum insulated siding is also quite durable and can last for several decades, but it’s more susceptible to dents and scratches. Wood insulated siding, while aesthetically pleasing, requires more frequent maintenance and has a shorter lifespan than vinyl or fiber cement, typically ranging from 20-30 years depending on the type of wood and the climate. The choice of material should consider the local climate, budget, and desired aesthetic.

    Long-Term Cost-Effectiveness of Insulated Siding

    While the initial cost of insulated siding might be higher than that of non-insulated options, the long-term cost-effectiveness is undeniable. The energy savings resulting from improved insulation can significantly offset the higher upfront investment over the siding’s lifespan. For example, a homeowner might spend an extra $5,000 on insulated siding compared to non-insulated alternatives. However, the reduced energy bills over 30 years could easily exceed this amount, leading to substantial savings. Furthermore, the increased lifespan of insulated siding reduces the need for frequent replacements, further contributing to its long-term cost-effectiveness compared to options requiring more frequent maintenance or replacement. This makes insulated siding a sound financial investment for homeowners seeking both energy efficiency and long-term value.

    Environmental Impact

    Insulated siding offers significant environmental advantages compared to traditional siding options, contributing to a more sustainable building practice and reduced carbon footprint. The benefits extend from the manufacturing process to the long-term energy savings it provides for homeowners.

    The sustainability of insulated siding hinges on the materials used in its production. Many manufacturers utilize recycled content in their products, reducing reliance on virgin materials and minimizing landfill waste. Furthermore, the use of materials with high recycled content contributes to a smaller carbon footprint throughout the product lifecycle. For example, some insulated siding manufacturers incorporate recycled plastic or wood fibers into their formulations, diverting waste from landfills and reducing the demand for new raw materials. The selection of sustainably sourced wood for certain types of insulated siding further enhances its environmental profile.

    Material Sustainability in Insulated Siding Production

    The environmental impact of insulated siding production is significantly influenced by the materials employed. Common materials include vinyl, fiber cement, and engineered wood. Vinyl siding, while often criticized for its reliance on fossil fuels, can incorporate recycled PVC content, reducing its overall environmental impact. Fiber cement siding, a composite material, typically contains a mix of cement, cellulose fibers, and other additives, offering a more sustainable alternative to some traditional siding options. Engineered wood siding often utilizes recycled wood fibers, further minimizing environmental impact. The selection of materials with high recycled content and sustainable sourcing practices directly impacts the overall sustainability of the product.

    Comparison of Carbon Footprint: Insulated vs. Traditional Siding

    A life-cycle assessment comparing insulated siding to traditional options reveals significant differences in carbon footprint. Traditional siding materials, such as wood, often require extensive harvesting and processing, resulting in higher greenhouse gas emissions. Furthermore, the lack of insulation in traditional siding necessitates increased energy consumption for heating and cooling, adding to the overall carbon footprint of the building over its lifetime. Insulated siding, by contrast, reduces energy consumption through improved insulation, thereby offsetting some of the emissions associated with its manufacturing. While the initial manufacturing process of insulated siding may have a slightly higher carbon footprint compared to some traditional options, the long-term energy savings from reduced heating and cooling needs significantly decrease the overall environmental impact over the siding’s lifespan. Studies comparing life-cycle assessments of various siding types often demonstrate that insulated siding presents a lower overall carbon footprint when considering the entire building lifecycle.

    Cost Analysis and Return on Investment

    Investing in insulated siding represents a significant home improvement, and understanding the associated costs and potential return on investment (ROI) is crucial for making an informed decision. This section will analyze the initial investment and demonstrate how to calculate the potential long-term financial benefits of this upgrade.

    The initial cost of purchasing and installing insulated siding varies considerably depending on several factors. These factors include the size of your home, the type of siding chosen (vinyl, fiber cement, etc.), the complexity of the installation (e.g., requiring significant repairs or removal of existing siding), regional labor costs, and the chosen contractor’s pricing. A rough estimate for a mid-sized home might range from $10,000 to $30,000 or more, but it’s essential to obtain multiple quotes from reputable contractors for an accurate assessment specific to your project.

    Calculating Return on Investment for Insulated Siding

    Calculating the ROI for insulated siding involves comparing the initial investment cost to the long-term savings generated through reduced energy consumption. This calculation requires estimating both the upfront costs and the anticipated annual energy savings. Several factors influence the accuracy of this calculation, including your current energy consumption, local energy prices, the R-value of the chosen insulated siding, and climate conditions.

    Sample ROI Calculation

    Let’s consider a hypothetical example: A homeowner invests $15,000 in installing insulated siding on a 1,500 square foot home. Assume their current annual heating and cooling costs are $2,000. After installation, they experience a 20% reduction in energy bills, resulting in annual savings of $400 ($2,000 x 0.20).

    To calculate the simple payback period, divide the initial investment by the annual savings: $15,000 / $400 = 37.5 years. This indicates that it would take approximately 37.5 years to recoup the initial investment through energy savings alone.

    However, a more comprehensive ROI calculation would also consider factors such as increased home value and potential tax credits. For instance, if the insulated siding increases the home’s value by $5,000, this should be added to the total return. Additionally, some regions offer tax incentives for energy-efficient home improvements. These factors can significantly improve the overall ROI, potentially shortening the payback period considerably. Therefore, it is crucial to factor in all relevant financial aspects for a realistic assessment.

    A thorough ROI calculation requires considering not only energy savings but also potential increases in home value and any applicable tax credits or rebates.

    Home Value and Curb Appeal

    Investing in insulated siding offers a significant return, not just in energy savings, but also in increased home value and enhanced curb appeal. A visually appealing and energy-efficient home is highly desirable in the real estate market, leading to a faster sale and a potentially higher selling price. Furthermore, improved curb appeal can positively impact a homeowner’s enjoyment of their property.

    Insulated siding dramatically improves a home’s aesthetic appeal by providing a clean, modern, and well-maintained look. The variety of colors and styles available allows homeowners to personalize their homes to reflect their individual tastes and complement their landscaping. This improved appearance not only enhances the property’s visual attractiveness but also contributes significantly to its market value. Appraisers often consider curb appeal a key factor when assessing a home’s worth.

    Siding Styles and Colors that Enhance Curb Appeal

    The selection of siding style and color significantly impacts a home’s overall curb appeal. Choosing the right combination can transform a house from ordinary to extraordinary. Consider the architectural style of your home when making your selection.

    • Classic Vinyl Siding: Available in a wide range of colors, including traditional earth tones like beige, brown, and gray, as well as bolder options like navy blue or deep red. This style offers a timeless appeal and requires minimal maintenance. Imagine a two-story colonial home with crisp white trim and deep charcoal vinyl siding – a classic and elegant combination.
    • Modern Fiber Cement Siding: Fiber cement offers a sophisticated, low-maintenance alternative to wood siding. Its sleek lines and ability to mimic the look of wood, stone, or stucco makes it ideal for contemporary or craftsman-style homes. Consider a sleek, gray fiber cement siding on a modern ranch-style home, accented with black windows and a dark gray front door.
    • Traditional Wood Siding: While requiring more maintenance, wood siding offers unparalleled natural beauty and character. Natural wood tones like cedar or redwood can create a warm and inviting aesthetic, especially for homes with a rustic or farmhouse design. Picture a charming cabin-style home with stained cedar siding, complementing its stone foundation and surrounding trees.

    Choosing the Right Insulated Siding

    Selecting the ideal insulated siding involves careful consideration of several key factors to ensure optimal performance, longevity, and aesthetic appeal for your home. The right choice depends on your climate, budget, and personal preferences. Understanding these factors will guide you towards a decision that maximizes both energy efficiency and curb appeal.

    Factors Influencing Insulated Siding Selection

    Several critical factors should be evaluated when choosing insulated siding. These include climate conditions, budget constraints, home style, and desired maintenance levels. The interplay of these factors will ultimately determine the most suitable material for your specific needs.

    • Climate: Homes in colder climates will benefit from siding with higher R-values (a measure of thermal resistance), offering superior insulation against freezing temperatures. Conversely, warmer climates might prioritize siding with better ventilation properties to prevent moisture buildup. For example, fiber cement siding might be preferred in a humid coastal climate due to its resistance to moisture damage, while vinyl siding, with its lower cost, might be suitable in a dry, desert climate.
    • Budget: Insulated siding options vary significantly in price. Vinyl siding is generally the most affordable, while fiber cement and engineered wood siding represent higher initial investments. It’s crucial to balance cost with long-term energy savings and durability.
    • Home Style: The architectural style of your home should influence your siding choice. Certain materials complement specific styles better than others. For example, traditional homes might pair well with clapboard siding, while modern homes might look better with sleek, smooth-surface options.
    • Maintenance Requirements: Different siding materials require varying levels of maintenance. Vinyl siding is generally low-maintenance, while wood siding requires regular painting or staining to protect against rot and insect damage. Fiber cement requires less maintenance than wood but more than vinyl.

    Material Comparison and Climate Suitability

    Various materials offer unique properties impacting their suitability for different climates. Understanding these differences is key to making an informed decision.

    Material Climate Suitability Pros Cons
    Vinyl Mild to moderate climates; less suitable for extreme temperatures or high humidity. Affordable, low maintenance, variety of colors and styles. Can be easily damaged, less durable than other options, may fade in intense sunlight.
    Fiber Cement Most climates; durable and resistant to fire, insects, and moisture. Durable, low maintenance, fire-resistant, resists insects and rot. Higher initial cost, heavier than vinyl, requires professional installation.
    Engineered Wood Moderate climates; less suitable for extremely wet or dry conditions. Aesthetically pleasing, relatively durable, can be painted or stained. More susceptible to moisture damage than fiber cement, requires regular maintenance.

    Insulated Siding Selection Decision-Making Flowchart

    A structured approach simplifies the decision-making process. The following flowchart provides a step-by-step guide.

    Begin by assessing your budget and climate. If budget is limited and climate is mild, consider vinyl siding. If budget allows and climate is extreme, consider fiber cement. If aesthetic appeal is prioritized and climate is moderate, consider engineered wood. Finally, factor in maintenance requirements and home style before making a final decision.

    Case Studies and Real-World Examples

    Illustrating the tangible benefits of insulated siding requires looking beyond theoretical data. This section presents real-world examples showcasing the impact of insulated siding on homes, highlighting homeowner experiences and the visual transformations achieved. We’ll explore specific cases to demonstrate the practical advantages and long-term value this upgrade provides.

    Successful Insulated Siding Installations

    The following examples demonstrate the successful application of insulated siding across various home styles and climates. These cases highlight the versatility and effectiveness of this home improvement solution.

    Example 1: A Colonial-Style Home in New England. A 1920s Colonial home in Massachusetts, originally clad in aging clapboard, underwent a complete exterior renovation. The installation of insulated vinyl siding not only dramatically improved the home’s curb appeal—transforming its faded, weathered exterior into a crisp, clean white—but also significantly reduced energy consumption. Before the renovation, the homeowners reported high heating bills during winter. After installation, they experienced a 30% reduction in their annual heating costs. The new siding’s robust construction also provided better protection against harsh New England weather, reducing maintenance needs. The visual transformation involved replacing the aged, uneven clapboard with smooth, uniformly colored vinyl siding, enhancing the home’s architectural details. The before image showed a home with noticeable discoloration and damage, while the after image showcased a revitalized home with a clean, updated appearance.

    Example 2: A Ranch-Style Home in the Southwest. A ranch-style home in Arizona, initially faced with stucco showing signs of cracking and fading, benefited from the installation of insulated fiber cement siding. The light-colored siding reflected sunlight, significantly reducing the interior temperature and lowering cooling costs. The homeowners reported a 20% decrease in their annual cooling bills. Furthermore, the fiber cement siding proved highly resistant to the intense desert sun and high temperatures, maintaining its appearance and structural integrity for years without requiring significant maintenance. The before image displayed the cracked and faded stucco, highlighting its deteriorated condition. The after image showcased the smooth, uniformly colored fiber cement siding, which improved the home’s aesthetic appeal and provided a more modern look.

    Homeowner Testimonials

    Direct feedback from homeowners who have experienced the benefits of insulated siding provides compelling evidence of its effectiveness.

    “We were hesitant about the investment at first, but the energy savings from our new insulated siding have already paid for a significant portion of the installation cost. Beyond that, our home is so much more comfortable year-round,” said Mrs. Johnson, a homeowner from Maine who opted for insulated vinyl siding.

    “The upgrade was a game-changer for our home in Phoenix. The insulated siding kept the interior significantly cooler during the scorching summers, drastically reducing our energy bills and improving our comfort level,” stated Mr. Rodriguez, a homeowner in Arizona who chose insulated fiber cement siding.

    Before-and-After Visual Transformations

    The visual impact of insulated siding is often as striking as its functional benefits.

    Many homes, particularly older ones, exhibit signs of wear and tear, such as peeling paint, damaged siding, and uneven surfaces. The installation of insulated siding not only addresses these issues but also offers a chance to refresh the home’s exterior color and style. Before-and-after photos commonly reveal a dramatic transformation, showcasing the updated appearance of the home. For instance, a weathered wood-sided home might be transformed into a modern, sleek structure with a new color scheme, while a home with outdated vinyl siding can be updated with a more contemporary style and color. The improvement is often so dramatic that it can add significantly to the overall aesthetic appeal and curb appeal of the property. In many cases, the renewed appearance not only improves the home’s value but also enhances the neighborhood’s aesthetic.

    Summary

    Ultimately, the decision to install insulated siding represents a significant investment in your home’s future. By weighing the initial costs against the long-term energy savings, increased comfort, enhanced curb appeal, and improved home value, homeowners can confidently assess the return on investment. The enhanced energy efficiency, reduced noise levels, and improved comfort contribute to a more enjoyable and valuable living space, making insulated siding a worthwhile consideration for any homeowner seeking to upgrade their property.

  • Pros and Cons of Insulated Vinyl Siding

    Pros and Cons of Insulated Vinyl Siding

    Pros and Cons of Insulated Vinyl Siding: Choosing the right siding for your home is a significant decision, impacting both aesthetics and long-term costs. Insulated vinyl siding presents a compelling option, promising energy efficiency and low maintenance. However, understanding its full range of advantages and disadvantages is crucial before making a commitment. This exploration delves into the multifaceted nature of insulated vinyl siding, examining its initial investment, long-term savings, durability, and environmental impact to help you make an informed choice.

    This comprehensive guide provides a balanced perspective, weighing the benefits against the potential drawbacks. We’ll compare insulated vinyl siding to other popular materials, analyzing factors such as lifespan, maintenance requirements, and aesthetic appeal. By the end, you’ll possess the knowledge needed to confidently determine if insulated vinyl siding is the right solution for your home improvement project.

    Initial Cost Comparison

    Choosing the right siding for your home involves careful consideration of various factors, not least of which is the initial cost. While insulated vinyl siding offers many advantages, understanding its price point relative to other common materials is crucial for informed decision-making. This section will compare the upfront costs of insulated vinyl siding with those of wood, fiber cement, and aluminum siding.

    Average Costs Per Square Foot of Different Siding Materials

    The initial cost of siding installation varies significantly depending on the material chosen. Labor costs, material quality, and regional differences all play a role. The following table provides average cost estimates per square foot for various siding options. It’s important to remember that these are averages, and actual costs can fluctuate based on several factors.

    Siding Material Average Cost Per Square Foot (USD) Range (USD) Notes
    Insulated Vinyl Siding $8-$15 $5 – $20+ Includes installation; cost varies greatly depending on features, thickness, and installation complexity.
    Wood Siding $10-$30 $7 – $40+ Price varies dramatically based on wood type (e.g., cedar, redwood) and quality. Requires more maintenance.
    Fiber Cement Siding $12-$25 $8 – $35+ Durable and low-maintenance, but typically more expensive than vinyl.
    Aluminum Siding $7-$12 $5 – $18+ Generally less expensive than vinyl or fiber cement, but may not offer the same insulation value.

    Factors Influencing the Initial Cost of Insulated Vinyl Siding Installation

    Several factors contribute to the overall cost of installing insulated vinyl siding. Understanding these factors allows for more accurate budgeting and informed comparisons with other siding options.

    Labor Costs: Labor costs are a significant component of the total installation expense. The complexity of the project, the size of the house, and the experience level of the installer all influence labor costs. A more complex project with intricate detailing will generally cost more to install than a simple, straightforward job.

    Material Quality: The quality of the insulated vinyl siding itself impacts the price. Higher-quality siding often features thicker panels, improved insulation properties, and more durable materials, resulting in a higher initial cost. Conversely, lower-quality siding may be less expensive but may have a shorter lifespan and require more frequent repairs.

    Regional Variations: Regional differences in labor rates, material availability, and permitting requirements can affect the total cost. Areas with high labor costs or limited access to materials will likely have higher installation costs than regions with more favorable conditions. For example, installation costs in major metropolitan areas tend to be higher than those in rural areas.

    Long-Term Cost Savings

    Insulated vinyl siding offers significant long-term cost savings primarily through reduced energy consumption and lower maintenance needs. While the initial investment may be higher than some other siding options, these savings accumulate over the lifespan of the siding, often making it a financially sound choice in the long run.

    The insulation properties of insulated vinyl siding work by creating a barrier that reduces heat transfer between the interior and exterior of your home. This means less energy is required to heat your home in the winter and cool it in the summer. For example, a home in a climate with average winter temperatures of 30°F and summer temperatures of 90°F could see a reduction in heating and cooling costs of 10-15% or more depending on the existing insulation levels and the R-value of the vinyl siding. This translates to substantial savings over a period of 10, 20, or even 30 years. A homeowner with an annual energy bill of $2000 could potentially save $200-$300 annually, accumulating to thousands of dollars in savings over the lifetime of the siding. This savings is further amplified by the increasing cost of energy.

    Maintenance Cost Comparison

    The long-term maintenance costs associated with insulated vinyl siding are generally lower compared to other siding materials such as wood or aluminum. This is due to the durability and low-maintenance nature of vinyl.

    • Vinyl Siding: Vinyl siding is resistant to rot, insect infestation, and warping. It typically requires only occasional cleaning with soap and water to maintain its appearance. Repairs are infrequent and usually involve replacing individual panels, which is relatively inexpensive and easy. The lifespan of properly installed vinyl siding can exceed 30 years, minimizing the need for complete replacement.
    • Wood Siding: Wood siding requires regular painting or staining to prevent deterioration and insect damage. It is susceptible to rot, warping, and cracking, necessitating more frequent and costly repairs. The lifespan of wood siding is significantly shorter than vinyl, often requiring replacement within 15-20 years.
    • Aluminum Siding: While aluminum siding is durable and relatively low-maintenance, it can dent easily and is prone to fading over time. Repairs can be more complex than with vinyl, potentially involving specialized tools and techniques. Aluminum siding, while lasting a long time, may require repainting to maintain its appearance.

    Durability and Lifespan

    Insulated vinyl siding offers a compelling combination of aesthetics and longevity, making it a popular choice for homeowners. Understanding its durability and lifespan, compared to other materials, is crucial for making an informed decision. This section will explore the expected lifespan of insulated vinyl siding and its resilience against various weather conditions, providing a comparative analysis with other common siding options.

    Insulated Vinyl Siding Lifespan and Maintenance Compared to Other Materials

    The lifespan of siding varies significantly depending on the material, quality of installation, and environmental factors. Proper installation and regular maintenance can extend the life of any siding. The following table provides a general comparison of expected lifespans and typical maintenance needs for several common siding materials. Note that these are estimates, and actual lifespans can vary.

    Siding Material Expected Lifespan (Years) Maintenance Needs Cost Considerations
    Insulated Vinyl Siding 30-50+ Occasional cleaning, occasional repair of minor damage. Relatively high initial cost, but lower long-term maintenance costs.
    Wood Siding 20-40 Regular painting or staining, occasional repair or replacement of damaged boards. Prone to rot and insect infestation. Moderate initial cost, but higher long-term maintenance costs.
    Aluminum Siding 30-50 Occasional cleaning, repainting may be needed if desired. Moderate initial cost, relatively low maintenance costs.
    Fiber Cement Siding 50+ Occasional cleaning, repainting every 10-15 years. High initial cost, but very low maintenance costs.

    Resistance to Weather Conditions

    Insulated vinyl siding is engineered to withstand a wide range of weather conditions. Its resistance to extreme temperatures prevents expansion and contraction issues common with wood or aluminum siding, minimizing warping and cracking. The material’s inherent water resistance significantly reduces the risk of moisture damage, rot, and mold growth. While impact-resistant, insulated vinyl siding may dent or crack from severe impacts, such as a large hailstone or falling branch. However, individual panels can usually be replaced relatively easily and inexpensively compared to repairing damage to other siding materials. For example, a dent in a vinyl siding panel might require only replacing the damaged panel, while a similar dent in wood siding might require significant repair or replacement of multiple boards. The low maintenance needs of vinyl siding, especially compared to wood, are a significant advantage in harsh climates. For instance, in regions with frequent snow and ice, the resistance to moisture damage reduces the risk of costly repairs associated with water intrusion and subsequent rot.

    Aesthetic Appeal and Design Options

    Insulated vinyl siding offers a surprisingly diverse range of aesthetic options, moving beyond the perception of a purely functional material. Homeowners can achieve a variety of looks, from traditional to contemporary, significantly impacting curb appeal and property value. The availability of numerous colors, textures, and styles allows for personalized expression and seamless integration with existing architectural details.

    The impact of insulated vinyl siding on a home’s curb appeal is substantial. Careful selection of color, texture, and style can dramatically enhance the visual appeal, creating a more welcoming and attractive exterior. Conversely, a poorly chosen siding can detract from the home’s overall aesthetic. For example, a stark white siding might clash with a home’s brickwork or landscaping, while a muted, earth-toned option could blend seamlessly, enhancing the natural surroundings. The right siding choice can transform a house into a home that reflects the owner’s personality and taste.

    Color Variety and Options

    Insulated vinyl siding is available in a wide spectrum of colors, ranging from classic neutrals like white, beige, and gray to bolder hues such as deep blues, reds, and greens. Many manufacturers offer color palettes designed to coordinate with popular architectural styles and regional aesthetics. For example, a craftsman-style home might benefit from warm earth tones, while a modern home could be enhanced by cool grays or blacks. The permanence of the color, thanks to the siding’s UV-resistant properties, also contributes to long-term aesthetic appeal. This ensures the home maintains its fresh look for years to come, avoiding the fading and discoloration common with other materials.

    Texture and Style Choices

    Beyond color, insulated vinyl siding offers a variety of textures to mimic the appearance of other materials, such as wood, stone, or stucco. This allows homeowners to achieve the desired aesthetic without the high maintenance requirements of those materials. For instance, siding that replicates the look of cedar shakes can provide a rustic charm, while a smooth, stucco-like finish offers a clean, contemporary feel. Different profiles and panel sizes further contribute to the design possibilities. Some manufacturers offer wider panels for a more modern look, while others provide narrower panels to emulate traditional clapboard. The varied styles allow homeowners to tailor the appearance of their homes to their individual preferences and architectural style.

    Impact on Overall Curb Appeal

    The choice of insulated vinyl siding significantly impacts the overall curb appeal of a home. A well-chosen siding complements the home’s architecture, landscaping, and surrounding environment, creating a cohesive and visually pleasing exterior. A poorly chosen siding, however, can create a jarring contrast, detracting from the home’s aesthetic value. For example, a brightly colored siding on a traditionally styled home might appear out of place, while a dark-colored siding on a small home could make it appear smaller and less inviting. Careful consideration of color, texture, and style, along with the home’s existing features and the surrounding landscape, is crucial in achieving a visually appealing and harmonious result.

    Installation Process and Difficulty

    Insulated vinyl siding installation is a relatively straightforward process, though it does require some skill and attention to detail to ensure a professional-looking and long-lasting result. Proper installation is crucial for maximizing the benefits of the siding, including its energy efficiency and weather protection. While a homeowner with some DIY experience might attempt the installation, it’s often recommended to hire experienced professionals for larger projects to ensure proper techniques are used and the warranty remains valid.

    The typical installation process for insulated vinyl siding involves several key steps. These steps are designed to create a seamless and durable exterior wall covering that provides both aesthetic and functional benefits.

    Typical Installation Steps

    The installation process typically begins with preparation and ends with final inspections and clean-up. A well-executed installation ensures the longevity and performance of the insulated vinyl siding.

    • Preparation: This crucial first step involves measuring the area to be sided, ordering the necessary materials (including starter strips, J-channels, and trim), and preparing the existing wall surface. This may involve removing old siding, repairing any damaged areas, and ensuring the wall is clean and dry.
    • Installation of Flashing and Water Barriers: Before siding installation, proper flashing and water barriers are installed around windows, doors, and other openings to prevent water penetration. This step is critical for preventing water damage and maintaining the integrity of the wall system.
    • Starter Strip Installation: A starter strip is installed at the bottom of the wall to provide a level starting point for the siding panels. This ensures a straight and even installation.
    • Siding Panel Installation: Insulated vinyl siding panels are then installed, overlapping each other and engaging with the locking mechanism. This process is typically done from bottom to top, ensuring each panel is properly aligned and secured.
    • Corner and J-Channel Installation: Corner and J-channel pieces are used to finish the edges of the siding and create a neat, professional look. These pieces are installed to neatly cover exposed edges and corners.
    • Trim and Accessory Installation: Finally, various trim pieces, such as window and door trim, are installed to complete the look and provide additional protection. These pieces add the finishing touches and ensure a professional look.
    • Final Inspection and Clean-up: A thorough inspection is conducted to ensure all panels are properly installed and there are no gaps or loose pieces. Any necessary adjustments are made, and the area is cleaned up.

    Installation Difficulty Compared to Other Siding Types

    The installation difficulty of insulated vinyl siding is generally considered moderate. Compared to other siding types, it presents a different set of challenges and advantages.

    • Compared to Wood Siding: Insulated vinyl siding is generally easier to install than wood siding. Wood siding requires more precise cuts, more careful handling to avoid damage, and often needs more specialized tools. Wood also requires regular maintenance such as painting or staining.
    • Compared to Fiber Cement Siding: Fiber cement siding is heavier and more difficult to handle and cut than vinyl siding, requiring more physical effort and specialized tools. It also requires more careful handling to avoid breakage.
    • Compared to Aluminum Siding: Aluminum siding can be easier to install than insulated vinyl siding in some aspects, particularly in terms of weight. However, aluminum siding can be more prone to denting and requires careful handling to avoid damage.

    Environmental Impact

    Insulated vinyl siding presents a complex environmental profile, encompassing both the manufacturing process and the eventual disposal of the material. Understanding its impact requires considering its lifecycle, from raw material extraction to end-of-life management, and comparing it to alternatives. This section will explore the environmental considerations associated with insulated vinyl siding.

    The manufacturing of insulated vinyl siding is energy-intensive. The production of vinyl involves the use of fossil fuels, primarily natural gas, resulting in greenhouse gas emissions. Furthermore, the creation of the insulating foam core often involves the use of blowing agents, some of which have been linked to ozone depletion and global warming. The transportation of raw materials and finished products also contributes to the overall carbon footprint.

    Manufacturing Processes and Emissions

    Vinyl siding production is a multi-stage process beginning with the extraction and processing of raw materials, including petroleum-based PVC (polyvinyl chloride) and additives. The polymerization of PVC is energy-intensive and releases volatile organic compounds (VOCs) into the atmosphere. The manufacturing of the foam core, typically polyurethane or polyisocyanurate, also contributes to greenhouse gas emissions through the use of blowing agents. While manufacturers are increasingly adopting more environmentally friendly blowing agents, the overall impact remains a significant consideration. The exact emission levels vary depending on the specific manufacturing processes and the chosen materials. Life cycle assessments (LCAs) conducted by independent organizations offer more detailed breakdowns of emissions associated with different manufacturers and product formulations.

    Disposal and Recycling of Vinyl Siding

    Disposal of vinyl siding poses another environmental challenge. Vinyl siding is not readily biodegradable, and landfilling it contributes to the accumulation of waste in landfills. While some vinyl siding can be recycled, the recycling infrastructure for this material is not as well-developed as for other building materials. The recycling process itself can also consume energy and resources. Many municipalities do not have dedicated recycling programs for vinyl siding, leading to its disposal in landfills where it can persist for centuries. The incineration of vinyl siding, while reducing landfill volume, releases harmful pollutants into the air if not properly managed. This makes responsible disposal crucial for minimizing the environmental impact.

    Comparison with Other Siding Materials

    The environmental impact of insulated vinyl siding must be weighed against other siding options. For instance, wood siding, while renewable, often requires the use of pesticides and herbicides during its cultivation and can have a significant embodied carbon footprint depending on its source and transportation. Fiber cement siding, though durable and relatively low-maintenance, has a high embodied energy content due to its manufacturing process. Metal siding, often made from recycled materials, has a lower carbon footprint than vinyl but can contribute to light pollution and requires significant energy for production. A comprehensive comparison requires considering the entire lifecycle of each material, including manufacturing, transportation, installation, maintenance, and disposal. Independent LCA studies provide valuable data for making informed comparisons.

    Maintenance Requirements

    Insulated vinyl siding is renowned for its low-maintenance nature, a significant advantage for homeowners. However, while it requires less upkeep than many other siding materials, regular care ensures its longevity and continued aesthetic appeal. Understanding the necessary maintenance tasks and comparing them to alternatives helps homeowners make informed decisions.

    Regular cleaning is the cornerstone of maintaining insulated vinyl siding. Dirt, pollen, and other airborne debris can accumulate, dulling the siding’s appearance and potentially trapping moisture. This can lead to discoloration or even damage over time.

    Cleaning Insulated Vinyl Siding

    Cleaning insulated vinyl siding is a straightforward process. A simple solution of mild detergent and water, applied with a soft-bristled brush or sponge, is usually sufficient. For stubborn stains, a pressure washer can be effective, but it’s crucial to maintain a safe distance to avoid damaging the siding. Always rinse thoroughly with clean water afterward to remove any soap residue. Annual cleaning is recommended, with more frequent cleaning in areas with heavy pollution or tree cover. Avoid harsh chemicals or abrasive cleaners, as these can scratch or damage the vinyl surface.

    Repairing Damaged Insulated Vinyl Siding

    While durable, insulated vinyl siding can sometimes be damaged. Minor scratches or dents may only require cleaning and potentially some touch-up paint. More significant damage, such as cracks or holes, may necessitate replacing individual panels. This is generally a relatively easy repair for DIY homeowners with basic tools, but larger repairs or extensive damage might require professional assistance. The ease of replacing individual panels is a key advantage over some other siding materials, where damage may necessitate more extensive and costly repairs.

    Maintenance Comparison with Other Siding Options

    Compared to wood siding, insulated vinyl requires significantly less maintenance. Wood siding needs regular painting or staining to prevent rot and insect infestation, and it’s susceptible to warping and cracking. Aluminum siding, while durable, can dent easily and may require repainting to maintain its appearance. Fiber cement siding, while very durable, is more challenging to repair and requires more intensive cleaning than vinyl. Brick, stone, and stucco, though highly durable, are the most demanding in terms of cleaning and repair, often requiring professional assistance for significant maintenance. The low-maintenance nature of insulated vinyl siding significantly reduces both time and cost commitments compared to these alternatives.

    Warranty and Guarantees

    Choosing insulated vinyl siding involves a significant investment, making the manufacturer’s warranty a crucial factor in your decision. Understanding the terms and conditions of these warranties is vital for protecting your investment and ensuring long-term satisfaction. This section details typical warranty offerings and highlights some key differences among manufacturers.

    Manufacturers typically offer warranties covering various aspects of their insulated vinyl siding products. These warranties often include a limited lifetime warranty on the material itself, protecting against defects in manufacturing such as cracking, fading, or peeling. Additionally, many manufacturers offer warranties against damage from extreme weather conditions, such as hail or high winds. The specific coverage and duration can vary significantly, however, depending on the brand and the specific product line. It’s essential to read the fine print carefully before making a purchase.

    Typical Warranty Coverage

    Most manufacturers provide warranties covering defects in material and workmanship. This typically means that if the siding develops a defect due to a manufacturing flaw within the warranty period, the manufacturer will replace the defective siding at no cost to the homeowner. Some warranties extend to cover issues arising from normal wear and tear, while others specify exclusions for damage caused by improper installation or acts of God. For example, a manufacturer might offer a 50-year warranty against fading, but this might not cover damage caused by a severe hurricane. The warranty document will explicitly outline these conditions.

    Comparison of Warranty Offerings

    While comparing warranties across different manufacturers requires reviewing individual documents, some general trends can be observed. Companies known for higher-end products often offer more comprehensive warranties with longer coverage periods. For instance, one manufacturer might offer a lifetime warranty against fading and cracking, while another might offer a shorter, limited warranty with more restrictions. Similarly, some warranties cover labor costs associated with repairs or replacements, while others only cover the cost of the materials. A homeowner considering different brands should compare these factors carefully to determine the best value. It is advisable to obtain warranty documentation from multiple manufacturers and compare the details of their offerings side-by-side. Pay close attention to the fine print and understand the limitations and exclusions before making a purchasing decision. The most comprehensive warranty isn’t always the best; the best warranty is the one that best fits your needs and expectations.

    Sound Insulation Properties

    Insulated vinyl siding offers a degree of sound insulation, though it’s not its primary function. The insulating foam core contributes to noise reduction by absorbing some sound energy before it reaches the underlying wall structure. However, it’s crucial to understand that the level of sound dampening provided is relatively modest compared to specialized acoustic materials.

    The noise reduction provided by insulated vinyl siding stems primarily from the air space created by the foam core. This air gap acts as a barrier, hindering the transmission of sound waves. The density and thickness of the foam core directly impact its sound-absorbing capabilities; thicker, denser foam offers better sound insulation. The effectiveness is also influenced by the overall construction of the building, including the wall assembly and other materials used.

    Comparison of Noise Reduction with Other Siding Materials

    Insulated vinyl siding’s sound insulation properties are comparable to, or slightly better than, standard vinyl siding, which offers minimal sound dampening. However, it generally falls short of materials specifically designed for acoustic performance, such as solid wood siding or certain types of fiber cement siding. These materials, due to their density and mass, offer superior sound absorption and reduction capabilities. For instance, a thick, solid wood wall would demonstrably reduce noise more effectively than insulated vinyl siding, due to the wood’s density and inherent sound-dampening properties. Similarly, engineered wood siding products often outperform insulated vinyl siding in acoustic performance. The choice of siding material for noise reduction should be carefully considered based on the specific needs and priorities of the project, weighing the benefits against other factors like cost, maintenance, and aesthetic appeal.

    Resistance to Pests and Mold

    Insulated vinyl siding offers several advantages regarding pest and mold resistance, contributing to its long-term durability and low-maintenance profile. Unlike wood siding, which is susceptible to various forms of damage, vinyl’s composition provides a significant barrier against many common household pests and the growth of mold and mildew.

    The inherent properties of vinyl make it an unattractive habitat for many insects and pests. Termites, for example, find it difficult to penetrate and digest vinyl, unlike wood. Similarly, other wood-boring insects are deterred by the material’s non-porous nature. This resistance reduces the risk of structural damage and the need for costly pest control treatments.

    Pest Resistance of Insulated Vinyl Siding

    Insulated vinyl siding’s resistance to pests stems from its composition and manufacturing process. The material is non-porous, meaning it doesn’t provide the necessary food source or moisture for many insects to thrive. This is in stark contrast to wood siding, which is porous and readily absorbs moisture, creating an ideal breeding ground for insects and encouraging decay. Furthermore, the solid, continuous surface of vinyl siding leaves little space for insects to burrow or nest. While no material is completely pest-proof, vinyl siding offers a significant level of protection compared to traditional wood alternatives. For instance, in regions with high termite activity, choosing vinyl siding can significantly reduce the likelihood of infestation and the associated repair costs.

    Mold and Mildew Resistance of Insulated Vinyl Siding

    Vinyl siding’s resistance to mold and mildew is equally important. The non-porous nature of the material prevents moisture absorption, hindering the growth of mold and mildew. This is crucial because moisture is a primary catalyst for fungal growth. Unlike wood, which can retain moisture and become a breeding ground for mold and mildew, vinyl siding sheds water effectively, minimizing the risk of fungal colonization. The smooth surface of vinyl siding also makes it easier to clean, further reducing the chances of mold and mildew buildup. Regular cleaning with soap and water is usually sufficient to maintain the cleanliness and prevent the growth of these organisms. This characteristic contributes to the overall longevity and aesthetic appeal of the siding, reducing the need for costly repairs or replacements due to mold damage. This contrasts sharply with wood siding, which often requires more frequent cleaning and treatment to prevent mold and mildew problems.

    Resale Value Impact

    Insulated vinyl siding’s impact on a home’s resale value is a complex issue, influenced by various factors beyond just the siding itself. While it offers several benefits that can indirectly boost value, the direct impact is often subtle and depends heavily on the overall condition of the property and prevailing market trends. A well-maintained home with attractive, high-quality insulated vinyl siding will generally command a better price than a comparable home with older, damaged, or less desirable siding. However, it’s crucial to remember that siding is just one aspect of a home’s overall appeal.

    The presence of insulated vinyl siding can positively influence a home’s resale value primarily by enhancing curb appeal and energy efficiency. Potential buyers are often attracted to homes that appear well-maintained and offer lower utility costs. Energy-efficient features, such as insulated siding, are increasingly sought after in today’s market, reflecting a growing awareness of environmental concerns and long-term cost savings. This translates to a potentially higher asking price and faster sale compared to homes with less energy-efficient exterior cladding. However, overspending on premium siding in a neighborhood where such features are not highly valued might not yield a proportional return on investment.

    Comparison of Siding Materials’ Impact on Market Value

    Different siding materials have varying effects on a home’s market value. High-end materials like fiber cement or cedar shake generally command a premium, reflecting their higher initial cost and perceived prestige. However, these options also require more maintenance and may not always be the most cost-effective choice. Aluminum siding, while durable, is often perceived as less aesthetically pleasing and may not add significant value compared to vinyl. Brick, stone, and stucco are considered high-value materials, but their installation costs are considerably higher than vinyl siding. The optimal choice depends on a variety of factors including the home’s style, location, and the target buyer demographic. For example, a contemporary home in a modern development might benefit more from fiber cement siding than a traditional home in a suburban neighborhood, where vinyl siding might be perfectly appropriate and competitive. In many cases, insulated vinyl siding presents a strong balance between cost-effectiveness, durability, and aesthetic appeal, making it a viable option for increasing a home’s resale value without excessive investment.

    Ultimate Conclusion

    Ultimately, the decision of whether or not to install insulated vinyl siding hinges on a careful consideration of individual needs and priorities. While the initial cost may be higher than some alternatives, the potential for long-term energy savings and low maintenance can offset this expense. The durability, aesthetic versatility, and relatively straightforward installation process further enhance its appeal. However, potential environmental concerns and limitations in design flexibility warrant careful evaluation. By weighing the pros and cons outlined in this guide, homeowners can make a well-informed decision that aligns with their budget, lifestyle, and long-term goals.

  • Free Siding Replacement Estimate: What to Expect

    Free Siding Replacement Estimate: What to Expect

    Free Siding Replacement Estimate: What to Expect? Securing a free estimate for siding replacement seems like a great deal, but understanding the nuances is crucial. This process involves more than just a quick price quote; it encompasses material selection, labor costs, potential hidden expenses, and navigating contractual agreements. A well-informed approach ensures a smooth and cost-effective renovation.

    This guide will walk you through each step, from understanding what’s typically included (and excluded) in a free estimate to comparing multiple offers, negotiating contracts, and managing the project timeline. We’ll cover essential factors influencing costs, such as house size, material choices (vinyl, wood, fiber cement, etc.), and regional labor rates. By the end, you’ll be equipped to make informed decisions and avoid potential pitfalls.

    Understanding “Free Siding Replacement Estimate” Offers

    The term “free siding replacement estimate” is a common marketing tactic used by many contractors. While appealing, it’s crucial to understand what’s included and what potential hidden costs might arise. A thorough understanding will empower you to make informed decisions and avoid unpleasant surprises during your home improvement project.

    The typical components included in a free estimate usually involve an on-site inspection of your existing siding, measurements of the area needing replacement, and a detailed breakdown of the proposed materials and labor. A reputable contractor will provide you with different siding options, outlining the price differences and the advantages and disadvantages of each. They should also offer a projected timeline for the project. However, the scope of a “free” estimate can vary significantly between contractors.

    Components of a Free Estimate

    A comprehensive free estimate should clearly list the materials to be used, the labor costs associated with removal and installation, and any permits or fees required by your local municipality. A detailed breakdown of the project timeline should also be included, outlining expected start and completion dates. Some contractors may also include a warranty on their workmanship or materials. However, it’s vital to carefully review all the documents provided to ensure complete transparency.

    Potential Hidden Costs Associated with “Free” Estimates

    While the initial estimate might be free, several hidden costs can quickly accumulate. These can include unforeseen repairs to underlying sheathing or structural issues discovered during the siding removal process. For example, if rotted wood is found beneath the siding, the cost of repairing or replacing this damaged material will be an additional expense. Similarly, if the existing flashing around windows and doors is deteriorated, this will need replacement, adding to the overall cost. Additional costs may also include disposal fees for the old siding, and unexpected increases in material prices due to market fluctuations. Always ask for a detailed list of potential additional costs upfront to avoid any surprises.

    Comparison of Siding Materials and Their Impact on Cost

    Different siding materials significantly impact the overall cost of your replacement project. Vinyl siding, a popular and budget-friendly option, typically falls into a lower price range compared to other materials. However, its lifespan and aesthetic appeal may be less than those of more expensive options. Fiber cement siding offers superior durability and fire resistance, but it’s generally more expensive than vinyl. Wood siding, known for its classic beauty, is often the most costly option, demanding higher initial investment and more ongoing maintenance. Finally, metal siding, while durable and low-maintenance, also typically sits in a higher price bracket than vinyl. The choice of material significantly influences the final cost of the project, necessitating careful consideration of your budget and long-term goals. For instance, a 1,500 square foot home might see a difference of several thousand dollars between vinyl and fiber cement siding installation.

    The Estimation Process

    Obtaining an accurate estimate for siding replacement is crucial for budgeting and planning your project. A thorough estimation process involves several key steps, ensuring you understand the scope of work and associated costs before committing to any contract. This process should be transparent and collaborative between you and the contractor.

    A professional siding replacement estimate typically involves a detailed assessment of your home’s exterior, followed by a comprehensive proposal outlining the materials, labor, and timeline. This allows for a clear understanding of the project’s financial implications and ensures that there are no unexpected surprises down the line.

    Contractor Selection and Initial Contact

    Before any on-site assessment, homeowners should thoroughly research potential contractors. This involves checking online reviews, verifying licenses and insurance, and requesting references. Initial contact should establish the scope of the project – clarifying whether the estimate includes material costs, labor, permits, and waste disposal. A reputable contractor will be happy to answer your questions and provide detailed information upfront.

    On-Site Assessment and Measurements

    The contractor will conduct a thorough inspection of your existing siding, noting its condition, type, and any damage. Precise measurements of your home’s exterior walls will be taken to determine the quantity of materials needed. They will also assess the complexity of the project, considering factors like the presence of windows, doors, and architectural details. For example, a home with intricate trim work or multiple stories will likely require more time and labor.

    Material Selection and Cost Calculation

    After the assessment, the contractor will present various siding options, outlining their costs and benefits. This often involves discussing different materials (vinyl, fiber cement, wood, etc.), colors, and styles. The contractor will then calculate the total cost of materials based on the measurements and your chosen options. Accurate cost calculation also includes factoring in waste, potential material damage during installation, and delivery charges. For example, a high-end fiber cement siding will naturally cost more than standard vinyl siding.

    Labor Cost Estimation and Timeline

    Labor costs are calculated based on the estimated time required for the project. This includes the time for removing the old siding, installing the new siding, and completing any necessary repairs or finishing touches. The contractor will provide an estimated timeline for the project completion, outlining potential delays and unforeseen circumstances. A detailed breakdown of labor costs, including hourly rates and the number of workers involved, should be provided for transparency. A realistic timeline should consider weather conditions, material availability, and potential scheduling conflicts.

    Detailed Estimate and Contract Review

    The final estimate should be a comprehensive document that details all aspects of the project, including a breakdown of material costs, labor costs, permits, and any other associated fees. This document should be reviewed carefully before signing a contract. It’s important to understand all the terms and conditions, payment schedules, and warranty information. A reputable contractor will be happy to clarify any uncertainties and answer any questions you may have before you commit to the project.

    Questions to Ask a Contractor Before Agreeing to an Estimate

    A comprehensive list of questions to ask before agreeing to a siding replacement estimate is essential for a smooth and successful project. These questions cover crucial aspects such as licensing, insurance, experience, materials, and payment terms.

    Sample Homeowner Questionnaire for the Estimation Process

    To ensure a smooth and efficient estimation process, homeowners should prepare a questionnaire to guide their discussions with contractors. This questionnaire will help gather essential information and compare different proposals effectively. The questionnaire should cover aspects such as contractor experience, licensing, insurance coverage, material options, warranty details, payment schedules, and the overall project timeline. This organized approach will help ensure you make an informed decision.

    Question Category Specific Question Examples
    Contractor Information What is your company’s experience with siding replacement? Are you licensed and insured? Can I see copies of your licenses and insurance certificates? May I have references from previous clients?
    Project Scope What is included in the estimate (materials, labor, permits, cleanup)? What is your process for addressing unexpected issues during the project? Will you provide a detailed timeline for the project?
    Materials and Warranties What types of siding do you offer? What are the warranties on the materials and workmanship? What is your process for handling material defects or damage during installation?
    Payment Terms What are your payment terms and schedule? What payment methods do you accept?
    Project Timeline What is your estimated completion time for the project? What is your contingency plan for delays?

    Factors Influencing Estimate Costs

    Several key factors contribute to the final cost of a siding replacement project. Understanding these factors allows homeowners to better prepare for the expense and to have more informed discussions with contractors. These factors interact in complex ways, so it’s crucial to consider them holistically rather than in isolation.

    Several elements significantly impact the overall cost of your siding replacement. These factors are interconnected and their influence varies depending on the specific project details. Accurate cost estimations require a thorough assessment of each aspect.

    House Size and Complexity

    The size of your house is a primary determinant of the overall cost. Larger houses naturally require more materials and labor, leading to a higher estimate. Beyond simple square footage, the complexity of your home’s design significantly influences the cost. A house with many angles, multiple stories, intricate architectural details (such as dormers or bay windows), or varied siding heights will require more time and specialized techniques, increasing labor costs. For example, a simple ranch-style home will likely have a lower estimate than a Victorian-style home with numerous gables and decorative trim. The presence of difficult-to-access areas, such as high gables or narrow sections, also adds to the complexity and expense.

    Labor Costs and Material Availability

    Labor costs represent a substantial portion of the total estimate. These costs vary based on factors such as geographical location, the contractor’s experience and reputation, and the current demand for skilled labor in the construction industry. Areas with higher costs of living or a shortage of qualified contractors will typically have higher labor rates. The type of siding chosen also influences labor costs; some materials, like intricate stone veneer, require more specialized installation techniques and therefore more expensive labor.

    Material availability and pricing fluctuate with market conditions. The type of siding selected (e.g., vinyl, wood, fiber cement, metal) directly impacts the material cost. Certain materials, such as high-end wood siding or specialized metal panels, can be significantly more expensive than standard vinyl siding. Current market conditions, supply chain disruptions, and seasonal demand can all affect material prices. For instance, a sudden increase in demand for a particular type of siding due to a natural disaster could lead to higher costs and potential delays in project completion.

    Comparing Multiple Estimates

    Receiving multiple siding replacement estimates is crucial for making an informed decision. Comparing these estimates effectively ensures you get the best value for your investment and avoid potential pitfalls. A systematic approach, focusing on key factors, will help you navigate this process with confidence.

    Comparing estimates involves more than simply looking at the bottom-line price. Several critical aspects need careful consideration to ensure a fair and accurate comparison. Ignoring these factors can lead to choosing an option that seems cheaper initially but proves more expensive in the long run due to hidden costs or inferior materials.

    Key Factors in Estimate Comparison

    A thorough comparison requires analyzing several key factors. These factors, when considered together, paint a comprehensive picture of the value each estimate offers. Don’t solely focus on the total cost; instead, dissect the individual components to understand what you are paying for.

    Factor Estimate A Estimate B Estimate C
    Total Cost $15,000 $17,500 $16,000
    Materials Used (Brand & Quality) CertainTeed, mid-range James Hardie, premium LP SmartSide, mid-range
    Labor Costs (Hours & Breakdown) 150 hours, detailed breakdown provided 120 hours, limited breakdown 160 hours, no breakdown provided
    Warranty Details (Length & Coverage) 10-year labor, 25-year material Lifetime labor, 30-year material 5-year labor, 20-year material

    The table above illustrates how three hypothetical estimates differ. Note that Estimate B, despite having the highest total cost, offers premium materials and a lifetime labor warranty. Estimate A presents a balance between cost and warranty, while Estimate C offers the lowest initial cost but with shorter warranty periods. A thorough analysis of these factors allows for a more informed decision, beyond simply choosing the cheapest option.

    Contractual Agreements

    Securing a free siding replacement estimate is only the first step in a potentially significant home improvement project. Understanding the contractual agreements involved is crucial to ensuring a smooth and satisfactory experience. A well-drafted contract protects both the homeowner and the contractor, outlining responsibilities, payment schedules, and dispute resolution mechanisms.

    The importance of carefully reviewing and understanding the contract cannot be overstated. This document legally binds both parties, and overlooking key clauses can lead to unforeseen costs, delays, or even legal disputes. Paying close attention to detail and seeking clarification on any ambiguous points is essential before signing.

    Essential Contract Clauses

    A comprehensive siding replacement contract should include several key clauses to protect your interests. These clauses provide clarity and prevent misunderstandings that could arise during the project.

    • Scope of Work: This section should clearly detail all aspects of the project, including materials, labor, and any preparatory or cleanup work. Specifics like the type and quantity of siding, color, and installation methods should be explicitly stated. Vague descriptions should be avoided.
    • Payment Schedule: The contract should outline a clear payment schedule, including the percentage of payment due at different stages of the project. It should also specify the methods of payment accepted (e.g., check, credit card). Avoid contracts that require full payment upfront.
    • Project Timeline: Realistic start and completion dates should be included, along with contingencies for unforeseen delays. The contract should clearly define who is responsible for delays and their potential impact on the project.
    • Warranty Information: The contract must clearly state the warranty offered on both materials and workmanship. This should specify the duration of the warranty and what it covers. A clear understanding of warranty limitations is crucial.
    • Dispute Resolution: The contract should outline a process for resolving disputes that may arise during the project. This might include mediation or arbitration as an alternative to litigation.
    • Permits and Inspections: The contract should clarify who is responsible for obtaining necessary permits and scheduling inspections. The contractor’s responsibility for ensuring compliance with building codes should be explicitly stated.

    Warranty Information and Limitations

    Warranty information is a critical component of any siding replacement contract. Understanding the warranty’s scope, limitations, and duration is vital for protecting your investment. For instance, a warranty might cover defects in materials but exclude damage caused by external factors like severe weather. The contract should clearly define what is and is not covered under the warranty. Pay close attention to the length of the warranty period; longer warranties typically indicate greater confidence in the quality of materials and workmanship. Also, ensure you understand the process for filing a warranty claim.

    Problematic Contract Clauses

    Some contract clauses can be detrimental to homeowners. Understanding these potential pitfalls can help you negotiate favorable terms or avoid problematic contracts altogether.

    • Unclear or Vague Language: Ambiguous wording can create opportunities for disputes. Avoid contracts with unclear definitions or descriptions of work to be performed.
    • Unrealistic Timelines: Excessively short project timelines might indicate a lack of planning or a willingness to cut corners. Be wary of contracts that seem too good to be true in terms of speed of completion.
    • Limited Liability Clauses: Clauses that severely limit the contractor’s liability for damages or defects should be carefully reviewed and potentially negotiated. A fair contract should provide reasonable protection for both parties.
    • Arbitration Clauses Favoring the Contractor: While arbitration can be a useful dispute resolution method, clauses that heavily favor the contractor’s interests should be avoided. The process should be fair and impartial.
    • Lack of a Detailed Payment Schedule: Contracts that lack a clear payment schedule or require substantial upfront payments can be risky. Progress payments tied to specific milestones are generally preferred.

    Permitting and Inspections

    Obtaining the necessary permits and passing inspections are crucial steps in any siding replacement project. These processes ensure your project complies with local building codes, protects your investment, and safeguards the safety and structural integrity of your home. Failure to obtain permits or pass inspections can lead to fines, project delays, and even legal issues.

    The permitting process for siding replacement varies depending on your location and the specifics of the project. Generally, it involves submitting an application to your local building department, providing detailed plans and specifications of the proposed work, and paying associated fees. These plans typically include details about the type of siding being used, the method of installation, and any changes to the exterior structure of the building. The review process can take several weeks or even months, depending on the workload of the building department and the complexity of the project. Some municipalities offer online portals for permit applications, streamlining the process.

    The Permitting Process for Siding Replacement

    The permitting process typically involves these steps:

    1. Application Submission: Gather all necessary documentation, including property ownership information, project plans, and contractor information. Submit the completed application and required fees to your local building department.
    2. Plan Review: The building department reviews the submitted plans to ensure they comply with local building codes and zoning regulations. This may involve consultations with inspectors or engineers.
    3. Permit Issuance: Once the plans are approved, the building department issues a permit authorizing the commencement of work. This permit should be displayed prominently at the work site.

    The Role of Building Inspections

    Building inspections are conducted at various stages of the project to verify that the work is being performed according to the approved plans and in compliance with building codes. These inspections help ensure the quality of the workmanship, the safety of the installation, and the overall structural integrity of the building. Common inspection points include the preparation of the existing siding, the installation of the new siding, and the final inspection upon completion of the project. Failure to pass an inspection may result in a stop-work order until the necessary corrections are made.

    Navigating the Permitting and Inspection Process: A Step-by-Step Guide

    A clear understanding of the process minimizes delays and potential problems. Here’s a practical guide:

    1. Initial Consultation: Contact your local building department early in the planning stages to inquire about the specific requirements for siding replacement permits in your area.
    2. Prepare Detailed Plans: Work with your contractor to develop comprehensive plans that include details of the materials, installation methods, and any structural modifications.
    3. Submit Application and Fees: Complete the application form accurately and submit it along with the required fees. Keep copies of all submitted documents.
    4. Schedule Inspections: Once the permit is issued, schedule inspections with the building department at the appropriate stages of the project (e.g., before, during, and after siding installation).
    5. Address Inspection Issues: If any issues are identified during an inspection, work with your contractor to address them promptly and schedule a re-inspection.
    6. Obtain Final Approval: Once all inspections are passed, obtain the final approval from the building department.

    Siding Material Options

    Choosing the right siding material is a crucial decision in your home’s exterior renovation. The material you select will significantly impact your home’s aesthetic appeal, longevity, and overall cost. This section will compare and contrast popular siding options, helping you make an informed choice.

    Three of the most common siding materials are vinyl, wood, and fiber cement. Each offers unique advantages and disadvantages regarding cost, durability, and aesthetic appeal. Understanding these differences is key to selecting the best option for your home and budget.

    Vinyl Siding

    Vinyl siding is a popular choice due to its affordability and low maintenance requirements. It’s manufactured from polyvinyl chloride (PVC), making it resistant to moisture, rot, and insect infestation. However, vinyl siding can be susceptible to damage from extreme temperatures and strong impacts. Its lifespan typically ranges from 20 to 40 years, depending on the quality and installation. Aesthetically, vinyl siding offers a wide variety of colors and styles, often mimicking the look of wood or other materials. However, it may not be as visually appealing as natural wood siding to some homeowners.

    Wood Siding

    Wood siding, while more expensive than vinyl, offers a classic and timeless aesthetic. It’s a natural material that can add significant curb appeal to a home. Different types of wood, such as cedar, redwood, and pine, offer varying degrees of durability and resistance to rot and insects. Proper maintenance, including regular painting or staining, is crucial to prolong the lifespan of wood siding, which can range from 30 to 50 years or more with proper care. However, wood siding requires more upkeep than vinyl and is susceptible to damage from moisture, insects, and fire.

    Fiber Cement Siding

    Fiber cement siding combines the durability of cement with the workability of wood. It’s a highly durable material resistant to fire, rot, insects, and moisture. It also offers excellent insulation properties, contributing to energy efficiency. Fiber cement siding is more expensive than vinyl but generally less expensive than high-quality wood siding. Its lifespan is typically longer than vinyl or wood, often exceeding 50 years. Aesthetically, fiber cement siding can mimic the look of wood or other materials, offering a variety of textures and colors. However, it is heavier than vinyl siding, requiring more robust installation techniques.

    Siding Material Comparison

    Material Cost Durability Maintenance
    Vinyl Low Moderate (20-40 years) Low
    Wood High Moderate to High (30-50+ years with proper maintenance) High
    Fiber Cement Medium to High High (50+ years) Low

    Understanding Labor Costs

    Labor costs represent a significant portion of your total siding replacement estimate. Understanding how these costs are determined is crucial for making informed decisions about your project. Several factors influence the final labor cost, and it’s important to be aware of them to avoid unexpected expenses.

    Contractor experience and expertise significantly impact labor costs. Highly experienced and skilled contractors often charge higher hourly or daily rates than less experienced ones. This is because their expertise translates to faster, more efficient work, potentially reducing overall project timelines and minimizing the risk of costly mistakes. Furthermore, experienced contractors often possess a deeper understanding of building codes and regulations, leading to smoother project approvals and fewer delays. Conversely, while a less experienced contractor might offer a lower initial price, potential delays, rework, or material waste could ultimately increase the total project cost.

    Regional Variations in Labor Rates

    Labor rates vary considerably across different regions due to several factors. The cost of living, local demand for skilled labor, and prevailing wage rates all play a role. Areas with a high cost of living generally have higher labor costs to attract and retain qualified contractors. Similarly, regions experiencing a surge in construction activity may see increased competition for skilled labor, driving up wages. For example, a siding replacement project in a major metropolitan area might have significantly higher labor costs compared to a similar project in a rural area. The availability of specialized skills also influences rates; a region with a limited pool of experienced installers of a particular siding type (e.g., fiber cement) may command higher labor costs for that specific type of work.

    Examples of Reasonable Labor Cost Ranges

    Providing precise labor cost ranges is difficult without knowing the specifics of a project (size, complexity, siding type, etc.). However, we can offer some general examples. For a smaller project, such as replacing siding on a single-story, average-sized house with standard vinyl siding, labor costs might range from $3,000 to $6,000. Larger projects, such as replacing siding on a multi-story home with more complex features or using specialized materials like stone or brick veneer, could easily exceed $10,000 or even more. It’s important to remember that these are just rough estimates. Always request a detailed breakdown of labor costs from your contractor to understand what you are paying for. Factors such as the amount of demolition and disposal, scaffolding needs, and the intricacy of the installation process all influence the final labor costs. For instance, a project requiring extensive repairs to underlying sheathing or significant removal of overgrown vegetation will naturally increase the labor component of the estimate.

    Potential Problems and Solutions

    While a free siding replacement estimate offers a valuable starting point, several potential problems can arise during the project. Understanding these potential issues and developing strategies to mitigate them is crucial for a smooth and successful renovation. Proactive planning and clear communication with your contractor can significantly reduce the likelihood of unexpected complications.

    Unforeseen issues during siding replacement projects are common, ranging from minor delays to significant cost overruns. These problems often stem from inaccurate initial assessments, unexpected structural damage, or changes in project scope. However, with careful planning and a collaborative approach with your contractor, many of these issues can be effectively managed.

    Unforeseen Structural Damage

    Discovering underlying structural damage, such as rotted wood or insect infestation, during siding removal is a common problem. This necessitates additional repairs, increasing both the project timeline and cost. Mitigation strategies include a thorough pre-project inspection by a qualified professional. This inspection should include a detailed assessment of the existing siding and underlying structure to identify potential problems before demolition begins. Should unforeseen damage be discovered, a revised estimate should be obtained detailing the additional costs and work required. For example, if significant rot is found behind the existing siding, the contractor might need to replace sections of the house’s sheathing, adding several days to the project and potentially thousands of dollars to the overall cost.

    Material Shortages or Delays

    Supply chain disruptions can lead to delays in obtaining necessary siding materials. This can halt the project until the materials arrive. To mitigate this risk, discuss material availability and lead times with your contractor upfront. Consider selecting readily available materials or allowing for potential delays in the project timeline. For instance, a popular siding color might have a longer lead time than a less popular option. Planning for a potential delay of a week or two can help prevent significant disruption to your schedule.

    Weather-Related Delays

    Adverse weather conditions can significantly impact the project timeline. Rain, snow, or extreme temperatures can make it impossible to work safely and efficiently. Mitigation involves scheduling the project during favorable weather conditions and including contingency plans for potential delays. A well-written contract should clearly outline how weather-related delays will be handled, including whether or not additional costs will be incurred. For example, a contractor might need to halt work for several days due to heavy rain, pushing back the completion date.

    Changes in Project Scope

    Once the project begins, you might decide to make changes to the initial plan. These changes, such as adding extra features or altering the design, can lead to cost overruns and delays. To avoid this, clearly define the project scope before work begins. Any changes should be documented in writing and a revised estimate obtained before proceeding. For instance, deciding to add extra insulation during the siding replacement will require additional materials and labor, impacting the final cost.

    Contractor Communication and Oversight

    Lack of clear communication and inadequate oversight can lead to misunderstandings and errors. Regular communication with the contractor, including on-site visits, helps identify and address potential problems early. A detailed contract outlining the scope of work, payment schedule, and dispute resolution process is essential. For example, a lack of communication might result in the contractor using a different type of siding than initially agreed upon, leading to potential disputes.

    Payment Schedules and Financing Options

    Securing financing and understanding payment schedules are crucial aspects of a siding replacement project. The total cost, your budget, and the contractor’s payment terms will all influence your final decision. This section clarifies typical payment structures and financing choices available to homeowners.

    Payment schedules typically involve a series of installments rather than a single lump-sum payment. The exact schedule varies depending on the project’s size, the contractor’s policies, and any financing agreements in place. Contractors often require a down payment upfront to cover initial materials and labor costs. Subsequent payments may be made at predetermined intervals throughout the project, such as after completion of specific phases (e.g., demolition, installation of underlayment, siding installation). A final payment is usually due upon project completion and final inspection.

    Typical Payment Schedules

    Common payment structures include a tiered approach. For example, a 30% down payment might be required at the contract signing, followed by 30% upon completion of the framing and underlayment, and the final 40% upon project completion and satisfactory inspection. Another approach might involve smaller, more frequent payments, perhaps 10% upon signing the contract, then 10% at the beginning of each major phase, with a final payment at the end. These schedules aim to balance the contractor’s need for timely payment with the homeowner’s desire for payment protection. Always review the detailed payment schedule within your contract before signing.

    Financing Options for Siding Replacement

    Homeowners have several financing avenues for large projects like siding replacement. These options can significantly impact the overall project cost, especially when considering interest charges.

    Home Equity Loans or Lines of Credit (HELOC)

    Home equity loans use your home’s equity as collateral. You borrow a lump sum, repaid with interest over a set term. HELOCs provide access to a revolving line of credit, allowing you to borrow and repay as needed within a specific period. Interest rates are typically lower than unsecured loans, but the risk involves potential foreclosure if you default on payments. Example: A homeowner with significant equity might secure a $15,000 home equity loan at a 6% interest rate over 10 years, resulting in monthly payments of approximately $160.

    Personal Loans

    Unsecured personal loans don’t require collateral. Lenders assess your creditworthiness to determine the loan amount, interest rate, and repayment terms. Interest rates are generally higher than home equity loans due to the increased risk for the lender. Example: A homeowner with good credit might qualify for a $10,000 personal loan at an 8% interest rate over 5 years, leading to monthly payments around $190.

    Contractor Financing

    Some contractors offer in-house financing plans. These often have higher interest rates than traditional loans but can streamline the process and potentially offer more flexible payment options. It’s crucial to compare these options with those from banks or credit unions before committing. Example: A contractor might offer a 0% interest financing plan for 12 months, followed by a higher interest rate for the remaining loan term.

    Credit Cards

    While convenient, using credit cards for a large project like siding replacement can be costly due to high interest rates and potential for accumulating debt. This is generally not recommended unless you can pay off the balance in full before accruing significant interest charges. Example: A homeowner using a credit card with a 18% APR to finance $10,000 could end up paying substantially more than the initial cost due to high interest charges.

    Impact of Payment Plans on Project Cost

    Financing options significantly impact the total project cost. While loans provide upfront capital, interest charges add to the overall expense. Carefully comparing interest rates, loan terms, and monthly payments across different options is vital to choosing the most financially responsible approach. Choosing a longer loan term reduces monthly payments but increases the total interest paid over time. Conversely, shorter-term loans have higher monthly payments but lower overall interest costs.

    Timeline and Project Management

    Understanding the timeline for your siding replacement project is crucial for planning and managing expectations. A realistic schedule considers various factors, including weather conditions, material availability, and the size and complexity of the job. Proper project management ensures a smooth and efficient process, minimizing disruptions and delays.

    The typical siding replacement project involves several distinct phases, each with its own estimated timeframe. These phases are interconnected, and delays in one area can impact the overall project completion date. Careful planning and communication between the contractor and homeowner are key to staying on schedule.

    Project Phases and Timeframes

    A typical siding replacement project can be broken down into several key phases. The duration of each phase can vary depending on the size of the house, the complexity of the job, and weather conditions. However, this sample schedule provides a realistic estimate for a medium-sized single-family home.

    Project Phase Estimated Timeframe Description
    Preparation and Site Survey 1-2 days This involves measuring the house, assessing the existing siding, and identifying any potential problems. The contractor will also discuss the project scope and details with the homeowner.
    Material Ordering and Delivery 1-2 weeks Once the scope of work is finalized, the contractor orders the necessary siding materials. Delivery times can vary depending on material availability and supplier logistics.
    Removal of Old Siding 2-5 days This phase involves carefully removing the existing siding, disposing of the old materials responsibly, and preparing the house for the new siding installation. The duration depends on the type and amount of siding being removed.
    Siding Installation 7-14 days This is the most time-consuming phase, involving the installation of the new siding, ensuring proper flashing and sealing, and maintaining a high-quality finish. The duration depends on the size of the house and the type of siding chosen. For example, installing vinyl siding is generally faster than installing cedar shake siding.
    Final Cleanup and Inspection 1-2 days After the installation is complete, the contractor performs a final cleanup, ensuring the work area is left clean and tidy. A final inspection is conducted to ensure the work meets the agreed-upon specifications.

    Note: This is a sample schedule, and actual timelines may vary depending on specific project circumstances. It is crucial to discuss a detailed project timeline with your contractor before work begins.

    Last Point

    Replacing your siding is a significant investment, and understanding the intricacies of obtaining and evaluating free estimates is paramount. By carefully considering the factors discussed—from material selection and labor costs to contractual agreements and project timelines—you can ensure a successful renovation that meets your budget and expectations. Remember to always compare multiple estimates, ask clarifying questions, and thoroughly review any contract before signing. A well-planned approach will transform your home’s exterior while safeguarding your financial interests.

  • How to Get Accurate Siding Replacement Estimates

    How to Get Accurate Siding Replacement Estimates

    How to Get Accurate Siding Replacement Estimates is crucial for a successful home improvement project. Replacing your siding is a significant investment, and understanding the process of obtaining precise estimates is paramount to avoiding costly surprises and ensuring a smooth renovation. This guide will equip you with the knowledge to navigate the complexities of siding replacement, from understanding the scope of work to negotiating fair prices and securing appropriate warranties.

    This comprehensive guide breaks down the process into manageable steps, covering everything from accurately measuring your home’s exterior to selecting reputable contractors and understanding the intricacies of different siding materials. We’ll explore how to decipher detailed estimates, identify potential hidden costs, and navigate the complexities of permits, inspections, and financing options. By the end, you’ll be confident in your ability to obtain accurate estimates and make informed decisions for your siding replacement project.

    Understanding the Scope of Work

    Accurately estimating the cost of siding replacement requires a thorough understanding of the project’s scope. Several factors contribute to the final price, and neglecting any of them can lead to significant discrepancies between the estimate and the actual cost. A detailed assessment of these factors is crucial for both homeowners and contractors to ensure a fair and accurate price.

    Several key factors influence the cost of siding replacement. These factors interact in complex ways, so a comprehensive evaluation is necessary for a precise estimate.

    Factors Influencing Siding Replacement Costs

    The cost of siding replacement is determined by a combination of material costs, labor costs, and the complexity of the project. Material costs vary significantly depending on the type of siding chosen (e.g., vinyl, wood, fiber cement), its quality, and its aesthetic features. Labor costs are influenced by the size of the house, the condition of the existing siding (requiring more or less demolition and preparation), the accessibility of the work area (scaffolding needs?), and the contractor’s experience and overhead. Additional factors include permits, waste disposal, and any unforeseen repairs discovered during the project. For example, a large two-story home with intricate architectural details will naturally require more labor and potentially more expensive materials than a smaller, simpler ranch-style house. A project requiring significant removal of rotted wood will also add to the overall cost.

    Measuring the Area Needing Siding Replacement

    Accurate measurement of the area requiring siding replacement is paramount for obtaining an accurate estimate. This involves more than simply calculating the square footage of the house’s exterior walls. Detailed measurements should account for windows, doors, vents, and other features that will not require new siding. The process typically involves using a measuring tape to determine the linear dimensions of each wall section, then subtracting the areas of openings. Professional contractors often use specialized software to create a detailed plan of the house, facilitating precise calculations and material ordering. For instance, measuring a 20ft x 30ft wall section with a single 3ft x 7ft window would involve calculating the total wall area (600 sq ft) and subtracting the window area (21 sq ft) resulting in 579 sq ft of siding needed for that particular section. This process is repeated for every section of the house requiring new siding.

    Siding Material Types and Their Cost Impact

    Different siding materials significantly impact the overall project cost. Vinyl siding is generally the most affordable option, offering a balance of durability and cost-effectiveness. However, it might not be as aesthetically pleasing or long-lasting as other options. Wood siding, while offering a classic look, is more expensive and requires more maintenance. Fiber cement siding provides excellent durability and fire resistance but is typically more costly than vinyl. Metal siding, such as aluminum or steel, offers exceptional durability and longevity, but often comes with a higher price tag. The choice of siding material directly affects not only the material cost but also the labor cost, as different materials require different installation techniques and expertise. For example, installing intricate wood siding requires specialized skills and thus a higher labor cost compared to installing vinyl siding.

    Finding Reputable Contractors

    Choosing the right contractor is crucial for a successful siding replacement project. A reputable contractor possesses the necessary experience, licensing, and insurance to ensure quality workmanship and protect you from potential liabilities. Thorough vetting is essential to avoid costly mistakes and project delays.

    Selecting a contractor involves careful consideration of their experience, licensing, insurance, and bidding process. This section provides guidance on how to effectively assess these critical factors.

    Contractor Experience and Reliability Assessment

    To gauge a contractor’s experience and reliability, several key questions should be addressed. Gathering this information will help you make an informed decision. Consider asking about the number of years they’ve been in business, their specific experience with siding replacement (including the types of siding they’ve worked with), and the size and scope of past projects similar to yours. Inquiring about their process for managing projects, including timelines and communication, will provide further insight into their professionalism. Furthermore, requesting references from previous clients allows you to independently verify their work quality and overall customer satisfaction. Finally, reviewing online reviews and testimonials can provide valuable additional insights into their reputation.

    Verification of Contractor Licenses and Insurance

    Verifying a contractor’s license and insurance is a critical step in protecting yourself from potential problems. Contact your state’s licensing board to confirm the contractor’s license is valid, current, and in good standing. This verification process helps ensure the contractor meets the minimum standards of competence and professionalism required by your state. Similarly, request proof of general liability and workers’ compensation insurance. General liability insurance protects you from financial losses if an accident occurs on your property during the project. Workers’ compensation insurance covers medical expenses and lost wages for employees injured on the job, protecting you from potential liability for their injuries. Failure to verify these crucial elements could leave you exposed to significant financial risks.

    Comparison of Contractor Bidding Processes

    Contractors utilize different bidding processes, each with its own advantages and disadvantages. Some contractors provide fixed-price bids, offering a total cost for the entire project upfront. This approach provides clarity and predictability regarding the final cost, but it may not account for unforeseen issues that could arise during the project. Other contractors use cost-plus bids, where the final cost is determined by the actual materials and labor used. This method offers flexibility to address unexpected issues, but it can lead to cost overruns if not carefully managed. Finally, some contractors provide a range of estimated costs, acknowledging potential variations in the final price based on factors discovered during the project. Understanding these differences is key to selecting a bidding process that aligns with your project’s needs and risk tolerance. For example, a complex project with potential for unforeseen issues might benefit from a cost-plus bid, while a straightforward project might be better suited to a fixed-price bid.

    Detailed Breakdown of Estimates

    Receiving a detailed estimate is crucial for a successful siding replacement project. A comprehensive breakdown allows you to compare quotes effectively, understand the true cost, and avoid unexpected expenses. A transparent estimate builds trust with the contractor and ensures you’re both on the same page regarding the project’s scope and financial implications.

    A well-structured estimate should clearly outline all costs associated with the project. This includes labor, materials, permits, and any other potential expenses. Failing to receive a detailed breakdown can lead to disagreements and cost overruns later in the process.

    Sample Estimate Template

    A clear and organized estimate significantly simplifies the comparison process. The following table illustrates a sample estimate template that contractors should use:

    Item Labor Cost Materials Cost Permits & Fees
    Siding Removal & Disposal $XXX $XXX $0
    Sheathing Repair (if needed) $XXX $XXX $0
    New Siding Installation $XXX $XXX $0
    Flashing & Caulking $XXX $XXX $0
    Permit Acquisition $0 $0 $XXX
    Clean Up $XXX $0 $0
    Total $XXX $XXX $XXX

    Note: Replace the “$XXX” placeholders with the actual costs provided by the contractor. Remember that prices will vary depending on factors such as location, materials chosen, and the size of the project.

    Detailed Materials List

    The inclusion of a detailed materials list is paramount. This list should specify the type, quantity, and brand of each material to be used. For example, instead of simply stating “siding,” the list should detail the type of siding (e.g., vinyl, fiber cement, wood), its color, manufacturer, and the square footage needed. This level of detail allows for accurate cost comparisons and ensures that you understand exactly what materials will be used in your project. Discrepancies between the quoted materials and those actually used should be immediately addressed.

    Potential Hidden Costs and Their Identification

    Unforeseen costs can significantly impact the final project price. Common hidden costs include unexpected repairs to underlying sheathing, additional labor required due to unforeseen complications (e.g., rotted wood), changes in material pricing, and disposal fees. To identify potential hidden costs, carefully review the estimate for any vague or unspecified items. Ask the contractor clarifying questions about any ambiguous entries and request a detailed breakdown of any additional charges that may arise. It is prudent to obtain multiple estimates to compare pricing and identify any potential discrepancies. For example, one contractor might include sheathing repair in their base price, while another might list it as an add-on, potentially leading to a higher final cost.

    Material Costs and Pricing

    Understanding material costs is crucial for accurate siding replacement estimates. The type of siding you choose significantly impacts both the initial expense and the long-term cost of ownership. Different materials offer varying levels of durability, maintenance requirements, and aesthetic appeal, all of which influence the overall price.

    Siding Material Price Comparison

    Vinyl, wood, and fiber cement are common siding choices, each with its own price range. Vinyl siding is generally the most affordable option, offering a wide range of colors and styles at a lower cost per square foot compared to wood or fiber cement. Wood siding, particularly premium varieties like cedar or redwood, commands a significantly higher price due to its natural beauty and inherent characteristics. Fiber cement siding falls somewhere in between, providing a durable, low-maintenance alternative at a cost often exceeding vinyl but generally less than high-end wood. Price fluctuations are common depending on the specific manufacturer, finish, and regional availability. For example, a basic vinyl siding might cost between $3 and $8 per square foot installed, while high-end wood siding could range from $15 to $30 or more. Fiber cement typically falls within $8 to $15 per square foot installed. These figures are estimates and can vary widely based on several factors.

    Material Quality and Longevity

    The quality of siding materials directly impacts both the upfront cost and the long-term expenses associated with maintenance and replacement. Higher-quality materials, while more expensive initially, often offer superior durability, resistance to weather damage, and a longer lifespan, ultimately reducing the total cost of ownership over time. For instance, a thicker, more robust vinyl siding with a better warranty will cost more upfront but is less likely to require repairs or replacement within a shorter timeframe compared to a thinner, less expensive option. Similarly, higher-grade wood siding, treated for rot and insect resistance, will be more expensive but require less maintenance and last longer than untreated wood. Fiber cement siding, known for its fire resistance and durability, also exhibits a longer lifespan, though higher-quality options within this category will typically come with a higher price tag.

    Obtaining Multiple Material Quotes

    Securing multiple quotes for siding materials from different suppliers is essential for ensuring you receive competitive pricing. Contact at least three to five different suppliers, providing them with detailed specifications of your siding needs, including the type of material, quantity, color, and any special features. Compare not only the price per unit but also the total cost, including delivery fees and any applicable taxes. Be sure to clarify the warranty offered on the materials and inquire about potential discounts or bulk purchase options. This comparative approach will enable you to make an informed decision and potentially save a significant amount of money on your siding project. Remember to verify the supplier’s reputation and reliability before committing to a purchase.

    Labor Costs and Timelines

    Understanding labor costs and project timelines is crucial for accurate siding replacement budgeting. These factors, often intertwined, significantly impact the overall cost and can vary considerably depending on several key variables. Accurate estimation requires a careful consideration of these variables to avoid unexpected expenses and delays.

    Labor costs for siding replacement are influenced by several factors. The experience level of the crew directly affects the speed and efficiency of the work, leading to variations in overall labor costs. More experienced crews, while commanding higher hourly rates, often complete the job faster, potentially offsetting the higher cost per hour with reduced overall labor time. Geographical location also plays a significant role; labor rates in high-cost-of-living areas tend to be higher than in more affordable regions. Finally, project complexity, including the size of the house, the type of siding being installed, and the presence of intricate architectural details or difficult-to-access areas, all contribute to increased labor hours and therefore higher costs.

    Factors Affecting Labor Costs

    Several factors influence the final labor costs associated with a siding replacement project. These include the experience and skill level of the workers, the prevailing wage rates in the specific geographic location, and the complexity of the project itself. For instance, a larger, more complex project with intricate detailing will naturally require more labor hours than a smaller, simpler project. Similarly, a crew with extensive experience in siding installation will likely complete the work more efficiently than a less experienced team, potentially leading to lower overall labor costs despite higher hourly rates. The type of siding material also influences labor costs; some materials are more challenging to install than others, impacting the time required and, consequently, the labor expenses.

    Realistic Timelines for Siding Replacement Projects

    The timeline for a siding replacement project varies greatly depending on the size of the house, the complexity of the design, and weather conditions. A small house with simple siding might take a few days to a week, while a larger, more complex project could take several weeks or even months. For example, a 1,500 square foot ranch-style home with standard vinyl siding might be completed within 7-10 business days by an experienced crew. However, a 3,000 square foot Victorian home with intricate detailing and multiple materials might take 4-6 weeks or longer. Unforeseen circumstances, such as inclement weather, material delays, or unexpected structural issues, can further extend the project timeline. It’s crucial to discuss realistic timelines with contractors and factor in potential delays during the planning phase.

    Negotiating Labor Costs

    Negotiating labor costs requires a balance between securing a fair price and ensuring quality workmanship. Before negotiating, obtain multiple detailed estimates from reputable contractors. Compare not only the total cost but also the breakdown of labor and materials. Ask for clarification on any unclear items in the estimate. If a contractor’s labor cost seems significantly higher or lower than others, inquire about the reasoning behind the difference. Focus on the value proposition—experience, warranty, materials used—rather than solely on the price. Remember that a slightly higher upfront cost might be justified by superior quality and a shorter project timeline, potentially saving you time and stress in the long run. Always ensure that the agreed-upon labor costs are clearly outlined in a written contract before work begins.

    Permits and Inspections

    Obtaining the necessary permits and undergoing inspections are crucial steps in a successful siding replacement project. These processes ensure your project complies with local building codes, protects your investment, and helps guarantee the quality of the workmanship. Ignoring these steps can lead to fines, legal issues, and potential safety hazards.

    Permitting Process for Siding Replacement

    Securing the necessary permits typically involves submitting an application to your local building department. This application will require detailed information about the project, including the type of siding being used, the scope of work, and often, detailed drawings or plans. The review process can vary depending on your location and the complexity of the project; expect delays of a few days to several weeks. You’ll likely need to pay a fee, the amount of which varies by jurisdiction and project size. For example, a small residential siding replacement might cost between $100 and $500, while larger commercial projects could cost significantly more. After review and approval, the permit will be issued, allowing you to legally commence work. Failure to obtain a permit before starting work can result in stop-work orders, fines, and potential legal action.

    Importance of Inspections

    Inspections are conducted by building officials at various stages of the project to verify compliance with building codes and ensure the work meets minimum quality standards. These inspections typically occur after the preparation of the existing siding, during the installation of new siding, and after completion. Inspectors will assess aspects such as proper installation techniques, adherence to code requirements for flashing and water management, and overall quality of materials. A failed inspection may require corrective work before the project can be completed and signed off. This ensures the long-term durability and safety of your siding and protects your home from potential damage. A positive inspection, on the other hand, offers peace of mind and protects your investment.

    Costs Associated with Permits and Inspections

    The costs associated with permits and inspections are typically separate from the contractor’s estimate. Permit fees vary significantly by location and project scope. Inspection fees are usually charged per inspection, with the number of inspections depending on the project’s complexity. For instance, a small residential project might involve two or three inspections, each costing between $50 and $150. Therefore, budgeting for these additional costs is essential for accurate project cost planning. It is always advisable to inquire about permit and inspection fees directly with your local building department to get the most accurate estimate for your specific project.

    Warranty and Guarantees

    Securing a comprehensive warranty is crucial when investing in siding replacement. Understanding the types of warranties offered, their terms, and limitations will protect your investment and ensure you receive the promised quality and service. This section will clarify the different warranties involved and highlight their importance in your decision-making process.

    Siding warranties typically come from two sources: the manufacturer and the contractor. Manufacturer warranties cover defects in the siding material itself, such as flaws in manufacturing or material failure due to inherent weaknesses. Contractor warranties, on the other hand, cover the workmanship of the installation. These warranties often overlap but address different aspects of the project’s success. It’s vital to carefully review both to understand the complete coverage.

    Manufacturer Warranties

    Manufacturer warranties vary considerably depending on the siding material (vinyl, fiber cement, wood, etc.) and the specific product line. Some offer limited warranties covering defects for a specific period, typically ranging from 10 to 50 years, while others offer more comprehensive warranties that include labor and material costs for repairs. For example, a high-end vinyl siding manufacturer might offer a 50-year warranty against fading, cracking, and peeling, while a less expensive option may only provide a 20-year warranty against manufacturing defects. Always obtain a copy of the manufacturer’s warranty documentation before making a purchase. Pay close attention to what is and is not covered, including exclusions related to improper installation or damage from extreme weather events.

    Contractor Warranties

    Contractor warranties primarily cover the quality of the installation. A typical contractor warranty might cover issues such as leaks, improper flashing, or faulty installation leading to siding damage within a specific timeframe, usually 1-2 years. Some contractors offer extended warranties for an additional fee, providing longer-term protection against workmanship issues. It’s important to note that contractor warranties often require adherence to specific maintenance guidelines. Failure to maintain the siding properly might void the warranty. For instance, a contractor might require annual cleaning and inspection of the siding to ensure the warranty remains valid.

    Warranty Limitations

    Understanding the limitations of both manufacturer and contractor warranties is paramount. Warranties rarely cover damage caused by acts of God (e.g., hurricanes, tornadoes), vandalism, or improper maintenance. They may also exclude damage resulting from modifications or alterations to the siding after installation. Some warranties contain stipulations about the use of specific cleaning products or repair methods. For example, using abrasive cleaners could void a warranty. Before signing any contract, carefully read the fine print to understand the scope of coverage and any exclusions that may apply. Clarify any ambiguities with the contractor or manufacturer to avoid misunderstandings later. A thorough understanding of warranty limitations ensures realistic expectations and prevents potential disputes down the line.

    Payment Schedules and Financing Options

    Securing financing and establishing a clear payment schedule are crucial aspects of your siding replacement project. Understanding the different options available and their implications will help you make informed decisions and ensure a smooth process. This section outlines typical payment structures and financing choices to consider.

    Payment schedules generally align with project milestones. A common approach involves several installments tied to specific stages of completion. This protects both the homeowner and the contractor, ensuring fair compensation for work performed.

    Sample Payment Schedule

    A typical payment schedule might look like this:

    Milestone Payment Percentage
    Contract signing and material ordering 10%
    Completion of demolition and preparation 20%
    Completion of installation (50%) 30%
    Final inspection and completion 40%

    Note: These percentages are examples, and the actual schedule will depend on the specifics of your project and agreement with the contractor. Always review the payment schedule carefully before signing the contract.

    Financing Options for Siding Replacement

    Several financing options exist to help manage the cost of siding replacement. These can significantly impact your overall budget and repayment plan.

    Homeowners can explore various financing routes, each with its advantages and disadvantages.

    Home Equity Loan or Line of Credit (HELOC)

    Home equity loans and HELOCs utilize the equity in your home as collateral. They typically offer lower interest rates than personal loans but carry the risk of foreclosure if payments are not met. The approval process involves a credit check and appraisal of your property. A significant advantage is the potential for tax deductibility of the interest.

    Personal Loan

    Personal loans are unsecured loans, meaning they don’t require collateral. They offer flexibility in terms of repayment schedules but often come with higher interest rates compared to home equity loans. Approval depends on your credit score and income.

    Contractor Financing

    Some contractors offer financing options directly to their clients. This can streamline the process, but it’s crucial to understand the terms and interest rates carefully. These plans might have limitations on the amount financed or specific repayment periods.

    Credit Cards

    Using credit cards can be a convenient short-term solution, but high interest rates can make it a costly option if not paid off quickly. Careful budgeting and prompt repayment are crucial to avoid accumulating significant debt.

    Advantages and Disadvantages of Different Payment Methods

    The best payment method depends on your individual financial situation and the terms offered by your contractor. Carefully weigh the advantages and disadvantages before making a decision.

    Payment Method Advantages Disadvantages
    Cash Often results in a lower overall cost due to the absence of interest. Requires a significant upfront capital investment.
    Home Equity Loan/HELOC Potentially lower interest rates, tax deductibility. Uses home equity as collateral, risks foreclosure.
    Personal Loan Flexible repayment schedules, no collateral needed (usually). Typically higher interest rates compared to home equity loans.
    Contractor Financing Streamlined process. Potentially limited options, interest rates may vary.
    Credit Cards Convenience. High interest rates if not paid promptly.

    Addressing Unexpected Issues

    Siding replacement projects, while meticulously planned, can sometimes encounter unforeseen complications. Understanding these possibilities and how they’re handled is crucial for a smooth and successful renovation. Proper communication between the contractor and homeowner is key to navigating these challenges effectively.

    Unexpected issues during a siding replacement project can significantly impact both the timeline and the final cost. Therefore, it’s vital to have a plan in place to address these contingencies. This involves proactive communication from the contractor, transparency about additional costs, and a clearly defined process for handling changes to the original scope of work.

    Examples of Unexpected Issues

    During a siding replacement, various unforeseen problems can arise. These often involve underlying structural issues or deterioration not visible during the initial inspection. For instance, extensive rotted wood beneath the existing siding might necessitate more extensive repairs than initially anticipated. Similarly, discovering damaged sheathing or structural framing requires addressing these issues before new siding can be installed. Other unexpected issues might include discovering lead paint, requiring specialized and more costly abatement procedures, or encountering unexpected obstacles such as underground utilities or difficult-to-access areas.

    Contractor Handling of Unforeseen Problems

    When unexpected issues arise, a reputable contractor will promptly inform the homeowner. This communication should include a clear explanation of the problem, its potential impact on the project timeline and budget, and proposed solutions. They should provide photographic evidence of the issue and discuss different options for repair, outlining the associated costs for each. The contractor should obtain the homeowner’s approval before proceeding with any additional work. Detailed documentation of these changes, including photos and written agreements, is crucial for maintaining transparency and avoiding future disputes.

    Accounting for Potential Unexpected Expenses in the Estimate

    While it’s impossible to predict every possible issue, a comprehensive estimate should include a contingency clause. This clause acknowledges the possibility of unforeseen problems and allocates a percentage (typically 5-10%) of the total estimated cost to cover unexpected expenses. This contingency fund allows for the resolution of minor problems without requiring significant budget adjustments or project delays. A detailed breakdown of the contingency allocation should be provided to the homeowner for transparency. For example, an estimate of $10,000 might include a $500-$1000 contingency to address minor unforeseen issues such as localized wood rot or minor adjustments to flashing. Larger, more significant unforeseen problems will require separate change orders.

    Final Thoughts

    Securing accurate siding replacement estimates requires diligent research, careful planning, and effective communication with contractors. By following the steps outlined in this guide—from understanding the scope of work and finding reputable contractors to analyzing detailed estimates and addressing potential unexpected issues—you can confidently navigate the process and ensure a successful and cost-effective siding replacement project. Remember, a well-informed homeowner is best positioned to achieve the desired outcome within budget and timeline expectations. Take your time, ask questions, and choose wisely.

  • Is Aluminum Siding a Good Investment for Your Home?

    Is Aluminum Siding a Good Investment for Your Home?

    Is Aluminum Siding a Good Investment for Your Home? This question weighs heavily on many homeowners considering exterior renovations. Aluminum siding presents a compelling blend of durability, low maintenance, and cost-effectiveness, but it also has drawbacks compared to other materials like vinyl, wood, or fiber cement. This comprehensive guide explores the multifaceted aspects of aluminum siding, helping you make an informed decision that aligns with your budget, aesthetic preferences, and long-term goals for your home.

    We’ll delve into the initial costs, long-term maintenance needs, impact on resale value, energy efficiency considerations, aesthetic appeal, environmental implications, warranty details, installation process, and even insurance implications. By the end, you’ll have a clear understanding of whether aluminum siding is the right investment for your property.

    Initial Cost Analysis

    Choosing the right siding for your home involves careful consideration of various factors, not least of which is the initial cost. While aluminum siding offers durability and low maintenance, understanding its price point relative to other options is crucial for making an informed decision. This section compares the upfront costs of aluminum siding with vinyl, wood, and fiber cement siding, considering material costs, labor, and potential permits.

    Material, Labor, and Permit Costs Comparison

    The overall cost of siding installation is a complex calculation influenced by several factors. A direct comparison across different materials provides a clearer picture. The following table presents estimated costs, keeping in mind that these figures can vary significantly based on location, contractor, and project specifics. Always obtain multiple quotes before making a decision.

    Siding Material Material Cost (per sq ft) Installation Labor (per sq ft) Permit Costs (Estimate)
    Aluminum $2.50 – $5.00 $3.00 – $6.00 $100 – $500
    Vinyl $1.50 – $4.00 $2.00 – $4.00 $100 – $500
    Wood $4.00 – $10.00+ $4.00 – $8.00+ $100 – $500
    Fiber Cement $3.00 – $8.00+ $4.00 – $7.00+ $100 – $500

    Factors Influencing Initial Investment

    Several factors beyond the basic material and labor costs significantly impact the overall initial investment in siding. Understanding these elements allows for a more accurate budget projection.

    The size of the house is a primary determinant. A larger house naturally requires more materials and labor, leading to a proportionally higher cost. For instance, siding a 2,000 square foot house will cost considerably more than siding a 1,000 square foot house.

    The complexity of the installation also plays a crucial role. Houses with intricate architectural details, multiple dormers, or complex trim work require more time and expertise, increasing labor costs. A simple, rectangular house will be less expensive to side than one with numerous angles and projections.

    Finally, regional variations in labor rates and material prices influence the total cost. Contractors in high-cost areas will typically charge more for both labor and materials compared to those in lower-cost regions. It’s essential to obtain local quotes to accurately reflect these regional differences.

    Long-Term Maintenance & Durability

    Aluminum siding offers a compelling combination of longevity and relatively low maintenance, making it a worthwhile consideration for homeowners. Understanding its lifespan, maintenance needs, and potential repair costs is crucial for assessing its long-term value. This section will delve into these aspects, providing a clearer picture of aluminum siding’s overall cost-effectiveness.

    Aluminum siding boasts a significantly longer lifespan than many other siding materials. While the exact lifespan depends on factors like climate, installation quality, and exposure to the elements, aluminum siding can easily last 50 years or more. This contrasts sharply with vinyl siding, which typically lasts 20-30 years, and wood siding, which may require replacement or extensive repairs after 20-40 years, depending on the type of wood and its treatment. The superior durability of aluminum contributes significantly to its long-term value proposition.

    Aluminum Siding Maintenance

    Regular cleaning is the primary maintenance requirement for aluminum siding. Dirt, grime, and other debris can accumulate over time, affecting its appearance and potentially leading to minor surface damage. A simple cleaning with soap and water, using a soft-bristled brush or pressure washer (at a low setting to avoid damage), is usually sufficient. Annual cleaning is generally recommended, with more frequent cleaning in areas with high pollution or heavy tree cover. For stubborn stains, a mild detergent or specialized siding cleaner can be used. It’s important to avoid abrasive cleaners or harsh chemicals, as these can scratch the surface.

    Aluminum Siding Repair Costs

    Repair costs for aluminum siding are generally lower compared to other materials. Minor dents or scratches can often be repaired with touch-up paint, readily available in a wide range of colors to match existing siding. More significant damage, such as large dents or punctures, might require panel replacement. The cost of replacing a single aluminum siding panel is typically less than replacing a comparable section of vinyl or wood siding, due to the material’s lower cost and ease of installation. For instance, replacing a damaged 10-foot section of aluminum siding might cost between $100 and $300, depending on labor costs and the complexity of the repair. This contrasts with the potential costs associated with wood siding repair, which could involve significant carpentry work and specialized materials. Major repairs, such as those caused by severe weather damage, are less common with aluminum due to its inherent strength and resistance to impact. However, even these extensive repairs are often less costly than comparable repairs for other materials.

    Resale Value Impact

    Aluminum siding’s effect on a home’s resale value is a complex issue, influenced by factors beyond the siding itself, such as location, overall home condition, and prevailing market trends. While it might not command a premium like some other materials, understanding its impact is crucial for homeowners considering this option. A balanced perspective acknowledges both potential advantages and disadvantages.

    Aluminum siding generally holds its value reasonably well, offering a degree of predictability in terms of resale. However, its perceived value can fluctuate depending on the specific market and the buyer’s preferences. In some markets, aluminum siding might be viewed as a practical and low-maintenance choice, while in others, buyers may favor more aesthetically appealing options like wood or vinyl.

    Aluminum Siding’s Resale Value in Different Market Conditions

    The impact of aluminum siding on resale value varies depending on market conditions. In a seller’s market, where demand exceeds supply, a home’s unique features may be less critical, and aluminum siding might not significantly hinder the sale. Conversely, in a buyer’s market, where choices are abundant, buyers are more discerning, and features like siding type can play a more significant role in their decision-making process. A well-maintained home with aluminum siding is still likely to sell, but it might command a slightly lower price compared to a similar home with more desirable siding. For instance, in a highly competitive market where buyers are prioritizing curb appeal, a home with updated vinyl siding might sell faster and for a higher price than one with older aluminum siding, even if both homes are structurally sound and well-maintained.

    Comparison with Other Siding Types

    Compared to other siding materials, aluminum siding often sits in the middle ground regarding resale value. High-end materials such as wood or fiber cement siding can significantly enhance a home’s perceived value and potentially justify a higher sale price. These materials often convey a sense of luxury and higher quality, which can appeal to a wider range of buyers. On the other hand, aluminum siding is generally more affordable than these premium options and often surpasses vinyl siding in terms of durability and longevity, which can be a selling point for budget-conscious buyers or those prioritizing long-term cost-effectiveness. The perceived value, therefore, is a balance between cost, durability, and aesthetic appeal.

    Hypothetical Scenario Illustrating Siding’s Impact on Selling Price

    Consider two identical homes in the same neighborhood, both needing some updates. Home A has aluminum siding that is showing its age but is otherwise in good condition. Home B has recently installed, high-quality vinyl siding. Both homes are listed at $300,000. In a balanced market, Home B, with its updated siding, might sell for $315,000, while Home A might sell for $305,000, reflecting a $10,000 difference attributable, at least in part, to the difference in siding. This scenario illustrates how, even with other factors being equal, the siding material can influence the final selling price. The actual difference could be higher or lower depending on numerous factors, including the specific market conditions and the overall condition of both properties.

    Energy Efficiency & Insulation

    Aluminum siding’s role in energy efficiency is complex and often misunderstood. While aluminum itself is a good conductor of heat, its impact on a home’s overall energy performance depends heavily on the installation and the presence of proper insulation. Effective use of aluminum siding in energy-efficient construction requires a holistic approach that addresses the entire building envelope.

    Aluminum siding does not inherently provide significant insulation. Its primary function is as a protective outer layer, shielding the underlying structure from the elements. To enhance energy efficiency, aluminum siding must be paired with appropriate insulation materials within the wall cavity. Common insulation choices include fiberglass batts, cellulose insulation, spray foam insulation, and rigid foam insulation boards. These materials act as a barrier, reducing heat transfer between the interior and exterior of the home, thus improving energy efficiency. The effectiveness of the insulation is directly related to its R-value, a measure of its resistance to heat flow. Higher R-values indicate better insulation performance.

    Insulation Options with Aluminum Siding

    The selection of insulation material depends on several factors, including budget, climate, and the existing wall construction. Fiberglass batts, for instance, are a cost-effective option that’s relatively easy to install in standard wall cavities. Spray foam insulation offers a superior air seal, minimizing air leakage and improving energy efficiency, but it is typically more expensive. Rigid foam boards, often used as sheathing under the siding, provide excellent insulation and structural support. The optimal insulation strategy often involves a combination of materials to address specific areas of heat loss. For example, spray foam might be used to seal air gaps around windows and doors, while fiberglass batts fill the main wall cavity.

    Comparison with Other Siding Materials

    Compared to other siding materials, aluminum’s energy efficiency is largely dependent on the accompanying insulation. Wood siding, for example, can offer some inherent insulation value, although this can vary depending on the type and thickness of the wood. Vinyl siding, while relatively energy-efficient due to its air pockets, generally has a lower R-value than well-insulated aluminum siding. Fiber cement siding, similar to wood, provides some insulation, but its energy performance is again heavily reliant on the insulation behind it. Ultimately, the overall energy efficiency of any siding system depends more on the insulation and air sealing than the siding material itself.

    Impact of Proper Installation on Energy Savings

    Proper installation is crucial for maximizing the energy efficiency of any siding system, including aluminum. Imperfect installation can lead to air leaks, compromising the effectiveness of the insulation. Air leaks allow conditioned air to escape during both heating and cooling seasons, increasing energy consumption and driving up utility bills. For example, gaps around windows and doors, improperly sealed seams, and inadequate flashing around the siding can all lead to significant energy loss. A properly installed aluminum siding system, with meticulous attention to air sealing and the use of high-quality insulation, can significantly reduce energy consumption, potentially lowering heating and cooling costs by 10-20% or more, depending on factors such as climate, home size, and existing insulation levels. This translates to significant long-term savings.

    Aesthetic Considerations

    Aluminum siding offers a surprisingly diverse range of aesthetic options, moving beyond the outdated image of a uniformly metallic exterior. Its versatility allows it to complement various architectural styles and homeowner preferences, making it a viable choice for a wide spectrum of houses. Understanding these aesthetic aspects is crucial when considering aluminum siding as a home improvement investment.

    Aluminum siding’s aesthetic appeal hinges on its color and style options. The material itself is highly adaptable, allowing manufacturers to create a vast array of finishes.

    Color and Style Variety

    The availability of numerous colors and styles significantly broadens the aesthetic possibilities of aluminum siding. Beyond the traditional metallic shades, modern aluminum siding comes in a wide spectrum of colors mimicking wood grain, stone, or even stucco textures. These finishes are achieved through advanced painting and embossing techniques, creating a realistic and visually appealing surface. For instance, a homeowner could choose a deep, rich brown to achieve a wood-like appearance, or opt for a subtle, light gray that mimics the look of painted wood clapboard. The availability of these options ensures that the siding can be seamlessly integrated into the existing aesthetic of a home, rather than appearing as a jarring addition. Furthermore, many manufacturers offer various panel profiles, from traditional horizontal lines to more contemporary vertical or even shingle-style patterns. This variety ensures that aluminum siding can complement a variety of architectural tastes.

    Aluminum Siding and Architectural Styles

    Aluminum siding’s adaptability extends to its compatibility with various architectural styles. Its versatility allows it to enhance the aesthetic appeal of homes ranging from traditional colonial designs to modern ranch-style homes. For example, a colonial home might benefit from aluminum siding that mimics the look of traditional wood clapboard, maintaining the historical charm of the architecture while offering the durability of aluminum. Conversely, a modern home could incorporate sleek, horizontal aluminum siding in a bold color, complementing the clean lines and minimalist design. The ability to customize the color, texture, and panel profile of the siding ensures a cohesive and visually appealing final product, regardless of the underlying architectural style.

    Pros and Cons of Aluminum Siding’s Aesthetic Appeal

    Considering the aesthetic aspects of aluminum siding requires weighing its advantages and disadvantages.

    Pros:

    • Wide range of colors and finishes, mimicking various materials like wood, stone, and stucco.
    • Adaptable to different architectural styles, ensuring a cohesive aesthetic.
    • Low maintenance, preserving its appearance for an extended period.
    • Durability ensures the siding’s color and finish resist fading and chipping.

    Cons:

    • Some may find the appearance less “natural” compared to wood or brick.
    • The metallic sheen, even with textured finishes, can be noticeable to some homeowners.
    • Matching the siding to existing architectural details might require careful selection.

    Environmental Impact

    Aluminum siding, while offering several advantages in terms of durability and longevity, presents a unique set of environmental considerations throughout its lifecycle, from manufacturing to disposal. Understanding these impacts is crucial for making informed decisions about home improvement projects.

    Aluminum siding production is an energy-intensive process. The extraction of bauxite ore, the primary source of aluminum, requires significant energy input, often involving open-pit mining with associated environmental consequences such as habitat destruction and soil erosion. Subsequent refining processes also contribute to greenhouse gas emissions. Furthermore, the manufacturing of aluminum siding itself requires energy for the smelting, rolling, and finishing stages.

    Aluminum Siding Manufacturing and Disposal

    The environmental impact of aluminum siding manufacturing is primarily linked to energy consumption and greenhouse gas emissions. The extraction and processing of bauxite ore, a key ingredient in aluminum production, contributes significantly to carbon emissions. Moreover, the energy required for the smelting process, which converts bauxite into aluminum, further adds to the environmental footprint. At the end of its lifespan, aluminum siding can end up in landfills, contributing to waste accumulation. However, aluminum is a highly recyclable material, and recycling significantly reduces the environmental impact compared to producing new aluminum from raw materials. Recycling aluminum requires considerably less energy than primary production, minimizing greenhouse gas emissions and resource depletion.

    Comparison with Other Siding Materials

    Comparing the environmental impact of aluminum siding to other common siding materials like vinyl, wood, and fiber cement requires a holistic life-cycle assessment. Vinyl siding, while often cheaper upfront, is derived from petroleum, a non-renewable resource, and its disposal can be problematic due to its non-biodegradability. Wood siding, although a renewable resource, often requires significant treatment with chemicals to protect it from pests and decay, potentially impacting water quality. Fiber cement siding, while durable, requires energy-intensive manufacturing processes and contains cement, which has its own environmental implications. A comprehensive analysis considering energy consumption, greenhouse gas emissions, and waste generation would be needed for a truly comparative assessment, but generally, aluminum’s recyclability offers an advantage. For instance, a study comparing the life cycle impacts of various siding materials might show aluminum having a lower carbon footprint than vinyl over its lifespan, particularly when recycling is factored in.

    Minimizing Environmental Impact

    Several strategies can help minimize the environmental impact associated with aluminum siding. Choosing recycled aluminum content in the siding itself reduces the demand for newly mined bauxite. Proper installation and maintenance can extend the lifespan of the siding, delaying the need for replacement and reducing waste. Most importantly, ensuring the siding is recycled at the end of its useful life is crucial. Many communities have recycling programs for aluminum, and contractors specializing in home demolition and renovation are often equipped to handle the responsible disposal and recycling of aluminum siding. Supporting and utilizing these programs significantly reduces the environmental burden associated with this building material.

    Warranty and Guarantees

    Aluminum siding warranties are crucial considerations when making a purchasing decision. Understanding the specifics of these warranties can significantly impact the long-term value and cost-effectiveness of your investment. Different manufacturers offer varying levels of coverage, and a thorough understanding of these differences is essential before committing to an installation.

    Aluminum siding warranties typically cover defects in materials and workmanship. This generally means that the manufacturer will replace any siding panels that are found to be faulty due to manufacturing errors, such as imperfections in the paint or the metal itself. The duration of these warranties varies considerably, ranging from a few years to several decades. However, it is important to note that warranties often exclude damage caused by external factors such as accidents, improper installation, or extreme weather events.

    Warranty Coverage Details

    Most manufacturers offer a limited warranty on their aluminum siding. This typically covers defects in the material itself, such as peeling paint, rusting, or cracking. However, the specific terms and conditions can differ significantly. Some warranties might cover only the replacement of defective panels, while others might cover the cost of labor for repairs or replacements. It is essential to carefully read the fine print to understand the extent of the coverage. For example, a warranty might cover the material for 25 years, but the paint finish for only 15 years. Furthermore, some manufacturers might offer a prorated warranty, meaning the amount of coverage decreases over time.

    Comparison of Manufacturer Warranties

    Direct comparison of warranties from different manufacturers requires reviewing individual warranty documents. However, a general observation is that some premium brands tend to offer longer warranties and more comprehensive coverage than budget-friendly options. For instance, one manufacturer might offer a 30-year warranty on the material and a 15-year warranty on the finish, while another might only offer a 20-year warranty on the material with no separate warranty for the finish. This difference can translate to substantial cost savings or added expense over the lifespan of the siding. Always obtain warranty details from multiple manufacturers before making a selection.

    Importance of Understanding Warranty Terms

    Before signing any contracts for aluminum siding installation, it is crucial to thoroughly understand the terms and conditions of the manufacturer’s warranty. Pay close attention to the duration of the warranty, what is covered, and what is excluded. Understanding the limitations of the warranty will help you make an informed decision about the overall value proposition of the product and the potential long-term costs associated with repairs or replacements. For example, a warranty that excludes damage from hail might seem insignificant initially but could become extremely relevant in areas prone to severe hailstorms. Clarifying any uncertainties with the manufacturer or installer before the installation begins is strongly recommended.

    Installation Process & Timeframe

    The installation of aluminum siding is a relatively involved process, requiring skilled labor and specialized tools. Understanding the typical steps, potential timeframe, and possible delays is crucial for homeowners considering this investment. A well-planned installation ensures a smooth process and a long-lasting result.

    The typical installation process begins with careful preparation of the existing exterior walls. This includes removing old siding, repairing any underlying damage to the sheathing or fascia, and ensuring the surface is clean and dry. Next, installers will typically install furring strips to create a consistent surface and allow for proper ventilation behind the new siding. Aluminum siding panels are then installed, starting from the bottom and working upwards, overlapping each panel to create a weather-tight seal. Finally, trim pieces, such as corner pieces, J-channel, and window/door trim, are installed to complete the aesthetic and protective elements of the siding. Throughout the process, proper fastening techniques are crucial to prevent future issues.

    Installation Timeframe

    The timeframe for a complete aluminum siding installation project varies significantly based on several factors. The size of the house, the complexity of the design (including multiple gables or dormers), the condition of the existing walls, and the experience of the installation crew all play a role. For a typical single-story house, the installation might take anywhere from a few days to a couple of weeks. Larger, more complex homes could require several weeks or even a month or more to complete. For example, a 2,000 square foot ranch-style home might be completed in approximately one week with a crew of three experienced installers, while a 4,000 square foot Victorian-style home could take three to four weeks.

    Potential Installation Challenges and Delays

    Several factors can lead to challenges and delays during the installation process. Unexpected underlying damage to the house’s exterior walls, requiring extensive repairs before siding installation can begin, is a common cause of delay. Unfavorable weather conditions, such as heavy rain, snow, or extreme temperatures, can also significantly impact the project timeline. Difficulties with obtaining necessary materials, particularly during periods of high demand, might cause delays. Finally, unforeseen complications related to the house’s structure or existing components could also prolong the installation. For instance, discovering significant water damage behind existing siding would necessitate repairs before new siding can be installed. This could easily add a week or more to the project schedule.

    Insurance Implications

    Aluminum siding can influence your homeowner’s insurance premiums, though the impact isn’t always straightforward. Several factors interact to determine the final cost, and the fire-resistant nature of aluminum plays a significant role. Understanding these factors can help homeowners make informed decisions and potentially save money on insurance.

    Aluminum siding’s inherent fire resistance often leads to lower insurance premiums compared to more combustible materials like wood or vinyl. Insurance companies recognize this reduced risk and may offer discounts or lower rates for homes with aluminum siding. However, other factors, such as the overall condition of the home and its location, will also influence the final premium.

    Fire Resistance and Insurance Costs

    The fire-resistant properties of aluminum siding are a key factor affecting insurance premiums. Aluminum does not readily ignite or contribute to the spread of fire, unlike many other siding materials. This inherent characteristic reduces the risk of fire damage to the property, making it a more attractive risk for insurance companies. Consequently, insurers may offer discounts or more favorable rates reflecting this lower risk profile. The specific discount will vary depending on the insurer, the location of the property, and the overall risk assessment of the home. For example, a home in a high-fire-risk area might still see a premium increase despite having aluminum siding, although the increase might be less than for a similar home with wood siding.

    Examples of Insurance Policy Clauses

    Insurance policies rarely explicitly mention specific siding materials in detail. Instead, they focus on broader risk factors. However, a clause related to “exterior building materials” might indirectly reflect the impact of siding choice. A well-maintained home with fire-resistant aluminum siding might be categorized under a lower risk bracket, leading to a lower premium. Conversely, a poorly maintained home, regardless of the siding material, would likely be associated with a higher risk and a higher premium. It is crucial to review your specific policy documents or contact your insurance provider for clarification on how your home’s siding material impacts your premium. It’s worth noting that some insurers may offer specific discounts for features that reduce risk, including fire-resistant siding, while others might incorporate it into their overall risk assessment without explicit mention. A hypothetical example could be a 5% discount offered by a particular insurer for homes with aluminum siding compared to those with wood siding, all other factors being equal. This discount would reflect the reduced risk associated with the fire-resistant nature of aluminum.

    Last Point

    Ultimately, the decision of whether or not to invest in aluminum siding is a personal one, dependent on a variety of factors unique to your home and circumstances. While it offers significant advantages in terms of longevity and low maintenance, it’s crucial to weigh these benefits against the initial cost, aesthetic preferences, and potential impact on resale value. Carefully consider all aspects discussed in this guide – from upfront expenses and long-term maintenance to energy efficiency and environmental impact – to make a well-informed and confident choice for your home’s exterior.

  • Best Sealants and Stains for Protecting Wood Siding

    Best Sealants and Stains for Protecting Wood Siding

    Best Sealants and Stains for Protecting Wood Siding: Protecting your home’s exterior wood siding requires careful consideration of the right sealants and stains. This comprehensive guide explores various types, application methods, and maintenance strategies to ensure long-lasting protection and enhance the aesthetic appeal of your wood siding. We’ll delve into the differences between oil-based, water-based, and solvent-based sealants, examine the nuances of solid, semi-transparent, and transparent stains, and help you choose the perfect product for your specific needs and budget. Understanding the impact of climate, wood type, and proper surface preparation will be key to achieving optimal results and extending the life of your siding.

    Types of Wood Siding Sealants

    Choosing the right sealant for your wood siding is crucial for its longevity and aesthetic appeal. Different sealants offer varying levels of protection against the elements, and understanding their properties will help you make an informed decision. The type of sealant you select will depend on factors such as the type of wood, climate, and desired finish.

    Oil-Based Sealants

    Oil-based sealants, often composed of linseed oil or tung oil, penetrate deeply into the wood, enhancing its natural beauty and providing excellent water repellency. They offer good UV protection, but their durability can vary depending on the specific product and application. Oil-based sealants tend to be more flexible than some other options, allowing them to accommodate the natural expansion and contraction of wood due to moisture changes. However, they require more frequent reapplication compared to other types of sealants, typically every 1-3 years depending on exposure. They also have a longer drying time and a strong odor during application.

    Water-Based Sealants

    Water-based sealants are becoming increasingly popular due to their low VOC (volatile organic compound) content, making them environmentally friendly and easier to work with. They are typically easier to clean up than oil-based sealants. Water-based sealants offer good protection against moisture and UV damage, but their penetration depth is generally less than oil-based sealants. Durability and longevity can vary significantly depending on the specific formulation, with some offering protection for up to 5 years. They usually have a less noticeable odor compared to oil-based options.

    Solvent-Based Sealants

    Solvent-based sealants, often containing mineral spirits or other solvents, offer excellent water repellency and durability. They form a strong protective barrier on the wood’s surface, providing long-lasting protection against the elements. These sealants often have a higher gloss finish compared to oil or water-based options. However, they typically have a strong odor during application and require proper ventilation. Solvent-based sealants are generally less flexible than oil-based sealants, potentially leading to cracking or peeling if the wood undergoes significant expansion and contraction. Their high VOC content also makes them less environmentally friendly than water-based alternatives.

    Comparison of Sealant Types

    The following table summarizes the key characteristics of oil-based, water-based, and solvent-based wood siding sealants:

    Characteristic Oil-Based Water-Based Solvent-Based
    Penetration Deep Moderate Surface
    Durability Moderate (1-3 years) Moderate to High (up to 5 years) High (longer lifespan)
    Flexibility High Moderate Low
    UV Resistance Good Good Good
    VOC Content High Low High
    Odor Strong Low Strong
    Clean-up Difficult Easy Moderate

    Types of Wood Siding Stains

    Choosing the right wood stain for your siding is crucial for both aesthetics and protection. Different stain types offer varying levels of color depth, wood grain visibility, and longevity, impacting the overall look and lifespan of your siding. Understanding these differences will help you make an informed decision.

    Solid Stains

    Solid stains provide the most color coverage, completely obscuring the natural wood grain. They offer a painted look with the added benefit of some wood protection. This makes them ideal for homeowners who want a bold, uniform color and are less concerned with showcasing the wood’s natural texture. Solid stains are generally thicker than other stain types and require more thorough preparation of the wood surface before application. However, they are more likely to chip or peel over time compared to other options, requiring more frequent maintenance.

    Semi-Transparent Stains

    Semi-transparent stains offer a balance between color and wood grain visibility. They provide a richer color than transparent stains while still allowing the wood’s natural texture to show through. This creates a more natural look than solid stains, with good protection against the elements. The depth of color varies depending on the product and the number of coats applied. Semi-transparent stains are a popular choice for homeowners who want a subtle color enhancement while retaining some of the wood’s natural beauty. Maintenance is generally less frequent than with solid stains but more frequent than with transparent stains.

    Transparent Stains

    Transparent stains, also known as penetrating stains, offer the least color coverage. Their primary function is to protect the wood from the elements while enhancing its natural color and grain. They penetrate deep into the wood, providing excellent protection against UV damage and moisture. The color enhancement is subtle, often just darkening the wood’s natural tone. While they offer excellent protection, they may require more frequent reapplication compared to semi-transparent or solid stains to maintain their protective properties.

    Comparison of Wood Stain Longevity and Weather Resistance

    The longevity and weather resistance of wood stains vary significantly depending on the type of stain, the quality of the product, and the climate. Proper surface preparation and application techniques also play a crucial role.

    Stain Type Longevity (Years) Weather Resistance Maintenance
    Solid 3-5 Moderate High (repainting may be needed)
    Semi-Transparent 5-7 Good Moderate (re-staining every few years)
    Transparent 2-4 Good (UV protection varies) High (frequent reapplication needed)

    Factors Affecting Sealant/Stain Selection

    Choosing the right sealant or stain for your wood siding is crucial for its longevity and aesthetic appeal. Several interconnected factors influence this decision, requiring careful consideration to ensure optimal protection and a beautiful finish. Ignoring these factors can lead to premature deterioration of the siding, necessitating costly repairs or replacements.

    Wood Type

    The type of wood significantly impacts sealant and stain selection. Different woods possess varying densities, porosities, and natural resistances to weathering. For instance, cedar and redwood, known for their natural durability, may require less frequent applications than softer woods like pine or fir. Hardwoods generally require less frequent maintenance than softwoods due to their denser structure. The specific characteristics of the wood will dictate the type of sealant or stain best suited for its protection. A highly porous wood will absorb more stain, requiring a higher-quality product to prevent premature fading or cracking. A less porous wood may benefit from a thinner, more penetrating sealant.

    Climate Considerations

    Climate plays a dominant role in sealant and stain performance. Areas with high humidity and frequent rainfall require sealants with excellent water resistance to prevent moisture damage and mold growth. In contrast, arid climates may necessitate products that offer superior UV protection to prevent fading and cracking from prolonged sun exposure. Extreme temperature fluctuations can also affect sealant and stain performance, requiring products formulated to withstand such conditions. For example, a sealant designed for a hot, desert climate would need to be highly flexible to prevent cracking from expansion and contraction, whereas a sealant for a cold, snowy climate would need to be resistant to freezing and thawing cycles.

    Budgetary Constraints

    Budget is a practical factor influencing sealant and stain choices. High-quality products generally offer superior protection and longevity, but they come at a higher price. However, the long-term cost savings associated with less frequent reapplication can outweigh the initial investment. Lower-cost options might require more frequent applications, ultimately increasing the overall cost over time. It’s important to balance the initial cost with the long-term maintenance requirements to make an informed decision that aligns with your budget.

    Surface Preparation

    Proper surface preparation is paramount for optimal sealant and stain performance. This involves cleaning the wood surface to remove dirt, debris, mildew, and loose paint or previous sealant. Power washing is often effective, but care must be taken to avoid damaging the wood. After cleaning, allowing the wood to dry completely is crucial before applying any sealant or stain. Any remaining moisture can trap underneath the finish, leading to blistering, peeling, or mold growth. Sanding may be necessary to smooth rough surfaces and ensure proper adhesion. This meticulous preparation maximizes the effectiveness of the chosen sealant or stain, ensuring a long-lasting and attractive finish.

    Application Methods for Sealants and Stains

    Applying wood sealants and stains to your siding requires careful preparation and technique to ensure even coverage, longevity, and a professional finish. Proper application minimizes drips, runs, and uneven color absorption, leading to a more attractive and protected surface. The following steps outline the process for achieving optimal results.

    Successful application depends on choosing the right tools and following a methodical approach. Remember that working in small sections allows for better control and prevents the sealant or stain from drying before it can be evenly distributed. Always follow the manufacturer’s instructions on the specific product you are using, as drying times and application methods may vary.

    Surface Preparation

    Thorough preparation is crucial for successful sealant and stain application. Begin by cleaning the siding to remove dirt, mildew, loose paint, and other debris. A pressure washer can be effective for this, but use caution to avoid damaging the wood. Allow the siding to dry completely before proceeding. Any loose or damaged wood should be repaired before applying the sealant or stain. This ensures a smooth, even surface for better adhesion and a more uniform finish. For heavily weathered wood, a light sanding may be necessary to create a better surface for the sealant or stain to bond to.

    Applying Sealant or Stain

    Once the surface is prepared, apply the sealant or stain using a brush, roller, or sprayer. For larger areas, a sprayer can be efficient, but a brush or roller often provides more control and prevents drips, especially on vertical surfaces. Work in small sections, applying the product in the direction of the wood grain. Avoid overloading the brush or roller; a thin, even coat is preferable to a thick, uneven one. Maintain a wet edge to prevent lap marks and ensure even color distribution. Allow sufficient drying time between coats, as specified by the manufacturer’s instructions. Multiple thin coats are generally better than one thick coat.

    Essential Tools and Materials

    Having the right tools and materials on hand will make the application process smoother and more efficient. The following list outlines the essential items:

    • Wood sealant or stain (choose the appropriate type based on your needs and the type of wood)
    • Paint brushes (various sizes for different areas and details)
    • Roller and roller tray (for larger areas)
    • Sprayer (optional, for large surfaces, but requires careful control)
    • Drop cloths or plastic sheeting (to protect surrounding areas)
    • Putty knife or scraper (for removing loose paint or debris)
    • Sandpaper (for smoothing rough surfaces)
    • Pressure washer (optional, for cleaning the siding)
    • Safety glasses and gloves (to protect yourself from chemicals and debris)
    • Ladder (if necessary to reach higher areas)

    Preventing Drips and Runs

    Drips and runs are common problems when applying sealants and stains, especially on vertical surfaces. To minimize this, avoid overloading your applicator, work in small sections, and apply the product evenly. Use a high-quality brush or roller that holds the product well without dripping. If drips do occur, immediately wipe them away with a clean cloth before they dry. Applying thin coats and allowing adequate drying time between coats will also help prevent runs.

    Maintenance and Re-application

    Proper maintenance and timely re-application of sealants and stains are crucial for preserving the beauty and longevity of your wood siding. Neglecting this can lead to premature weathering, damage from moisture, and a significant decrease in the aesthetic appeal of your home’s exterior. The frequency of re-application depends on several interacting factors, including the type of wood, the climate, and the quality of the products used.

    The lifespan of wood siding sealants and stains can vary greatly. Factors such as sun exposure, rainfall, temperature fluctuations, and the type of wood all play a significant role in how quickly the protective layer degrades. Regular inspection is key to determining when re-application is necessary. A proactive approach to maintenance will not only extend the life of your siding but also save you money in the long run by preventing costly repairs.

    Sealant and Stain Re-application Frequency

    The frequency of re-application for wood siding sealants and stains is highly variable. For example, in regions with harsh, sunny climates and frequent rainfall, re-application might be needed every 1-2 years, especially for softer woods like cedar or redwood. Harder woods, such as redwood or ipe, might require less frequent maintenance, potentially lasting 3-5 years between applications in milder climates. However, regular inspection is always recommended. Southern yellow pine, a commonly used siding material, may need re-application every 2-3 years in areas with significant sun exposure and moisture. In areas with less harsh weather, the interval could extend to 3-5 years. Always refer to the manufacturer’s instructions for specific recommendations.

    Assessing the Condition of Existing Sealant and Stain

    Regular visual inspection is the most effective method for determining if your wood siding needs re-application. Look for signs of fading, cracking, peeling, or blistering of the sealant or stain. If you notice any significant discoloration, especially in areas exposed to direct sunlight, it may indicate that the protective layer is failing. Another crucial indicator is the ability of the wood to absorb water. A simple test involves sprinkling a small amount of water onto the surface. If the water beads up and rolls off, the sealant is likely still effective. However, if the water is quickly absorbed, it’s a strong indication that re-application is necessary. The texture of the wood is also important; if it feels rough or dry to the touch, it could indicate a need for re-application.

    Tips for Extending the Lifespan of Sealants and Stains

    Proper preparation is crucial before applying sealants and stains. This includes cleaning the siding thoroughly to remove dirt, mildew, and loose debris. Power washing can be effective, but it’s essential to use the correct nozzle and pressure to avoid damaging the wood. Using a high-quality sealant or stain that is specifically designed for exterior wood applications will significantly extend its lifespan. Following the manufacturer’s instructions for application, including the proper drying time between coats, is essential. Regularly cleaning the siding to remove dirt, pollen, and other debris will help prevent premature deterioration of the sealant or stain. Finally, consider trimming overhanging branches that could trap moisture against the siding. This simple step can dramatically reduce the risk of rot and decay, thus extending the lifespan of the sealant or stain.

    Cost Considerations for Sealants and Stains

    Protecting your wood siding involves a financial investment, and understanding the cost factors is crucial for making informed decisions. The initial cost of sealants and stains is just one piece of the puzzle; long-term costs, including maintenance and potential repairs due to inadequate protection, must also be considered. Choosing the right product can significantly impact your overall expenditure.

    Sealant and Stain Cost Comparison

    The price of wood siding sealants and stains varies considerably depending on the type, brand, quality, and quantity purchased. Generally, oil-based products tend to be more expensive than water-based options, while high-quality, professional-grade products command a higher price than those found in home improvement stores. The following table provides a general price range; actual prices may vary based on location and retailer.

    Product Type Cost per Gallon (USD) Cost per Liter (USD) (approx.) Notes
    Water-Based Stain $25 – $50 $6.60 – $13.20 Often offers good value for money.
    Oil-Based Stain $40 – $80 $10.60 – $21.20 Provides superior protection but is more expensive.
    Water-Based Sealant $30 – $60 $7.90 – $15.80 Good for moisture protection, often less expensive than oil-based.
    Oil-Based Sealant $50 – $100 $13.20 – $26.40 Offers superior durability and water resistance.

    Factors Affecting Overall Cost

    Several factors influence the total cost of protecting your wood siding beyond the price of the sealant or stain itself. These include the size of the area to be treated, the number of coats required, labor costs (if hiring a professional), the need for surface preparation (cleaning, sanding, etc.), and the cost of any necessary equipment rentals (sprayers, etc.). For example, a large two-story home will naturally require more product and potentially more labor than a small shed. Thorough surface preparation, while adding to upfront costs, can significantly extend the lifespan of the sealant or stain, ultimately saving money in the long run.

    Long-Term Cost Savings of High-Quality Products

    Investing in high-quality sealants and stains may seem expensive initially, but it often translates to significant long-term cost savings. Superior products offer better protection against the elements, reducing the frequency of reapplication and minimizing the risk of costly wood damage from rot, decay, or insect infestation. For instance, a high-quality stain might last 7-10 years, whereas a cheaper alternative might require reapplication every 2-3 years, leading to higher overall costs over the lifespan of your siding. This difference in longevity makes the initial higher cost of premium products a worthwhile investment in many cases.

    Popular Brands and Products

    Choosing the right wood sealant or stain can significantly impact the longevity and aesthetic appeal of your siding. Many reputable brands offer high-quality products, each with its own strengths and weaknesses. Understanding these differences will help you make an informed decision based on your specific needs and budget. This section highlights several popular brands and their key product offerings.

    Reputable Brands of Wood Sealants and Stains

    Several manufacturers consistently receive high praise for their wood protection products. These brands are known for their commitment to quality ingredients, innovative formulations, and excellent customer service. The following list represents a selection of these reputable brands, but it is not exhaustive.

    • Cabot: A long-standing brand with a wide range of stains and sealants known for their durability and color retention.
    • Olympic: Offers a diverse selection of products, including stains, sealants, and primers, catering to various wood types and project needs.
    • Sherwin-Williams: A well-established paint and coatings company that also produces high-quality wood stains and sealants, often integrated into their broader paint systems.
    • Behr: Provides a broad spectrum of products for both professional and DIY users, with a focus on user-friendly application and long-lasting protection.
    • Benjamin Moore: Known for premium-quality paints, their wood stains and sealants are similarly high-performing and offer a wide array of color choices.

    Popular Product Examples and Their Features

    The following examples illustrate the diversity of products available from these brands. Specific product availability and formulations may vary by region.

    • Cabot Australian Timber Oil: This penetrating oil is lauded for its ability to enhance the natural beauty of wood while providing excellent protection against weathering. It offers a low-luster finish and is suitable for various exterior wood applications.
    • Olympic Elite Exterior Wood Stain & Sealant: This product combines stain and sealant in one, offering convenience and protection. It’s known for its rich color and long-lasting durability, resisting fading and peeling.
    • Sherwin-Williams SuperDeck Solid Color Stain: This solid-color stain provides complete opacity, hiding imperfections and creating a uniform look. It is formulated for exceptional durability and resistance to mildew.
    • Behr Premium Advanced Decking Stain and Sealer: This product offers a combination of stain and sealant, providing both color and protection against the elements. It is formulated to resist fading, peeling, and mildew.
    • Benjamin Moore Arborcoat Exterior Wood Sealer: This water-based sealer is designed to protect wood from moisture damage while allowing the natural grain to show through. It offers excellent mildew resistance and is easy to apply.

    Performance Comparison of Top-Selling Products

    Direct comparison of all products is challenging due to variations in formulation, application methods, and environmental conditions. However, key performance characteristics can be generalized. For example, solid-color stains generally offer superior hiding power compared to semi-transparent stains, but semi-transparent stains better highlight the wood grain. Oil-based products often provide deeper penetration and better water resistance than water-based products, but water-based options are typically lower in VOCs (Volatile Organic Compounds) and easier to clean up. The ultimate choice depends on individual project requirements and preferences. Consulting product specifications and reviews will assist in making informed decisions.

    Environmental Impact

    Choosing sealants and stains for your wood siding involves considering not only their protective qualities but also their environmental impact. The manufacturing process, ingredients, and eventual disposal all contribute to the overall footprint of these products. Understanding these impacts allows for more informed and environmentally conscious decisions.

    The environmental impact of wood siding sealants and stains stems primarily from their chemical composition. Many traditional products contain volatile organic compounds (VOCs), which contribute to air pollution and smog formation. Some also contain biocides, designed to prevent mold and mildew growth, that can have detrimental effects on aquatic life if improperly disposed of. The manufacturing process itself can also generate waste and consume energy. Furthermore, the extraction and processing of raw materials used in these products can have associated environmental consequences.

    Eco-Friendly Options for Wood Siding Protection

    Several eco-friendly options are available for protecting wood siding, minimizing environmental harm. These options often utilize natural ingredients and employ manufacturing processes that reduce their overall environmental impact. For example, linseed oil, a natural oil derived from flax seeds, provides water resistance and UV protection without the harsh chemicals found in many synthetic products. Other natural options include tung oil and milk paint, both offering a more sustainable alternative to traditional chemical-based sealants and stains. When selecting eco-friendly options, look for products certified by organizations such as Green Seal or the Environmental Protection Agency (EPA) to ensure they meet certain environmental standards. These certifications verify that the products have been assessed for their environmental impact across their entire life cycle.

    Proper Disposal of Leftover Materials

    Proper disposal of leftover sealants and stains is crucial to minimizing environmental harm. Never pour leftover materials down the drain or into the ground. These materials can contaminate water sources and harm wildlife. Instead, contact your local waste management facility to determine the proper disposal method for your specific products. Many facilities offer hazardous waste disposal programs that accept these materials safely. Some retailers also participate in take-back programs for certain types of paint and sealant products, offering a convenient way to dispose of leftover materials responsibly. Thoroughly cleaning containers before disposal is also important, reducing the risk of accidental spills and environmental contamination. By following these guidelines, you can ensure that leftover materials do not contribute to environmental pollution.

    Troubleshooting Common Problems

    Protecting your wood siding with sealants and stains is an investment that should last for years. However, various issues can arise during application and maintenance, impacting the longevity and aesthetic appeal of your siding. Understanding these common problems and their solutions is crucial for achieving optimal results. This section details common problems, their causes, and preventative measures to ensure your wood siding remains protected and beautiful.

    Peeling or Blistering Sealant or Stain

    Peeling or blistering indicates a problem with adhesion, often stemming from improper surface preparation or unsuitable weather conditions during application. Moisture trapped beneath the sealant or stain can cause blistering, while poor adhesion to a dirty or previously treated surface can lead to peeling.

    Uneven Color Application

    Inconsistent color can result from several factors. These include applying the sealant or stain unevenly, using an inappropriate application method (e.g., spraying on a windy day), or failing to adequately stir the product before use. Variations in the wood itself can also contribute to subtle color differences.

    Premature Fading or Degradation

    Exposure to UV radiation from sunlight is a major cause of premature fading and degradation of wood sealants and stains. Choosing a product with high UV protection and applying it correctly can mitigate this. Using a low-quality product or applying too thin a coat will also lead to quicker deterioration. For example, a stain rated for 5 years of UV protection will visibly fade and lose its protective properties sooner if applied thinly compared to a thicker application.

    Mold and Mildew Growth

    Mold and mildew thrive in damp environments. Poor ventilation, inadequate surface preparation (leaving old, decaying material), or the use of a sealant or stain that doesn’t offer sufficient mildew resistance can lead to fungal growth. This is especially prevalent in shaded areas with poor air circulation.

    Solutions for Addressing Common Problems

    Addressing these issues often requires removing the affected areas and reapplying the sealant or stain correctly. For peeling or blistering, gently scrape away the loose material, clean the surface thoroughly, and then reapply, ensuring the surface is dry and clean. Uneven color may require sanding and re-staining, or applying a second coat to achieve a uniform finish. For mold and mildew, a thorough cleaning with a suitable fungicide is necessary before reapplication.

    Preventative Measures

    Preventative measures are key to avoiding these problems. Proper surface preparation, including cleaning, sanding, and allowing sufficient drying time, is crucial. Selecting high-quality products designed for the specific type of wood and climate is essential. Following the manufacturer’s instructions carefully regarding application methods, drying time, and re-application intervals will significantly reduce the likelihood of problems. Regular inspection and prompt attention to minor issues can prevent them from escalating into major problems. For instance, addressing small areas of peeling immediately prevents the damage from spreading.

    Safety Precautions

    Working with wood sealants and stains requires careful attention to safety to prevent health hazards and accidents. These products often contain chemicals that can be harmful if inhaled, ingested, or absorbed through the skin. Proper preparation and the use of appropriate safety equipment are crucial for a safe and successful project.

    Proper handling and storage of wood sealants and stains are essential to minimize risks. Always follow the manufacturer’s instructions printed on the product label, as these instructions provide specific safety guidelines tailored to the individual product. Never mix different types of sealants or stains unless explicitly stated as safe to do so by the manufacturer. Improper mixing can lead to unpredictable chemical reactions, creating hazardous fumes or reducing the effectiveness of the product.

    Personal Protective Equipment

    Safe handling of wood sealants and stains necessitates the use of appropriate personal protective equipment (PPE). This equipment acts as a barrier between you and potentially harmful chemicals, significantly reducing the risk of exposure. Inadequate protection can lead to skin irritation, respiratory problems, or eye damage.

    • Gloves: Use chemical-resistant gloves, such as nitrile or neoprene gloves, to protect your hands from contact with the sealant or stain.
    • Eye Protection: Safety glasses or chemical splash goggles are essential to prevent eye irritation or injury from splashes or fumes.
    • Respiratory Protection: A respirator with appropriate cartridges for the specific chemicals in the sealant or stain is recommended, especially in poorly ventilated areas. This is crucial to prevent inhalation of harmful fumes.
    • Clothing Protection: Wear long sleeves, long pants, and closed-toe shoes to protect your skin from contact with the product. Consider using disposable coveralls for added protection.

    Ventilation and Workspace

    Adequate ventilation is critical when working with wood sealants and stains. These products often release volatile organic compounds (VOCs) which can be harmful if inhaled. Working outdoors in a well-ventilated area is ideal. If working indoors, ensure proper ventilation by opening windows and doors, or using exhaust fans to remove fumes. Never work in an enclosed space without adequate ventilation. Poor ventilation can lead to headaches, dizziness, nausea, and more serious health problems.

    Storage and Disposal

    Store sealants and stains in their original containers, tightly sealed, in a cool, dry place, away from children and pets. Keep them away from sources of ignition, as many are flammable. Proper disposal is equally important. Never pour sealants or stains down the drain or into the trash. Check with your local waste management authority for proper disposal guidelines, as regulations vary by location. Improper disposal can contaminate water sources and harm the environment.

    Choosing the Right Finish for Different Aesthetics

    The final appearance of your wood siding is significantly impacted by the choice of sealant and stain. Understanding the subtle yet impactful differences between various finishes allows for a personalized aesthetic that complements your home’s architectural style and personal preferences. The interplay of color, sheen, and texture created by these products can dramatically alter the perceived age, character, and overall mood of the exterior.

    Different sealants and stains offer a wide spectrum of aesthetic possibilities, from enhancing the natural beauty of the wood to creating a completely transformed look. Clear sealants, for instance, protect the wood while allowing its natural grain and color to shine through, while pigmented stains add depth and color, altering the wood’s appearance significantly. The level of sheen also plays a crucial role, with options ranging from matte to high-gloss, each contributing to a distinct visual effect.

    Effects of Different Finishes on Wood Appearance

    Clear sealants preserve the natural beauty of the wood, highlighting its grain and color variations. A semi-transparent stain allows some of the wood’s natural color to show through while adding a subtle tint, enhancing its character. Solid-color stains, on the other hand, completely obscure the wood grain and provide a uniform, opaque finish. The choice between a matte, satin, or gloss finish further modifies the visual impact, with matte finishes offering a more natural and understated look, while gloss finishes create a more polished and reflective surface. For example, a clear sealant on cedar siding will accentuate the wood’s rich reddish tones and prominent grain, while a dark brown solid stain on the same siding would create a completely different, more dramatic and modern aesthetic.

    Aesthetic Considerations for Different Architectural Styles

    The selection of sealant and stain should harmonize with the architectural style of the house. A traditional colonial home might benefit from a semi-transparent stain in a warm, earthy tone, allowing the wood grain to show through while adding depth and richness. This would complement the home’s classic and timeless aesthetic. Conversely, a modern minimalist home might be better suited to a solid-color stain in a sleek, neutral tone, creating a clean and contemporary look. A rustic farmhouse might use a weathered gray stain to enhance the feeling of age and character. The choice of sheen also plays a role; a high-gloss finish might be jarring on a rustic home but perfectly suitable for a sleek, contemporary design. For instance, a glossy white stain on a Victorian home might seem incongruous, while a matte finish on a Craftsman-style house would feel more harmonious.

    Examples of Finish Choices and Their Visual Impact

    Consider a home with redwood siding. A clear sealant would emphasize the redwood’s natural reddish hue and grain pattern, creating a warm and inviting appearance. Applying a semi-transparent stain in a honey tone would subtly deepen the color while still allowing the grain to be visible. A solid-color stain in a deep brown or gray, however, would completely transform the look, creating a more dramatic and modern feel. Similarly, the sheen level can drastically change the perception. A matte finish on a light-colored stain would give a more relaxed, natural look, while a high-gloss finish on a dark stain would create a sleek, almost luxurious effect.

    Final Conclusion

    Ultimately, selecting the best sealants and stains for your wood siding involves a careful balancing act between aesthetics, durability, cost-effectiveness, and environmental considerations. By understanding the properties of different products, following proper application techniques, and implementing a regular maintenance schedule, you can significantly extend the lifespan of your siding and maintain its beauty for years to come. Remember to always prioritize safety and follow manufacturer instructions for best results. Investing in high-quality products and proper application will save you money and effort in the long run, ensuring your wood siding remains a stunning feature of your home.

  • Aluminum Siding vs. Vinyl Siding: Price and Durability Comparison

    Aluminum Siding vs. Vinyl Siding: Price and Durability Comparison

    Aluminum Siding vs. Vinyl Siding: Price and Durability Comparison – choosing the right siding for your home is a significant decision impacting both aesthetics and long-term costs. This comprehensive comparison delves into the initial investment, ongoing maintenance, durability under various weather conditions, and the overall impact on your home’s value. We’ll weigh the pros and cons of each material, helping you make an informed choice that aligns with your budget and lifestyle.

    From analyzing material and labor costs to exploring the lifespan and potential repair expenses, we’ll leave no stone unturned. We will also cover energy efficiency, aesthetic considerations, environmental impact, installation complexities, warranty details, and the influence on your home’s resale value. This detailed analysis will equip you with the knowledge to confidently select the best siding option for your needs.

    Initial Cost Comparison

    Choosing between aluminum and vinyl siding involves careful consideration of various factors, with initial cost being a primary concern. This section will analyze the average costs associated with both materials, breaking down the expenses into material and labor components to provide a clearer understanding of the overall investment required. We will then illustrate these costs with a comparative example for a typical-sized home.

    The average cost per square foot for aluminum siding installation typically ranges from $8 to $15, while vinyl siding installation usually falls between $6 and $12 per square foot. These figures vary depending on several factors, including the chosen style, quality of materials, regional labor rates, and the complexity of the installation (e.g., presence of intricate architectural details or difficult-to-access areas).

    Material and Labor Cost Breakdown

    A significant portion of the total cost for both aluminum and vinyl siding is attributed to materials. For aluminum, the material cost often accounts for approximately 40-50% of the overall expense, with the remaining portion covering labor. Vinyl siding’s material cost is usually slightly lower, contributing around 30-40% to the total, leaving a larger percentage for labor costs. This difference stems from the inherent manufacturing processes and material costs associated with each siding type.

    Upfront Cost Comparison for a 1500 sq ft House

    To provide a clearer picture, let’s consider the estimated upfront costs for a 1500 square foot house. These figures are averages and may vary based on the aforementioned factors. We will use the mid-range cost per square foot for each material and labor to provide a reasonable estimate.

    Siding Type Material Cost (per sq ft) Labor Cost (per sq ft) Total Cost (1500 sq ft)
    Aluminum $11.50 $10.50 $33,000
    Vinyl $7.50 $8.50 $24,000

    The table above demonstrates that, for a 1500 sq ft house, vinyl siding presents a considerably lower upfront cost compared to aluminum siding. This difference highlights the significant impact of material and labor cost variations on the overall project budget.

    Long-Term Cost Analysis

    While the initial cost of aluminum and vinyl siding differs, a comprehensive understanding of long-term expenses is crucial for making an informed decision. This analysis considers maintenance, lifespan, and potential unexpected repairs over a 20-year period, offering a clearer picture of the total cost of ownership for each siding type. This allows for a more accurate comparison beyond the initial investment.

    Maintenance Costs Over 20 Years

    Regular maintenance significantly impacts the longevity and appearance of any siding. For both aluminum and vinyl, preventative care minimizes the need for costly repairs. The frequency and type of maintenance differ, however, leading to variations in overall expenses.

    Aluminum siding generally requires less frequent maintenance than vinyl. Typical maintenance involves occasional washing to remove dirt and debris, and repainting every 10-15 years, depending on climate and exposure to the elements. This repainting is a significant cost, but infrequent. Vinyl siding, while needing less repainting, may require more frequent cleaning to prevent the buildup of mildew and dirt, especially in humid climates. Power washing is often recommended, but improper techniques can damage the siding.

    Lifespan and Replacement Costs

    The lifespan of siding directly impacts long-term costs. Aluminum siding, with proper maintenance, can last 50 years or more. However, its susceptibility to dents and scratches means that sections might need replacement before the entire system fails. Vinyl siding typically lasts 20-30 years, depending on quality and exposure to severe weather. Complete replacement is usually necessary after this period. The cost of replacing siding is substantial, making the lifespan a critical factor in the overall cost analysis. For example, replacing siding on a 2,000 square foot house could cost anywhere from $10,000 to $20,000 or more, depending on the material chosen and labor costs. This cost is a significant consideration when comparing the two options.

    Unexpected Repair Costs

    Unforeseen circumstances can lead to unexpected repair expenses. Aluminum siding, while durable, can be damaged by hail or strong impacts, requiring panel replacement. Corrosion can also occur in coastal areas or regions with high humidity. Vinyl siding is more susceptible to damage from strong winds, particularly in areas prone to hurricanes or tornadoes. Severe impacts can crack or break vinyl panels, necessitating replacements. Additionally, improper installation of either siding type can lead to water damage, requiring extensive repairs and potentially affecting underlying structures. For instance, a severe hailstorm could damage both types of siding, but the cost of repairing aluminum might be less than repairing vinyl due to the relative ease of replacing individual aluminum panels compared to vinyl.

    Durability and Weather Resistance

    Choosing between aluminum and vinyl siding involves careful consideration of their respective durability and resistance to various weather conditions. Both materials offer protection for your home, but their strengths and weaknesses differ significantly, impacting their longevity and maintenance requirements. This section will compare their performance against impact damage, fading, cracking, and warping, ultimately aiding in selecting the best option for your specific climate.

    Impact Resistance

    Aluminum siding generally exhibits superior resistance to impact damage compared to vinyl siding. Aluminum’s inherent strength allows it to withstand impacts from hail, falling debris, or accidental bumps more effectively. While vinyl siding can dent or crack under significant impact, aluminum is more likely to simply dent, often retaining its shape and requiring only minor repair. The greater resilience of aluminum makes it a more suitable choice in areas prone to severe hailstorms or where the risk of accidental damage is higher, such as homes near construction sites or busy streets. For instance, a large hailstone might leave a noticeable dent in aluminum, but a similar impact on vinyl siding could result in a crack that necessitates replacement of the affected panel.

    Susceptibility to Fading, Cracking, and Warping

    Both aluminum and vinyl siding are susceptible to fading, cracking, and warping, but the mechanisms and extent of damage differ. Aluminum siding is less prone to cracking and warping than vinyl, particularly under extreme temperature fluctuations. However, it can fade over time, especially if exposed to prolonged periods of intense sunlight. The fading is usually gradual and may not be noticeable for several years. Vinyl siding, while generally less expensive initially, can be more susceptible to cracking and warping, especially in areas with extreme temperature swings or prolonged exposure to direct sunlight. The ultraviolet (UV) radiation in sunlight can degrade the vinyl’s polymeric structure, leading to discoloration and brittleness. Furthermore, expansion and contraction due to temperature changes can put stress on the seams, increasing the likelihood of cracking.

    Climate Considerations for Siding Selection

    The ideal siding choice depends heavily on the prevailing climate. In regions with extreme temperature fluctuations, aluminum siding’s resistance to warping and cracking makes it a more reliable option. Its ability to withstand extreme heat and cold without significant dimensional changes contributes to its long-term durability. Conversely, in areas with consistently moderate temperatures and less intense sunlight, vinyl siding may be a suitable choice, provided it’s of high quality and properly installed. In humid climates, both materials perform reasonably well, but proper ventilation is crucial to prevent moisture buildup behind the siding, regardless of the material used. Areas prone to hurricanes or high winds might benefit from aluminum siding’s superior strength, reducing the risk of damage from flying debris.

    Maintenance Requirements

    Understanding the maintenance needs of your siding is crucial for preserving its appearance and extending its lifespan. Both aluminum and vinyl siding are relatively low-maintenance options, but their upkeep differs slightly. Regular cleaning and occasional repairs are key to maximizing their longevity and curb appeal.

    Aluminum siding generally requires less frequent maintenance than vinyl, but both benefit from periodic attention. Ignoring maintenance can lead to premature deterioration, impacting both aesthetics and the structural integrity of your home.

    Aluminum Siding Cleaning and Maintenance

    Maintaining the pristine look of aluminum siding involves a straightforward process. Regular cleaning prevents dirt and grime buildup, preserving its luster and protecting the underlying metal from corrosion.

    1. Preparation: Begin by gathering your supplies: a garden hose with a spray nozzle, a soft-bristled brush (avoid abrasive brushes that can scratch the surface), a bucket of warm soapy water (mild dish soap is recommended), and a rinse bucket filled with clean water. Consider wearing protective gloves to prevent skin irritation.
    2. Washing: Rinse the siding thoroughly with the hose to remove loose dirt and debris. Then, apply the soapy water solution to the siding using the brush, working from top to bottom in sections. Pay close attention to areas prone to dirt accumulation, such as corners and around windows and doors.
    3. Rinsing: Once the entire surface is scrubbed, rinse the siding thoroughly with clean water from the rinse bucket to remove all soap residue. Ensure complete rinsing to prevent streaking.
    4. Drying: Allow the siding to air dry completely. Avoid using high-pressure washers, as they can damage the siding’s finish.
    5. Repairing Damage: Inspect the siding for any dents, scratches, or loose panels. Minor scratches can often be touched up with aluminum paint, matching the existing color as closely as possible. More significant damage may require professional repair or panel replacement.

    Vinyl Siding Cleaning and Maintenance

    Vinyl siding, while durable, also benefits from regular cleaning to maintain its appearance and prevent the buildup of mildew and algae, especially in humid climates. Proper cleaning techniques will help preserve the siding’s color and finish.

    1. Preparation: Gather your cleaning supplies: a garden hose with a spray nozzle, a soft-bristled brush or sponge, a bucket of warm water, and a mild detergent specifically designed for vinyl siding (avoid harsh chemicals). Protective gloves are also recommended.
    2. Washing: Rinse the siding thoroughly to remove loose dirt. Mix the detergent with water according to the product instructions. Apply the solution to the siding using a brush or sponge, working from top to bottom in sections. Gently scrub to remove dirt and grime. For stubborn stains, let the cleaning solution sit for a few minutes before scrubbing.
    3. Rinsing: Thoroughly rinse the siding with clean water to remove all soap residue. Ensure complete rinsing to prevent streaking and water spots.
    4. Drying: Allow the siding to air dry completely. Again, avoid high-pressure washers to prevent damage.
    5. Maintaining Color and Finish: To help preserve the color and finish of your vinyl siding, avoid using abrasive cleaners or harsh chemicals. Regular cleaning and avoiding contact with harsh substances will prolong its life and maintain its appearance.

    Maintenance Frequency Comparison

    Aluminum siding typically requires cleaning every 1-2 years, depending on environmental factors. Vinyl siding may require more frequent cleaning, potentially every year or even more often in areas with high humidity or heavy tree cover, due to its susceptibility to mildew and algae growth. Both require occasional inspections for damage, with repairs needed as necessary. Regular maintenance for both types of siding will significantly extend their lifespan and enhance the curb appeal of your home.

    Energy Efficiency

    Choosing between aluminum and vinyl siding involves considering not only initial cost and durability but also the impact on your home’s energy efficiency. Both materials affect how well your home retains heat in winter and stays cool in summer, influencing your energy bills and environmental footprint. Understanding the thermal properties of each is crucial for making an informed decision.

    Aluminum and vinyl siding differ significantly in their insulation capabilities. Vinyl, being a plastic material, generally offers better insulation than aluminum, a metal known for its high thermal conductivity. This means heat transfers more readily through aluminum siding than through vinyl.

    Aluminum Siding’s Impact on Energy Consumption

    Aluminum siding’s high thermal conductivity means it readily transfers heat. In hot climates, this can lead to increased cooling costs as heat easily penetrates the siding and into the home. Conversely, in cold climates, heat escapes more readily through aluminum siding, increasing heating costs. The effectiveness of aluminum siding in terms of energy efficiency is significantly dependent on the presence and quality of the underlying insulation. A well-insulated wall behind aluminum siding can mitigate some of these issues, but it’s crucial to consider that the siding itself contributes less to insulation compared to vinyl.

    Vinyl Siding’s Impact on Energy Consumption

    Vinyl siding, due to its lower thermal conductivity, acts as a better insulator than aluminum. It helps to create a barrier against heat transfer, reducing both heating and cooling costs. While vinyl doesn’t possess the insulating properties of specialized foam-backed siding or other advanced insulation materials, it contributes positively to a home’s overall energy efficiency compared to aluminum. The energy savings from using vinyl siding can be significant, especially in areas with extreme temperature fluctuations.

    Energy Efficiency Comparison of Aluminum and Vinyl Siding

    The following table summarizes the relative energy efficiency of aluminum and vinyl siding. Note that these are general comparisons, and actual energy savings can vary based on factors like climate, home insulation, and window efficiency.

    Siding Type Thermal Conductivity Insulation Properties Impact on Energy Consumption
    Aluminum High Low Increased heating and cooling costs
    Vinyl Low Moderate Reduced heating and cooling costs

    Aesthetic Considerations

    The aesthetic appeal of siding is a crucial factor in a homeowner’s decision-making process. Both aluminum and vinyl siding offer a variety of options, but their visual impact and suitability differ depending on the architectural style of the home and the homeowner’s personal preferences. Understanding these differences can help in choosing the best siding material for a specific project.

    Aluminum and vinyl siding each provide a range of colors and styles, although vinyl generally boasts a wider selection. This allows for significant flexibility in achieving the desired aesthetic. However, the longevity and maintenance requirements of each material can influence the overall visual impact over time.

    Color and Style Options

    Vinyl siding typically offers a broader spectrum of colors, including various shades of whites, creams, grays, browns, and even bolder hues. Many manufacturers offer wood-grain finishes and textured surfaces to mimic the appearance of natural wood or stone. Aluminum siding, while available in a variety of colors, often presents a more limited palette, typically featuring solid colors with less variation in texture. While advancements have been made, the smooth, metallic look of aluminum siding remains distinct. The color choices for aluminum often lean towards more traditional options.

    Visual Appeal and Architectural Styles

    Vinyl siding’s versatility allows it to complement a wide range of architectural styles. Its ability to mimic natural materials makes it a suitable choice for homes with traditional, craftsman, or even farmhouse designs. The range of colors and textures allows for customization to match existing architectural details. Aluminum siding, with its sleek and modern appearance, is often better suited to contemporary or mid-century modern homes. Its clean lines and smooth finish can enhance a home’s modern aesthetic. However, the more limited color palette can be a constraint for homes requiring a specific color scheme.

    Examples of Homes with Aluminum and Vinyl Siding

    Imagine a Cape Cod-style home clad in creamy white vinyl siding with subtle wood-grain texture. The siding’s warmth complements the home’s traditional design, creating a welcoming and classic aesthetic. The slightly textured surface adds depth without being overly distracting. In contrast, picture a modern ranch home featuring charcoal gray aluminum siding. The smooth, even surface and dark color emphasize the home’s clean lines and contemporary feel, creating a striking and sophisticated look. The lack of texture contributes to the minimalist aesthetic. Another example could be a Victorian-style home with dark green vinyl siding designed to imitate cedar shakes. This adds depth and visual interest, complementing the home’s intricate details.

    Environmental Impact

    Choosing between aluminum and vinyl siding involves considering not only cost and durability but also the environmental consequences throughout the product’s lifecycle. Both materials have associated environmental impacts, from manufacturing and transportation to disposal and potential recycling. A comprehensive assessment requires examining these stages to make an informed decision.

    The manufacturing processes for aluminum and vinyl siding differ significantly, leading to varying environmental footprints. Aluminum production is energy-intensive, requiring substantial amounts of electricity to extract aluminum ore (bauxite) and refine it into usable metal. This process also generates greenhouse gas emissions and waste byproducts. Vinyl siding, primarily composed of polyvinyl chloride (PVC), is manufactured using petroleum-based resources and energy-intensive processes. The production of PVC involves the use of volatile organic compounds (VOCs) and other chemicals, which can contribute to air and water pollution. Comparing the total energy consumption and greenhouse gas emissions per unit of siding produced reveals a complex picture, with studies showing varying results depending on the specific manufacturing processes and energy sources used.

    Manufacturing Emissions

    Aluminum siding production generally has a higher carbon footprint compared to vinyl siding due to the energy-intensive nature of aluminum smelting. However, the specific environmental impact varies considerably based on the energy source used in the smelting process. Hydroelectric power, for instance, significantly reduces the carbon footprint compared to reliance on fossil fuels. Similarly, advancements in vinyl manufacturing processes are leading to reductions in VOC emissions and overall energy consumption. Therefore, a direct comparison requires detailed information about the specific manufacturing processes and energy sources used for each siding type in a particular region. Life cycle assessments (LCAs), which analyze the environmental impact across the entire product lifecycle, can provide a more comprehensive comparison. However, the availability and accuracy of LCAs for building materials can vary.

    Recyclability and Sustainability

    Aluminum is a highly recyclable material, and recycled aluminum requires significantly less energy to produce than primary aluminum. The recycling process for aluminum siding typically involves melting and re-processing the material into new aluminum products, although the quality of the recycled material may depend on the level of contamination. Vinyl siding, on the other hand, has a lower recycling rate. While some vinyl can be recycled, the process is often more complex and less efficient than aluminum recycling. The presence of additives and stabilizers in PVC can complicate the recycling process, and recycled vinyl often ends up being downcycled into lower-grade products. The sustainability of each material is therefore influenced by both its recyclability and the energy efficiency of its production and recycling processes.

    Long-Term Environmental Consequences

    The long-term environmental consequences of choosing either aluminum or vinyl siding relate primarily to disposal and landfill space. While aluminum is readily recyclable, a significant portion of aluminum siding ends up in landfills due to a lack of efficient recycling infrastructure or economic incentives. This contributes to landfilling issues and resource depletion. Similarly, the disposal of vinyl siding poses challenges due to its non-biodegradability and potential leaching of chemicals into the environment. Landfill space is a finite resource, and the accumulation of non-biodegradable materials like vinyl siding contributes to environmental concerns. The potential for microplastic pollution from the degradation of vinyl siding in landfills or the environment is also a significant consideration. Strategies for extending the lifespan of siding through repair and maintenance can mitigate the long-term environmental consequences of both materials.

    Installation Process

    The installation process for both aluminum and vinyl siding differs significantly in terms of complexity, time commitment, required skills, and potential challenges. Understanding these differences is crucial for homeowners planning a siding replacement project, allowing them to make informed decisions about contractor selection and project budgeting. While both can be DIY projects for experienced homeowners, professional installation is often recommended to ensure longevity and avoid costly mistakes.

    Aluminum siding installation generally requires more specialized skills and tools compared to vinyl siding. The process involves more precise measurements and cutting due to the material’s rigidity and the need for overlapping seams for water resistance. Vinyl, being more flexible, allows for some leeway in installation, reducing the risk of errors.

    Aluminum Siding Installation

    Aluminum siding installation is a more demanding process requiring a higher level of skill and precision. The material’s rigidity necessitates accurate measurements and cuts to ensure proper alignment and overlap. Improper installation can lead to gaps, leaks, and a less aesthetically pleasing finish. The process typically involves fastening the aluminum panels to a prepared wall using special nails or screws designed for this material. Expanding foam sealant may also be employed to ensure a tight seal around windows and doors.

    Tools and Skills Required for Aluminum Siding Installation

    Installing aluminum siding demands specific tools and skills. These include accurate measuring and cutting tools (e.g., metal shears, snips, and a measuring tape), specialized fasteners, a level, and possibly a power drill for certain applications. The installer needs a strong understanding of building construction and experience working with metal materials to ensure proper alignment, overlap, and sealing. Knowledge of proper ventilation techniques is also crucial to prevent moisture buildup behind the siding.

    Potential Challenges in Aluminum Siding Installation

    Potential challenges during aluminum siding installation include working with the rigid material, which can be difficult to manipulate and cut precisely. The installer must also be mindful of potential damage to the aluminum panels during handling and installation. Additionally, ensuring proper overlap and sealing to prevent water infiltration is crucial and requires experience and attention to detail. Uneven walls or surfaces can also pose a significant challenge, requiring extra preparation and expertise to achieve a smooth, even finish.

    Vinyl Siding Installation

    Vinyl siding installation is generally considered easier and faster than aluminum siding installation due to the material’s flexibility and ease of cutting. This makes it a more accessible option for DIY enthusiasts with basic carpentry skills. The process typically involves interlocking the vinyl panels together and attaching them to the house’s framing using nails or staples.

    Tools and Skills Required for Vinyl Siding Installation

    While less demanding than aluminum, vinyl siding installation still requires specific tools and some basic carpentry skills. Essential tools include a measuring tape, utility knife or saw, level, and hammer or staple gun. Understanding basic carpentry principles, such as proper nailing techniques and ensuring straight lines, is beneficial for a professional-looking finish. The installer needs to be familiar with the different types of vinyl siding profiles and their respective installation methods.

    Potential Challenges in Vinyl Siding Installation

    Despite its relative ease of installation, vinyl siding installation can present challenges. Working in extreme temperatures can affect the flexibility of the vinyl, making it more brittle in cold weather or prone to expansion and warping in extreme heat. Proper expansion gaps need to be maintained to prevent issues. Additionally, ensuring a consistent overlap between panels is important to prevent leaks and maintain a neat appearance. Dealing with uneven walls or complex architectural features may require additional skill and careful planning.

    Warranty and Guarantees

    Choosing between aluminum and vinyl siding involves considering not only the initial cost and long-term durability but also the warranties offered by manufacturers. These warranties provide crucial protection against defects and can significantly impact the overall value and peace of mind associated with your investment. Understanding the differences in warranty coverage between aluminum and vinyl siding is essential for making an informed decision.

    Warranty coverage for both aluminum and vinyl siding varies greatly depending on the manufacturer and specific product line. However, some general trends exist. It is crucial to carefully review the specific terms and conditions of the warranty provided with your chosen product before installation. Do not rely solely on general information; always refer to the manufacturer’s documentation.

    Aluminum Siding Warranties

    Aluminum siding warranties typically cover manufacturing defects, such as holes, cracks, or peeling paint, for a period ranging from 20 to 50 years. However, this coverage often excludes damage caused by accidents, improper installation, or normal wear and tear. Some manufacturers offer limited warranties on the finish, which may cover fading or chalking, for a shorter period, often around 10-15 years. The warranty might also specify limitations based on environmental factors like extreme weather conditions. For example, a warranty might not cover damage caused by prolonged exposure to harsh coastal environments.

    Vinyl Siding Warranties

    Vinyl siding warranties are often similar in length to aluminum warranties, frequently covering manufacturing defects for periods ranging from 20 to 50 years. However, similar to aluminum siding, these warranties typically exclude damage resulting from accidents, improper installation, or normal wear and tear. Many vinyl siding manufacturers offer specific warranties covering fading or chalking, usually for a period of 10-20 years. It is important to note that the warranty’s specific details will vary depending on the manufacturer and the type of vinyl siding chosen. A high-end vinyl siding product might have a more comprehensive warranty than a standard product.

    Filing a Warranty Claim

    The process for filing a warranty claim generally involves contacting the siding manufacturer directly. This usually requires providing documentation such as proof of purchase, photographs of the damaged siding, and a detailed description of the problem. The manufacturer will then assess the claim and determine whether the damage is covered under the warranty. If approved, the manufacturer may replace the damaged siding or provide a reimbursement for the repair costs. The exact procedures and required documentation will vary depending on the manufacturer and the specifics of the warranty. It is always advisable to carefully read the warranty documents to understand the process thoroughly before making a claim. Delaying a claim can negatively impact its processing.

    Resale Value Impact

    The choice between aluminum and vinyl siding can subtly, yet significantly, influence a home’s resale value. While both are popular choices, buyer preferences and perceived value can vary depending on factors like location, home style, and the overall condition of the property. Understanding these nuances can help homeowners make informed decisions that maximize their return on investment.

    Buyers often associate different siding materials with different levels of quality and maintenance. This perception, whether accurate or not, directly impacts a home’s perceived value and ultimately its selling price. For instance, aluminum siding, known for its durability, might appeal to buyers seeking a low-maintenance option, while vinyl siding’s affordability could attract budget-conscious buyers. However, the overall presentation and condition of the siding, regardless of material, remain crucial.

    Buyer Preferences and Market Data

    Analyzing real estate market data reveals trends in buyer preferences for different siding materials. While comprehensive nationwide data specifically comparing aluminum and vinyl siding’s impact on resale value is scarce, localized studies and anecdotal evidence offer insights. For example, in regions with harsh weather conditions, the durability of aluminum siding might command a higher premium compared to vinyl, which could be more susceptible to damage from extreme temperatures or hail. Conversely, in areas with milder climates, the lower initial cost of vinyl siding could outweigh any perceived disadvantages in the eyes of some buyers. Real estate agents often track these preferences within their specific markets and can offer valuable local data. A comparative market analysis (CMA) prepared by a real estate professional for a particular property will often include details on comparable properties with different siding types, revealing market-specific pricing impacts.

    Presenting Siding Choice to Potential Buyers

    High-quality photographs and a well-maintained exterior are paramount. Regardless of the siding material, showcasing the home’s curb appeal through professional photos and a clean, well-landscaped yard is crucial. In the property listing description, highlighting the siding’s positive attributes is important. For aluminum siding, emphasize its durability, low maintenance, and resistance to fire and pests. For vinyl siding, focus on its affordability, variety of colors and styles, and ease of cleaning. If renovations were recently completed, clearly state this and emphasize the warranty information. Open houses or virtual tours should allow potential buyers to appreciate the quality and condition of the siding firsthand. During showings, be prepared to answer questions about the siding’s maintenance and lifespan, emphasizing the long-term cost-effectiveness of a well-maintained exterior. Finally, remember that a professional home appraisal can provide an objective assessment of the property’s value, taking into account all factors, including the type of siding.

    Pest and Insect Resistance

    Aluminum and vinyl siding offer different levels of protection against pest infestation, a crucial factor in maintaining the longevity and structural integrity of your home. Understanding these differences can help homeowners make informed decisions based on their specific needs and local pest populations. Both materials present advantages and disadvantages regarding pest resistance, and proactive measures are essential regardless of the siding choice.

    Aluminum siding, being a non-porous material, is naturally resistant to many common wood-destroying insects like termites and carpenter ants. These insects require organic matter for sustenance and nesting, and aluminum provides no such resource. However, insects can still cause indirect damage. For example, rodents might nest behind the siding, potentially causing damage to the underlying structure or creating pathways for water intrusion.

    Aluminum Siding Pest Resistance and Mitigation

    Aluminum siding’s inherent resistance to insect infestation significantly reduces the likelihood of direct damage. However, pests might still create problems in areas where aluminum siding meets other building materials, such as wooden framing or trim. Regular inspections of these junctions are crucial to identify and address any potential issues early. Maintaining a clean perimeter around the house, removing debris and vegetation that could provide shelter for pests, is also an effective preventative measure. Addressing any potential rodent entry points, such as gaps or cracks in the foundation, is also essential. If rodent activity is detected, professional pest control services should be considered to eliminate the infestation and prevent future problems.

    Vinyl Siding Pest Resistance and Mitigation

    Vinyl siding, while generally resistant to insect damage, is not impervious. While termites and carpenter ants will not directly feed on vinyl, they may still utilize areas behind the siding for nesting if moisture is present. This is especially true if there is water damage or rotting wood underneath. Rodents can also gnaw on vinyl siding, though it is less likely to be a primary food source than wood. Regular inspections are key to identifying any signs of damage, such as gnaw marks or areas where the siding has separated from the underlying structure. Proper ventilation and moisture control are essential to prevent conditions that attract pests. Similar to aluminum siding, maintaining a clean perimeter and addressing potential rodent entry points are vital preventative measures. If pest activity is suspected, a professional pest inspection is recommended to determine the extent of the infestation and implement an appropriate treatment plan.

    Closing Summary

    Ultimately, the best siding choice – aluminum or vinyl – depends on a careful consideration of your individual priorities. While vinyl often offers a lower initial cost, aluminum’s superior durability and longevity might prove more economical in the long run. By weighing factors like climate, budget, aesthetic preferences, and long-term maintenance, you can confidently choose a siding material that enhances your home’s beauty and value for years to come. Remember to factor in the total cost of ownership, including installation, maintenance, and potential replacements, to make the most informed decision.

  • Where to Buy Affordable Aluminum Siding

    Where to Buy Affordable Aluminum Siding

    Where to Buy Affordable Aluminum Siding for Your Home is a question many homeowners ask. Finding the right balance between cost and quality can be challenging, but understanding the market and your options makes the process significantly easier. This guide explores various avenues for purchasing affordable aluminum siding, considering factors like material quality, installation costs, and financing options to help you make an informed decision.

    From identifying reputable manufacturers and online retailers to understanding the nuances of installation and maintenance, we’ll cover essential aspects to ensure you achieve the best possible outcome for your home improvement project. We’ll also delve into the importance of warranties, environmental considerations, and ways to avoid hidden costs, equipping you with the knowledge to navigate the process confidently.

    Defining “Affordable”

    Determining the affordability of aluminum siding hinges on a variety of factors, making it difficult to assign a single price point that applies universally. The cost varies significantly based on location, project size, and the quality of materials and labor involved. Understanding these variables is key to making an informed decision.

    Affordability in the context of aluminum siding typically refers to a price range that represents good value for the investment, considering the product’s longevity and maintenance requirements. While the initial outlay might be higher than some alternatives, the long-term cost-effectiveness should be a primary consideration.

    Price Ranges for Affordable Aluminum Siding

    The price of aluminum siding typically ranges from $3 to $12 per square foot, including both materials and installation. This wide range reflects differences in material quality (thickness, finish, color), labor costs (regional variations and contractor experience), and the complexity of the installation (e.g., intricate trim work, multiple architectural features). In regions with higher labor costs, such as major metropolitan areas on the East and West Coasts, the higher end of this range is more common. More rural areas might see prices closer to the lower end. A homeowner in a rural area of the Midwest might find $4-$6 per square foot to be a reasonable price, while someone in New York City might consider $8-$12 per square foot affordable, recognizing the increased cost of labor.

    Factors Influencing Perceived Affordability

    Several factors beyond the base price per square foot significantly impact the perceived affordability of aluminum siding.

    Material quality plays a crucial role. Thicker aluminum sheets are more durable and resistant to damage, justifying a higher initial cost. Premium finishes, such as those with enhanced fade resistance or textured surfaces, also increase the price. However, these premium materials often translate to lower long-term maintenance costs and increased lifespan, making the investment worthwhile for many homeowners.

    Installation costs constitute a substantial portion of the overall expense. The complexity of the project, including the size of the house, the number of architectural details, and the need for specialized labor (e.g., for difficult-to-reach areas), directly affects labor costs. Choosing a reputable and experienced installer is crucial, even if it means a slightly higher upfront cost, as it minimizes the risk of costly mistakes or future repairs.

    Price Comparison of Siding Materials

    The following table compares the approximate price ranges for aluminum siding with other common siding materials. These figures are estimates and can vary significantly based on location, quality, and installation costs.

    Siding Material Price Range Per Square Foot (USD) Pros Cons
    Aluminum $3 – $12 Durable, low maintenance, long lifespan, fire-resistant Higher initial cost compared to vinyl, can dent
    Vinyl $1 – $6 Affordable, easy to install, low maintenance Less durable than aluminum, can fade or crack
    Wood $4 – $20+ Aesthetically pleasing, natural look High maintenance, susceptible to rot and insect damage, expensive
    Fiber Cement $6 – $15 Durable, fire-resistant, low maintenance More expensive than vinyl, requires professional installation

    Sourcing Aluminum Siding

    Finding the right aluminum siding for your home involves understanding where to source it and comparing options to ensure you get the best value for your budget. This section will explore various avenues for purchasing aluminum siding, highlighting the advantages and disadvantages of each. Careful consideration of these options will help you make an informed decision.

    Major Aluminum Siding Manufacturers and Distribution Channels

    Several major manufacturers produce aluminum siding, each with its own distribution network. These manufacturers often sell their products through a combination of wholesale distributors, specialized siding contractors, and, in some cases, directly to consumers. Understanding these channels is crucial for securing competitive pricing and reliable installation services.

    • Alcoa: A leading producer of aluminum products, Alcoa’s siding is often available through building material suppliers and contractors specializing in exterior renovations. Their distribution often relies on a network of established wholesalers and dealers.
    • CertainTeed: Known for a wide range of building materials, CertainTeed offers aluminum siding distributed through a similar network to Alcoa, including home improvement retailers and contractors.
    • Mastic: Mastic, a prominent player in the exterior cladding market, typically distributes its aluminum siding through a network of independent dealers and contractors, alongside some larger home improvement chains.

    Online Retailers Specializing in Aluminum Siding Sales and Pricing Strategies

    The internet provides a convenient platform for comparing prices and finding deals on aluminum siding. However, it’s important to be aware of the different pricing strategies employed by online retailers. Some may offer competitive pricing on bulk orders, while others may focus on offering a wider selection of styles and colors, potentially at a higher price point. Always compare total costs, including shipping and handling fees.

    • Many online retailers operate as marketplaces, listing products from various manufacturers and suppliers. Pricing can vary significantly depending on the seller and the specific product specifications.
    • Some online retailers specialize in home improvement supplies and offer competitive pricing by leveraging bulk purchasing power. They may offer discounts for larger orders or bundle deals that include installation materials.
    • Direct-to-consumer manufacturers may offer online sales, often bypassing the traditional distribution network. This can potentially result in lower prices but might require more direct involvement in the purchasing and shipping process.

    Big-Box Stores versus Specialized Siding Contractors

    Purchasing aluminum siding from big-box stores versus specialized siding contractors presents distinct advantages and disadvantages. Big-box stores offer convenience and potentially competitive pricing on standard products, but may lack the specialized knowledge and service provided by experienced siding contractors.

    • Big-box stores typically offer a limited selection of aluminum siding options and may not provide comprehensive installation services. However, they are generally convenient for smaller projects and readily accessible.
    • Specialized siding contractors often offer a wider selection of siding options, expert installation services, and potentially better warranties. They can also provide valuable advice on choosing the right siding for your home and climate. However, their services typically come at a higher cost.

    Evaluating Material Quality

    Choosing high-quality aluminum siding is crucial for ensuring the longevity and aesthetic appeal of your home’s exterior. The initial cost savings of lower-quality materials can quickly be offset by premature deterioration, requiring costly repairs or replacements. Understanding the key characteristics of durable aluminum siding will help you make an informed decision.

    Aluminum siding thickness, coating type, and manufacturer warranty are key indicators of quality. Thicker siding generally offers greater resistance to dents and damage, while a high-quality coating protects against fading, chipping, and corrosion. A comprehensive warranty demonstrates the manufacturer’s confidence in their product.

    Aluminum Siding Thickness and Gauge

    Aluminum siding is measured by its gauge, a number inversely proportional to thickness. Lower gauge numbers indicate thicker siding. For example, a .032-inch thick siding (gauge 26) is considered more durable than a .024-inch thick siding (gauge 28). Thicker aluminum siding better withstands impacts from hail, debris, and accidental bumps, contributing to a longer lifespan. This added durability translates to less frequent repairs and replacements, ultimately saving you money in the long run. While thicker siding generally costs more upfront, the investment pays off in increased longevity and reduced maintenance.

    Aluminum Siding Coatings and Finishes

    The coating applied to aluminum siding significantly influences its resistance to weathering and fading. Two common types are painted and powder-coated finishes. Painted finishes, while generally less expensive, are often less durable than powder-coated finishes. Powder-coating involves applying a dry powder coating and then curing it at high temperatures, resulting in a thicker, more resilient finish that better resists chipping, peeling, and fading. Powder-coated siding often comes with longer warranties reflecting its superior performance. The choice between painted and powder-coated siding depends on budget and desired longevity; powder-coating offers superior protection and longevity but commands a higher initial cost.

    Warranty Information and Manufacturer Reputation

    A comprehensive warranty is a strong indicator of a manufacturer’s confidence in their product. Look for warranties that cover defects in materials and workmanship for an extended period, typically 20-30 years or longer. A reputable manufacturer will stand behind their product and offer prompt resolution of any issues. Checking online reviews and ratings from previous customers can also help assess the manufacturer’s reliability and customer service. Understanding the specifics of the warranty, including what is and is not covered, is crucial before making a purchase.

    Questions to Ask Manufacturers or Suppliers

    Before committing to a purchase, it is essential to gather all necessary information regarding material quality and warranties. The following points should be clarified:

    • What is the gauge (thickness) of the aluminum siding?
    • What type of coating is used (painted, powder-coated, etc.) and what is its thickness?
    • What is the warranty period and what specific defects are covered?
    • What is the manufacturer’s reputation and history in the industry?
    • Are there any independent certifications or testing results verifying the siding’s quality and durability?
    • What are the available color options and their fade resistance ratings?

    Installation Costs and Considerations

    Installing aluminum siding involves significant costs, encompassing both materials and labor. Understanding these expenses is crucial for budgeting and making informed decisions about your home improvement project. Accurate cost estimation depends on several key factors, allowing for a realistic assessment of the overall investment.

    The total cost of aluminum siding installation is typically a combination of material costs and labor charges. Material costs vary depending on the type of siding chosen (thickness, color, style), the amount needed (square footage of your home), and the supplier. Labor costs are heavily influenced by factors such as the complexity of the installation (e.g., intricate trim work, multiple gables), the size of your home, and prevailing regional labor rates. In many cases, contractors provide a comprehensive quote encompassing both materials and labor.

    Typical Installation Cost Breakdown

    A detailed breakdown of installation costs is difficult to provide without specifics about your home and location. However, we can offer a general range based on national averages. Keep in mind that these are estimates and actual costs may vary significantly. Always obtain multiple quotes from reputable contractors for accurate pricing in your area.

    For a typical single-family home, the cost of aluminum siding installation can range from $6,000 to $15,000 or more. This includes both materials and labor. The lower end of the range often applies to smaller homes with simpler designs and straightforward installations, while the higher end reflects larger homes, complex architectural features, and potentially higher labor rates in certain regions.

    Factors Influencing Installation Costs

    Several factors significantly impact the final cost of your aluminum siding installation. Understanding these variables allows for better budgeting and realistic expectations.

    • Home Size: Larger homes naturally require more materials and more labor hours, leading to higher overall costs.
    • Home Complexity: Homes with intricate architectural details, such as dormers, multiple gables, or complex trim work, increase labor time and thus the cost. These details require more precision and careful installation.
    • Regional Labor Rates: Labor costs vary significantly across geographical locations. Areas with higher costs of living generally have higher labor rates for contractors.
    • Material Choice: The type of aluminum siding selected impacts the material cost. Higher-quality siding, featuring thicker gauge aluminum or specialized finishes, will be more expensive.
    • Existing Siding Removal: If existing siding needs removal before installation, this adds to both labor and disposal costs.

    DIY Installation versus Hiring a Professional

    The decision to install aluminum siding yourself or hire a professional contractor involves weighing the potential benefits and risks of each approach.

    Factor DIY Installation Professional Installation
    Cost Potentially lower initial cost (materials only) Higher initial cost (materials and labor)
    Time Significantly longer project duration Faster project completion
    Skill Level Requires significant experience and skill Expertise and experience guaranteed
    Warranty Limited or no warranty on installation Warranty typically provided on both materials and labor
    Risk of Damage Higher risk of damage to the home or improper installation Lower risk of damage or improper installation

    While DIY installation might seem cost-effective initially, the potential for errors, damage, and increased project time can ultimately negate any savings. Professional contractors possess the expertise, tools, and insurance to ensure a proper and safe installation, offering peace of mind and a warranty to protect your investment.

    Financing Options

    Securing funding for your aluminum siding project can significantly impact your budget and timeline. Understanding the various financing options available allows you to make informed decisions based on your financial situation and the project’s scope. This section will explore several common methods, highlighting their advantages and disadvantages.

    Several financing avenues exist for home improvement projects, each with its own set of benefits and drawbacks. Choosing the right option depends heavily on factors such as your credit score, the project’s cost, and your repayment comfort level. Careful consideration of these factors will lead to a more financially sound decision.

    Home Improvement Loans

    Home improvement loans are specifically designed for projects like siding replacement. These loans offer fixed interest rates, predictable monthly payments, and longer repayment periods than credit cards. However, they typically require a credit check and may involve closing costs. For example, a homeowner might secure a 5-year loan with a 7% interest rate to cover a $10,000 siding project. The monthly payments would be calculated based on the loan amount, interest rate, and loan term. This predictability allows for better budgeting.

    Credit Cards

    Credit cards offer immediate access to funds, making them convenient for smaller projects. However, high interest rates and potential for accumulating debt are significant drawbacks. Using a credit card for a large home improvement project could lead to substantial interest charges over time if not paid off quickly. For instance, using a credit card with a 18% APR to finance a $5,000 project could result in significantly higher total costs compared to a home improvement loan.

    Home Equity Loans or Lines of Credit (HELOCs)

    Home equity loans and HELOCs use your home’s equity as collateral. HELOCs offer flexibility, allowing you to borrow funds as needed up to a pre-approved limit. Home equity loans provide a lump-sum payment. Both options typically offer lower interest rates than credit cards but carry the risk of foreclosure if payments are not made. For larger projects, a HELOC might be advantageous, allowing for staged payments as the project progresses. However, it’s crucial to understand the terms and conditions, including potential interest rate fluctuations with a HELOC.

    Comparison of Financing Options

    The following table compares common financing options for home improvement projects. Remember that interest rates and terms can vary based on your creditworthiness and the lender.

    Financing Option Typical Interest Rate Range Typical Repayment Term Advantages
    Home Improvement Loan 6% – 12% 1-7 years Fixed interest rate, predictable payments, longer repayment period
    Credit Card 15% – 25% Varies, often revolving Immediate access to funds, convenience
    Home Equity Loan 5% – 10% 5-15 years Lower interest rates than credit cards, lump sum payment
    HELOC Variable, typically lower than credit cards Draw period and repayment period vary Flexibility, access to funds as needed

    Warranty and Guarantees

    Protecting your investment in new aluminum siding requires careful consideration of the warranty offered by the manufacturer and installer. A comprehensive warranty provides peace of mind and safeguards against potential defects or issues that may arise over time. Understanding the specifics of different warranty types is crucial for making an informed purchasing decision.

    A thorough review of warranty information is paramount before committing to a purchase. Warranties vary significantly between manufacturers, impacting the level of protection you receive. Some may only cover material defects, while others might extend coverage to include workmanship or even labor costs associated with repairs. Choosing a product with a robust warranty can significantly reduce the risk of unforeseen expenses down the line.

    Warranty Types Offered by Manufacturers

    Manufacturers typically offer several types of warranties for their aluminum siding products. These warranties often address different aspects of the product and its installation. Common types include material defect warranties, which cover flaws in the manufacturing process, and workmanship warranties, which cover issues arising from improper installation. Some manufacturers offer combined warranties encompassing both material and workmanship, providing more comprehensive coverage. Additionally, some may offer extended warranties for an additional cost, providing longer-term protection. For example, one manufacturer might offer a 30-year warranty against material defects, while another might offer a 20-year warranty that covers both material defects and workmanship. A third might offer a 25-year limited warranty covering material defects, with an option to purchase a 10-year extended warranty covering labor. These differences highlight the importance of carefully comparing warranty terms.

    Key Aspects to Consider When Evaluating an Aluminum Siding Warranty

    Before finalizing your purchase, carefully examine the warranty’s fine print. A checklist of essential considerations includes:

    • Warranty Period: Note the duration of coverage for material defects and workmanship. Longer warranty periods generally indicate higher confidence in the product’s quality and durability.
    • Coverage Details: Understand precisely what is covered under the warranty. Does it include only material defects, or does it also encompass labor costs for repairs or replacements? Are there specific exclusions, such as damage caused by extreme weather events?
    • Transferability: Determine if the warranty is transferable to a future homeowner should you sell your property. Transferable warranties add significant value to your home.
    • Claim Process: Review the procedure for filing a warranty claim. Is it straightforward, or are there complex requirements or lengthy processing times?
    • Manufacturer Reputation: Research the manufacturer’s reputation and track record for honoring warranties. Online reviews and customer testimonials can offer valuable insights.
    • Written Documentation: Ensure you receive a clear and concise written warranty document. This document should clearly outline all terms and conditions of the warranty.

    Local Suppliers and Contractors

    Finding the right local supplier and contractor is crucial for a successful aluminum siding project. Choosing reputable professionals ensures quality materials, proper installation, and peace of mind. This section will guide you through the process of identifying and vetting potential partners for your home improvement project.

    Locating reputable local suppliers and contractors involves a multi-pronged approach. Online searches, referrals from trusted sources, and direct inquiries within your community are all effective strategies. Thorough vetting is paramount to avoid potential pitfalls and ensure a positive experience.

    Finding Reputable Local Suppliers and Contractors

    Several methods exist for finding qualified professionals. Online directories, such as those provided by the Better Business Bureau (BBB) and Angie’s List, offer ratings and reviews from past clients. Local home improvement stores often have relationships with reliable contractors and can provide recommendations. Networking within your community—asking friends, neighbors, and family for recommendations—can also yield valuable leads. Finally, checking with your local building permits office may provide a list of licensed contractors operating in your area. It’s advisable to contact several suppliers and contractors to compare prices and services.

    Vetting Potential Contractors

    Before committing to a contractor, a thorough vetting process is essential. This involves verifying their licensing and insurance, checking online reviews, and requesting references. Confirm that the contractor holds the necessary licenses to operate legally in your area. Verify they carry adequate liability and workers’ compensation insurance to protect you from potential financial liabilities in case of accidents or damages. Examine online reviews on platforms like Yelp, Google My Business, and the BBB to gauge customer satisfaction and identify any recurring issues. Request references from previous clients to directly inquire about their experiences with the contractor’s work quality, professionalism, and adherence to deadlines.

    Negotiating Prices and Securing Favorable Terms

    Negotiating prices and securing favorable terms requires preparation and clear communication. Obtain multiple quotes from different contractors to compare pricing and services. Clearly outline your project requirements, including the scope of work, materials, and desired timeline. Don’t hesitate to negotiate based on the quotes received, highlighting competitive pricing from other contractors. Clarify payment terms, including the down payment amount, payment schedule, and any penalties for late payments. Ensure the contract clearly specifies all aspects of the project, including materials used, warranty provisions, and dispute resolution mechanisms. A well-defined contract protects both you and the contractor, minimizing the potential for misunderstandings or disputes. For larger projects, consider breaking down the project into phases with milestone payments linked to the completion of each phase.

    Environmental Impact

    Aluminum siding, while offering durability and affordability, carries environmental implications throughout its lifecycle, from manufacturing to disposal. Understanding these impacts allows for informed decision-making, promoting responsible home improvement choices. This section details the environmental considerations associated with aluminum siding, comparing it to alternatives and outlining recycling options.

    Aluminum siding production is energy-intensive. The extraction of bauxite ore, the primary aluminum source, requires significant energy consumption and can lead to habitat disruption and water pollution. The smelting process, transforming bauxite into aluminum, also necessitates substantial energy input, often relying on fossil fuels, contributing to greenhouse gas emissions. Furthermore, the manufacturing of siding involves additional energy usage for processes like rolling, coating, and finishing.

    Aluminum Siding Manufacturing and Disposal

    The environmental impact of aluminum siding manufacturing stems primarily from energy consumption during bauxite mining and aluminum smelting. These processes contribute to greenhouse gas emissions and habitat destruction. Disposal presents another concern, as improper disposal can lead to landfill accumulation and resource depletion. However, the durability of aluminum siding often translates to a longer lifespan compared to some alternatives, potentially offsetting some of the initial environmental costs. The impact can be further reduced by choosing recycled aluminum content in the siding itself.

    Comparison with Other Siding Materials

    Compared to other common siding materials, aluminum siding presents a mixed environmental profile. Vinyl siding, while often cheaper initially, is derived from petroleum, a non-renewable resource, and releases harmful chemicals during manufacturing and incineration. Wood siding, while renewable, requires extensive logging, potentially impacting forests and biodiversity. The environmental impact of each material depends on factors such as manufacturing processes, transportation distances, and end-of-life management. Life cycle assessments, which consider the entire lifespan of a product, are necessary for comprehensive comparisons. For instance, a life cycle assessment might reveal that while the initial energy input for aluminum is high, its longevity and recyclability can make its overall environmental impact comparable to, or even better than, other options, depending on the specific scenarios and the other materials being compared.

    Aluminum Siding Recycling

    Aluminum is a highly recyclable material. At the end of its lifespan, aluminum siding can be recycled and reused in the production of new aluminum products, significantly reducing the demand for newly mined bauxite. Many scrap metal recycling centers accept aluminum siding. The recycling process requires significantly less energy than primary aluminum production, minimizing environmental impact. Checking with local recycling facilities to confirm their acceptance of aluminum siding is recommended before undertaking removal and disposal. The high recyclability rate of aluminum makes it a more environmentally sustainable option compared to materials with lower recyclability rates, such as vinyl.

    Long-Term Maintenance

    Aluminum siding, while durable, requires regular maintenance to preserve its appearance and extend its lifespan. Neglecting maintenance can lead to increased repair costs and a diminished aesthetic appeal. Understanding the typical maintenance needs and potential damage scenarios is crucial for homeowners.

    Aluminum siding is relatively low-maintenance compared to other siding materials, but it still needs attention to keep it looking its best and functioning properly. Proper care prevents costly repairs and extends the life of your investment.

    Cleaning Aluminum Siding

    Regular cleaning is essential for removing dirt, grime, and other debris that can accumulate over time. This prevents staining and helps maintain the siding’s original color and luster. A simple solution of mild detergent and water, applied with a soft brush or sponge, is usually sufficient. Power washing can be used, but should be done cautiously to avoid damaging the siding’s finish. Excessive pressure can strip paint or damage the surface. For stubborn stains, a specialized siding cleaner might be necessary, always following the manufacturer’s instructions. Annual cleaning is recommended, but more frequent cleaning may be necessary depending on environmental factors, such as proximity to trees or heavy pollution.

    Repairing Damaged Aluminum Siding

    Despite its durability, aluminum siding can be susceptible to damage from impacts, such as hail or flying debris. Minor dents can often be repaired by carefully pushing the dent back into place from the back side of the panel. More significant damage, such as large dents, cracks, or holes, may require panel replacement. The cost of repair will vary depending on the extent of the damage and the labor involved. For example, replacing a single damaged panel might cost between $50 and $150, including the cost of the replacement panel and labor, while more extensive repairs could cost several hundred dollars. It’s advisable to contact a qualified siding contractor for significant repairs to ensure proper installation and prevent further damage.

    Maintenance Schedule for Aluminum Siding

    A proactive maintenance schedule helps prevent costly repairs and keeps your aluminum siding looking its best.

    Task Frequency Notes
    Cleaning (mild detergent and water) Annually More frequent cleaning may be needed in areas with heavy pollution or near trees.
    Inspection for damage Semi-annually Check for dents, cracks, loose panels, or other signs of damage.
    Caulk inspection and repair Annually Check caulking around windows and doors for cracks or gaps. Repair as needed.
    Professional inspection Every 5-10 years A professional can identify potential problems early on and recommend necessary repairs.

    Style and Aesthetics

    Aluminum siding offers a surprisingly diverse range of aesthetic options, moving beyond the perception of a purely utilitarian material. Careful selection can significantly enhance a home’s curb appeal and complement its architectural style, providing a durable and attractive exterior. The key lies in understanding the available styles and colors and how they interact with the overall design of the house.

    Aluminum siding comes in a variety of styles and colors designed to mimic other materials or create a modern, clean look. The ability to customize the appearance allows homeowners to achieve a specific aesthetic without the higher cost and maintenance of traditional materials like wood or brick. This versatility makes it a popular choice for both renovations and new constructions.

    Color Options and Finishes

    Aluminum siding manufacturers offer an extensive palette of colors, ranging from classic neutrals to bold and vibrant hues. These colors are achieved through a durable powder-coating process, providing excellent protection against fading and chipping. Popular choices include various shades of white, beige, gray, and brown, which tend to complement a wide range of architectural styles. However, bolder colors like deep blues, greens, and reds can also be incorporated to create a striking visual impact, particularly on homes with modern or contemporary designs. Finishes also vary, offering options that mimic wood grain, stone textures, or a smooth, even surface. The choice of color and finish significantly impacts the overall appearance and should be carefully considered.

    Aluminum Siding and Architectural Styles

    The adaptability of aluminum siding makes it suitable for various architectural styles. For example, a classic colonial home might be complemented by aluminum siding in a muted, earth-toned color with a subtle texture that mimics wood clapboard. This creates a traditional look without the maintenance demands of real wood. A contemporary home, on the other hand, might benefit from sleek, smooth aluminum siding in a bold color like charcoal gray or deep blue, enhancing the modern lines and minimalist aesthetic. Ranch-style homes often look great with horizontal siding, while Victorian homes might use vertical siding or a combination of patterns to accentuate the architectural details. The choice of siding style and color should always be considered in relation to the existing architectural features and the desired overall effect.

    Enhancing Curb Appeal with Aluminum Siding

    To maximize curb appeal, careful consideration should be given to the interplay of color, style, and trim. Choosing colors that complement the roof, windows, and landscaping is crucial. For instance, a home with a dark gray roof might look stunning with light gray or beige aluminum siding, creating a balanced and visually appealing contrast. The use of contrasting trim colors, such as white or black, can add visual interest and highlight architectural details. Moreover, selecting a siding style that complements the home’s proportions and architectural features can significantly enhance its overall aesthetic. For example, vertical siding can make a home appear taller, while horizontal siding can emphasize its width. Paying attention to these details ensures that the aluminum siding not only protects the home but also enhances its beauty and value.

    Hidden Costs

    While the upfront cost of aluminum siding is a significant factor in your decision, several hidden expenses can significantly inflate the final bill. Understanding these potential costs beforehand is crucial for accurate budgeting and avoiding financial surprises during the installation process. Failing to account for these hidden costs can lead to project delays, budget overruns, and ultimately, homeowner dissatisfaction.

    Permitting and Inspection Fees

    Securing the necessary permits from your local municipality is a non-negotiable step in any home improvement project, including aluminum siding installation. These permits ensure your project complies with building codes and safety regulations. Permit fees vary widely depending on location, the scope of the project, and the complexity of the design. For example, a large home requiring extensive siding replacement might incur significantly higher permit fees than a smaller project involving only a section of the house. Additionally, you should anticipate inspection fees, which are typically charged for each stage of the installation process, ensuring compliance with the approved plans. Always inquire about these fees early in the planning process to accurately incorporate them into your budget.

    Demolition and Removal Costs

    Before the new aluminum siding can be installed, the existing siding (if any) needs to be removed. This demolition process may involve additional costs beyond the initial siding quote. For instance, if the old siding is difficult to remove due to its age or condition, the labor costs can increase substantially. Moreover, disposal fees for the removed materials must be considered. These costs depend on your local waste disposal regulations and the volume of material removed. It’s advisable to obtain separate quotes for demolition and waste removal to avoid unexpected expenses during the project’s execution. Consider obtaining multiple quotes to compare pricing.

    Unexpected Repairs and Damage

    During the siding removal and installation process, unforeseen damage to underlying structures may be discovered. This could involve rotted wood, damaged sheathing, or insect infestation requiring repairs before the new siding can be safely installed. These repairs can significantly impact the overall project cost, sometimes exceeding the initial siding estimate. A thorough inspection of the existing siding and underlying structure before starting the project can help minimize such surprises. A pre-installation inspection can provide a clearer picture of potential issues and associated repair costs.

    Accurate Cost Estimation

    Accurately estimating the total cost of an aluminum siding project requires a comprehensive approach. Obtain detailed quotes from at least three reputable contractors. Ensure these quotes clearly outline all aspects of the project, including materials, labor, permits, demolition, and waste disposal. Don’t hesitate to ask clarifying questions about any ambiguities. Consider adding a contingency buffer of 10-15% to the total cost to account for unforeseen expenses. This buffer helps avoid financial stress if unexpected issues arise during the installation. Compare the quotes meticulously, ensuring they cover the same scope of work before making a decision.

    Aluminum Siding Installation Checklist: Avoiding Unexpected Expenses

    To minimize unexpected costs, use this checklist throughout the process:

    • Obtain multiple detailed quotes from reputable contractors.
    • Inquire about permit and inspection fees upfront.
    • Get separate quotes for demolition and waste removal.
    • Request a thorough pre-installation inspection to identify potential repairs.
    • Include a contingency buffer (10-15%) in your budget.
    • Review the contract carefully before signing, ensuring all aspects of the project are clearly defined.
    • Maintain open communication with the contractor throughout the process.

    Conclusion

    Ultimately, securing affordable aluminum siding for your home involves careful planning and research. By considering the factors outlined in this guide—from material selection and sourcing to installation and long-term maintenance—you can confidently make choices that enhance your home’s aesthetic appeal and value while staying within your budget. Remember to prioritize quality, obtain multiple quotes, and thoroughly vet any contractor before committing to a project. Your investment in new siding will enhance your home’s beauty and curb appeal for years to come.

  • Is Insulated Siding Worth the Extra Cost?

    Is Insulated Siding Worth the Extra Cost?

    Is Insulated Siding Worth the Extra Cost? This question sits at the heart of many home improvement decisions. Weighing the initial investment against potential long-term savings and increased home value requires careful consideration of various factors. This exploration delves into the financial aspects, energy efficiency gains, maintenance needs, and aesthetic considerations to help you make an informed choice that aligns with your budget and home improvement goals. We will examine the total cost of ownership, including installation, maintenance, and potential energy savings, providing a comprehensive analysis to guide your decision.

    From comparing upfront costs of insulated versus traditional siding to analyzing long-term energy savings and the impact on your home’s resale value, this guide provides a detailed breakdown. We’ll explore the installation process, maintenance requirements, environmental impact, and aesthetic options, ultimately empowering you to determine if the added expense of insulated siding is a worthwhile investment for your specific circumstances.

    Initial Cost Comparison

    Choosing between insulated and traditional siding involves a significant upfront investment. Understanding the cost differences between various materials and labor is crucial for making an informed decision. This section will break down the initial costs associated with each type of siding for a 1500 sq ft house, providing a clear comparison to aid in your decision-making process. Remember that these are estimates, and actual costs can vary depending on location, labor rates, and specific material choices.

    Cost Breakdown of Insulated and Traditional Siding

    The initial cost of siding is comprised of two main components: materials and labor. Material costs vary greatly depending on the type of siding chosen, its quality, and the supplier. Labor costs are influenced by factors such as the complexity of the installation, the size of the house, and the contractor’s rates. Generally, insulated siding requires more specialized labor, potentially leading to higher labor costs.

    Comparative Costs for a 1500 sq ft House

    The following table presents a comparative analysis of the initial investment required for different siding types for a 1500 sq ft house. These figures are estimates based on average costs in the United States as of late 2023 and should be considered a starting point for your own cost assessment. It is highly recommended to obtain multiple quotes from reputable contractors in your area to get a more accurate estimate.

    Siding Material Material Cost Labor Cost Total Cost Cost per sq ft
    Vinyl (Traditional) $5,000 – $8,000 $4,000 – $6,000 $9,000 – $14,000 $6 – $9.33
    Fiber Cement (Traditional) $10,000 – $15,000 $6,000 – $9,000 $16,000 – $24,000 $10.67 – $16
    Insulated Vinyl Siding $8,000 – $12,000 $5,000 – $7,000 $13,000 – $19,000 $8.67 – $12.67
    Insulated Fiber Cement Siding $15,000 – $22,000 $7,000 – $10,000 $22,000 – $32,000 $14.67 – $21.33

    Energy Efficiency Benefits

    Insulated siding offers significant long-term energy savings by reducing the amount of heat transferred between your home and the outside environment. This translates to lower heating and cooling bills, contributing to a more comfortable and cost-effective living space. The effectiveness of this insulation is directly related to its R-value.

    The R-value is a measure of a material’s resistance to heat flow. A higher R-value indicates better insulation. Insulated siding typically boasts a significantly higher R-value compared to traditional vinyl or wood siding, meaning it effectively acts as a thermal barrier, preventing heat loss in winter and heat gain in summer. This improved insulation performance leads to a reduction in the energy required to maintain a comfortable indoor temperature. The amount of energy saved will depend on factors such as climate, home size, and existing insulation levels.

    R-Value’s Impact on Heating and Cooling Costs

    The R-value of insulated siding directly influences heating and cooling costs. A higher R-value means less energy is needed to heat or cool your home. For example, a home with insulated siding possessing an R-value of 4 might require 20% less energy for heating compared to a similar home with non-insulated siding. This percentage can vary based on the specific R-value, climate, and other factors. This translates to tangible savings on your monthly energy bills, adding up to substantial cost reductions over the lifetime of the siding. This energy efficiency not only saves money but also reduces your carbon footprint.

    Potential Energy Savings Over 10 Years

    The following table illustrates the potential energy savings over a 10-year period for different climate zones, comparing insulated siding to non-insulated siding. These figures are estimates based on average energy costs and typical climate conditions. Actual savings may vary depending on specific factors such as home size, energy efficiency of other building components, and individual energy consumption habits.

    Climate Zone Annual Savings (Insulated Siding) Annual Savings (Non-Insulated Siding) Total Savings Difference Over 10 Years
    Mild (e.g., Southern California) $150 $50 $1000
    Moderate (e.g., Mid-Atlantic) $300 $100 $2000
    Cold (e.g., New England) $500 $150 $3500
    Severe (e.g., Northern Plains) $700 $200 $5000

    Maintenance and Lifespan

    Choosing siding involves considering not only initial costs and energy efficiency but also long-term maintenance needs and the material’s lifespan. Understanding these factors is crucial for making a financially sound and practical decision. Insulated siding, while more expensive upfront, often requires less maintenance over its lifetime compared to some alternatives, potentially offsetting the initial investment.

    Insulated siding and other common siding types exhibit varying maintenance requirements and lifespans. These differences significantly impact the overall cost of homeownership. Understanding these differences is crucial for making an informed decision about your home’s exterior.

    Insulated Siding Maintenance and Lifespan

    Insulated siding, typically made of vinyl or fiber cement with an integrated foam insulation layer, generally requires minimal maintenance. Its robust construction resists damage from weather and pests. Regular cleaning with soap and water is usually sufficient to maintain its appearance and functionality.

    • Cleaning: Annual cleaning with a mild detergent and water removes dirt and grime, preventing build-up and maintaining the siding’s aesthetic appeal. This is a relatively inexpensive maintenance task, requiring only basic cleaning supplies.
    • Repairing minor damage: While durable, insulated siding can be susceptible to minor damage from impacts. Repairing small dents or cracks may involve patching or replacing individual panels, depending on the extent of the damage. The cost of repairs is typically modest, and DIY repair is often feasible.
    • Lifespan: Insulated siding typically boasts a lifespan of 30-50 years, depending on the quality of the materials and installation. This longevity contributes to long-term cost savings by reducing the frequency of replacement.

    Vinyl Siding Maintenance and Lifespan

    Vinyl siding is a popular and relatively inexpensive option. However, it requires more frequent maintenance than insulated siding.

    • Cleaning: Regular cleaning is necessary to prevent dirt and mildew buildup, which can affect its appearance and potentially damage the material over time. Power washing should be done cautiously to avoid damage.
    • Repairing minor damage: Vinyl siding can crack or warp under extreme temperature fluctuations or impact. Repairing these issues often involves replacing damaged panels, which can be costly if extensive damage occurs.
    • Lifespan: Vinyl siding typically lasts 20-30 years, significantly shorter than insulated siding. This shorter lifespan necessitates replacement sooner, adding to the long-term cost.

    Wood Siding Maintenance and Lifespan

    Wood siding offers a classic aesthetic but demands significant ongoing maintenance.

    • Cleaning and staining/painting: Wood siding needs regular cleaning to remove dirt and debris. Periodic repainting or restaining is essential to protect it from weather damage and maintain its appearance. This can be a labor-intensive and costly process.
    • Repairing damage: Wood is susceptible to rot, insect infestation, and damage from harsh weather. Repairs can range from minor patching to extensive board replacement, significantly impacting costs.
    • Lifespan: With proper maintenance, wood siding can last 30-50 years, but neglecting maintenance significantly reduces its lifespan. The high maintenance costs contribute to a higher overall cost of ownership.

    Fiber Cement Siding Maintenance and Lifespan

    Fiber cement siding is a durable and low-maintenance option, offering a good balance between cost and longevity.

    • Cleaning: Regular cleaning is recommended to remove dirt and grime, preserving its appearance. Power washing is generally acceptable.
    • Repairing damage: Fiber cement is relatively resistant to damage, but repairs may be necessary for cracks or chips. Repairing is generally straightforward, although replacing large sections can be costly.
    • Lifespan: Fiber cement siding has a lifespan of 25-50 years, depending on the quality of installation and environmental conditions. This makes it a solid long-term investment.

    Home Value Impact

    Insulated siding can significantly influence a home’s resale value, often resulting in a higher selling price compared to homes with traditional siding. This increase is primarily due to the combined benefits of improved energy efficiency, enhanced curb appeal, and reduced maintenance needs. While the exact impact varies depending on location, home features, and market conditions, studies and real estate trends consistently demonstrate a positive correlation.

    The perceived value increase associated with insulated siding stems from several key factors. Buyers are increasingly aware of the long-term cost savings associated with energy efficiency, and insulated siding offers a tangible demonstration of this commitment. Moreover, the improved aesthetics, often featuring a cleaner, more modern look, contribute to a higher perceived value. The reduced maintenance requirements also appeal to buyers seeking a low-maintenance property.

    Factors Influencing Perceived Value Increase

    Several factors interact to determine the extent to which insulated siding boosts a home’s resale value. These include the overall quality of the siding material, the professional installation, and the prevailing market conditions. For example, in a competitive market with many comparable homes, the added value of energy-efficient features like insulated siding becomes more pronounced.

    Market Data and Examples

    While precise figures vary widely based on location and market dynamics, numerous real estate studies indicate a positive return on investment for home improvements that enhance energy efficiency. For instance, a 2023 study by the National Association of Realtors (NAR) – although not specific to insulated siding – found that energy-efficient upgrades generally recoup a significant portion of their cost at resale. A hypothetical example: In a market where the average home sells for $300,000, a home with high-quality insulated siding might command a premium of $5,000 to $15,000, reflecting the added value of energy savings and enhanced curb appeal. This premium could be higher in areas with higher energy costs or a strong preference for energy-efficient homes. It is crucial to consult with local real estate professionals for the most accurate and up-to-date market data specific to your region.

    Installation Process

    Insulated siding installation is a more involved process than traditional vinyl or fiber cement siding, demanding specialized tools and expertise. The added layer of insulation requires careful attention to detail to ensure proper fit, thermal performance, and longevity. Understanding the process can help homeowners make informed decisions about whether the added complexity is worthwhile for their specific project.

    The installation process generally begins with thorough preparation of the existing wall surface. This involves removing old siding, repairing any damaged sheathing or framing, and ensuring the wall is clean, dry, and level. Next, the insulated siding panels are installed, usually starting at a corner and working horizontally. Each panel is carefully fitted and secured using specialized fasteners. Proper flashing and caulking are crucial to prevent water penetration. Finally, trim pieces are installed to finish the edges and corners, creating a neat and professional appearance. The specific techniques and materials may vary depending on the type of insulated siding used (e.g., foam-backed vinyl, insulated fiber cement).

    Installation Time and Complexity Compared to Other Siding Options

    Insulated siding installation typically takes longer than installing traditional vinyl or fiber cement siding. The added layer of insulation and the need for precise fitting increases both labor time and the overall project duration. For example, installing traditional vinyl siding on a 1,500 square foot house might take a crew of two experienced installers three to four days, while insulated siding installation for the same house could extend the timeframe to five to seven days, depending on the complexity of the existing wall structure and any necessary repairs. This increased installation time translates to a higher overall labor cost. Furthermore, the installation of insulated siding often requires more specialized skills and tools than installing other siding types, potentially leading to higher labor costs due to the need for experienced installers. The complexity of the installation also increases the likelihood of potential issues if not installed by a qualified professional, leading to potentially costly repairs or replacements down the line.

    Environmental Considerations

    Choosing siding involves more than just aesthetics and cost; it also carries significant environmental implications. The production, transportation, and eventual disposal of siding materials all contribute to our carbon footprint. Understanding these impacts is crucial for making an informed and environmentally responsible decision. This section will explore the environmental impact of insulated siding compared to other common options, focusing on the resources used and the energy consumed throughout their lifecycles.

    Insulated siding, while offering energy efficiency benefits, requires a careful assessment of its overall environmental impact. The manufacturing process for insulated siding, typically involving vinyl, fiber cement, or engineered wood, consumes energy and resources. The extraction and processing of raw materials, the energy used in manufacturing, and transportation all contribute to the product’s overall carbon footprint. Comparing this to other siding options, such as wood, requires considering the sourcing and processing of those materials as well. For instance, sustainably harvested wood has a lower environmental impact than wood from unsustainable logging practices.

    Embodied Carbon of Different Siding Materials

    The embodied carbon of a building material refers to the total greenhouse gas emissions associated with its entire lifecycle, from raw material extraction to manufacturing, transportation, installation, and eventual disposal. Different siding materials have varying embodied carbon footprints. For example, vinyl siding, while often affordable, typically has a higher embodied carbon footprint than fiber cement or sustainably sourced wood. This is due to the energy-intensive process of manufacturing vinyl from petroleum-based products. Fiber cement, on the other hand, often utilizes readily available materials like cement and cellulose fibers, potentially leading to a lower embodied carbon footprint, though its manufacturing still involves energy consumption. Sustainably harvested wood siding boasts a comparatively low embodied carbon footprint, particularly when sourced locally, reducing transportation emissions. However, the embodied carbon of wood siding can vary significantly depending on the type of wood and the harvesting and processing methods employed. A life cycle assessment (LCA) can provide a comprehensive comparison of the embodied carbon of different siding materials, taking into account all stages of their lifecycles. Such assessments are increasingly used to inform sustainable building practices. For example, a study conducted by the University of California, Berkeley, found that sustainably sourced wood siding had a significantly lower embodied carbon footprint compared to vinyl siding, highlighting the importance of material sourcing and manufacturing processes.

    Curb Appeal and Aesthetics

    Insulated siding offers a compelling blend of functionality and aesthetics, significantly impacting a home’s curb appeal. The enhanced energy efficiency is a major benefit, but the visual improvements can also add considerable value and enhance the overall attractiveness of your property. The wide variety of styles and finishes available allows for customization to suit diverse architectural styles and personal preferences.

    The aesthetic options available with insulated siding are surprisingly diverse. Homeowners are not limited to a few basic choices. Instead, they can select from a broad spectrum of colors, textures, and styles to create a truly personalized look. This versatility allows for seamless integration with existing architectural features or the opportunity to create a completely new and striking facade.

    Color and Texture Variety

    Insulated siding manufacturers offer a wide range of colors, often mirroring the color palettes of traditional wood, vinyl, or fiber cement siding. Popular choices include classic neutrals like white, beige, and gray, as well as bolder options such as deep blues, greens, and reds. The availability of various shades allows for subtle or dramatic contrasts, enhancing the home’s architectural features. Furthermore, the textures mimic natural materials effectively. Options range from smooth, sleek finishes to those that replicate the look of wood grain, stucco, or even stone, providing a level of visual depth and realism that is often difficult to achieve with other materials. For example, a homeowner might choose a deep gray siding with a wood-grain texture to complement a craftsman-style home, or a crisp white with a smooth finish for a modern design.

    Visual Appeal Compared to Other Siding Materials

    Compared to other siding materials, insulated siding often presents a more refined and consistent appearance. Traditional wood siding, while aesthetically pleasing, requires significant maintenance to prevent rot, warping, and insect infestation. Vinyl siding, though low-maintenance, can sometimes appear less sophisticated and may fade or become brittle over time. Fiber cement siding offers a more durable and aesthetically pleasing option, but it is typically heavier and more expensive to install. Insulated siding, in many cases, provides a happy medium, offering the durability and low-maintenance benefits of vinyl or fiber cement, but with a wider range of colors and textures that can rival or surpass the aesthetic appeal of wood. For instance, high-quality insulated siding can mimic the richness and depth of natural wood without the associated upkeep. The consistent color and texture across panels also contribute to a cleaner, more modern look compared to the potential variations in wood or older vinyl siding.

    Warranty and Guarantees

    Choosing siding is a significant investment, and understanding the warranty and guarantee offered is crucial for protecting that investment. Different siding materials, including insulated siding, come with varying levels of protection against defects and failures. This section compares the typical warranty offerings and explains their implications for homeowners.

    Manufacturers of insulated siding typically offer warranties covering defects in materials and workmanship. These warranties often span a period of several decades, with some extending for as long as 50 years. However, it’s important to carefully review the specific terms and conditions, as limitations may apply. For example, certain types of damage, such as that caused by severe weather events or improper installation, might not be covered. In contrast, warranties for other siding materials, such as vinyl or fiber cement, generally offer shorter coverage periods, often ranging from 10 to 30 years.

    Warranty Types and Their Implications

    Understanding the different types of warranties is key to making an informed decision. Limited warranties typically cover defects in materials and workmanship, but often exclude damage caused by external factors. Full warranties, on the other hand, offer broader coverage, sometimes including damage from certain external sources. Furthermore, some manufacturers provide transferable warranties, meaning the coverage can be passed on to future homeowners, adding value to the property. Conversely, non-transferable warranties only protect the original purchaser. The length of the warranty period significantly impacts the long-term cost-effectiveness of the siding. A longer warranty period indicates greater manufacturer confidence in the product’s durability and longevity, reducing the potential for expensive repairs or replacements in the future.

    Comparing Warranty Offerings

    Let’s consider a hypothetical comparison. Company A offers insulated siding with a 50-year limited warranty covering manufacturing defects, while Company B provides vinyl siding with a 20-year limited warranty covering the same. While the initial cost of the insulated siding might be higher, the significantly longer warranty period suggests a lower long-term risk of needing costly repairs or replacements within the warranty period. This extended coverage can be a significant factor in justifying the higher upfront investment. It is essential to obtain written copies of all warranties before making a purchasing decision and to fully understand the limitations of the coverage provided. A thorough comparison of warranties from different manufacturers and siding types is highly recommended before making a final choice.

    Regional Considerations

    The cost-effectiveness and suitability of insulated siding are significantly influenced by regional climate and weather patterns. Areas with extreme temperature fluctuations or harsh weather conditions often see the greatest return on investment from this type of siding. Conversely, regions with moderate climates might find the added expense less justifiable.

    The benefits of insulated siding are most pronounced in regions experiencing significant temperature swings throughout the year, leading to higher heating and cooling costs. These regions will experience a more noticeable reduction in energy consumption and a faster return on the initial investment in insulated siding. Furthermore, areas prone to extreme weather events, such as heavy snow, hail, or strong winds, will benefit from the added protection and durability that insulated siding provides.

    Climate Impact on Energy Savings

    The effectiveness of insulated siding in reducing energy costs directly correlates with the severity of the regional climate. In areas with long, cold winters and hot, humid summers, such as the northern United States or Canadian provinces, the insulating properties of the siding will significantly reduce the burden on heating and cooling systems. For example, a home in Minnesota with insulated siding might see a reduction in heating costs of 15-20% compared to a similar home with traditional vinyl siding. Conversely, in milder climates like those found in parts of California or the southern United States, the energy savings might be less substantial, potentially negating the higher initial cost of installation.

    Regional Cost Variations

    The cost of insulated siding installation can vary depending on the region. Labor costs, material availability, and local regulations all contribute to price fluctuations. Areas with a high concentration of skilled labor might have higher installation costs, while regions with readily available materials could experience lower prices. For instance, a home in a densely populated urban area might face higher installation costs compared to a similar project in a rural area due to factors like transportation costs and labor demand. Additionally, government incentives or tax credits available in some regions can offset the initial cost, making insulated siding more financially attractive in certain locations.

    Examples of Suitable Regions

    Regions with extreme temperature variations and harsh weather conditions are prime candidates for insulated siding. The Northeastern United States, experiencing harsh winters and humid summers, would significantly benefit from the energy efficiency and protection offered. Similarly, areas in the Midwest and Canada, with prolonged cold winters, would see substantial returns on investment. Conversely, regions with consistently mild temperatures, such as parts of Southern California or Florida, might find the added cost less worthwhile, unless other factors, such as increased durability and protection from extreme weather events (like hurricanes in Florida), are prioritized.

    Return on Investment (ROI)

    Determining the return on investment for insulated siding requires a careful consideration of several factors. The initial cost of installation, the annual savings in energy bills, and the potential increase in your home’s value all contribute to the overall ROI. While it’s impossible to provide a universally applicable figure, a thorough analysis can illuminate whether insulated siding is a worthwhile financial undertaking for your specific circumstances.

    Calculating the ROI involves comparing the total cost of the investment against the total benefits received over a set period. This typically involves projecting energy savings and increases in home value over several years, then comparing these benefits to the initial investment cost. The longer the timeframe considered, the more significant the potential ROI.

    ROI Calculation Methodology

    The formula for calculating ROI is straightforward: ROI = (Net Profit / Cost of Investment) x 100. In the context of insulated siding, the “Net Profit” represents the cumulative energy savings and increased home value over the chosen timeframe, minus the initial cost of installation. The “Cost of Investment” is simply the total cost of purchasing and installing the insulated siding.

    Illustrative ROI Scenarios

    The following table illustrates potential ROI scenarios for different property values and annual energy savings. These are illustrative examples and actual results may vary based on factors like climate, energy prices, and the specific type of insulated siding installed. It is crucial to obtain personalized quotes and energy audits for accurate projections.

    Scenario Initial Investment Annual Savings ROI over 10 Years
    Small Home, Moderate Savings $10,000 $500 50% ([$500/year * 10 years – $10,000] / $10,000) * 100 = 50%
    Medium Home, Significant Savings $15,000 $1,000 66.7% ([$1,000/year * 10 years – $15,000] / $15,000) * 100 = 66.7%
    Large Home, High Savings & Value Increase $25,000 $1,500 40% (Assuming a $5,000 increase in home value after 10 years. [($1,500/year * 10 years) + $5,000 – $25,000] / $25,000) * 100 = 40%

    Note: These calculations do not include potential tax credits or other financial incentives that might further improve the ROI. Furthermore, the increase in home value is a subjective estimate and will vary depending on the local real estate market. A professional appraisal would be needed for a precise determination.

    Closing Notes

    Ultimately, the decision of whether or not insulated siding is worth the extra cost is a personalized one. While the initial investment is higher, the potential for significant long-term savings on energy bills, increased home value, and reduced maintenance costs can make it a financially sound choice for many homeowners. By carefully weighing the factors discussed—including energy efficiency, lifespan, maintenance, and aesthetic preferences—alongside a thorough ROI calculation, you can confidently determine if insulated siding is the right investment for your home and your budget. Remember to consult with qualified contractors for accurate cost estimates and professional installation.