Tag: Siding Materials

  • Budgeting for a Full Home Siding Replacement

    Budgeting for a Full Home Siding Replacement

    Budgeting for a Full Home Siding Replacement is a crucial step in any home renovation project. This process involves careful consideration of various factors, from material costs and labor expenses to permits, unexpected repairs, and financing options. Understanding these elements ensures a smooth and financially responsible renovation, transforming your home’s exterior and potentially increasing its value. This guide will walk you through each stage, providing valuable insights and practical advice to help you navigate the budgeting process with confidence.

    We will explore the cost differences between various siding materials like vinyl, wood, and fiber cement, highlighting the long-term cost-effectiveness of each. We’ll also delve into the complexities of labor costs, contractor selection, and permit acquisition, offering strategies for finding reliable contractors and navigating the permitting process efficiently. Furthermore, we’ll address potential hidden costs, contingency planning, and financing options to ensure you’re fully prepared for the financial aspects of your siding replacement.

    Understanding Material Costs

    Replacing your home’s siding is a significant investment, and understanding the material costs is crucial for accurate budgeting. The price of siding varies considerably depending on the material chosen, its quality, and regional factors. This section will break down the costs of common siding materials and discuss their long-term value.

    Typical Siding Material Costs

    Several factors influence the final cost of siding materials. These include the type of siding, its quality (e.g., thickness, durability ratings), the style and color chosen, and regional variations in material availability and labor rates. Additionally, the complexity of your home’s design, such as the number of angles, dormers, and other architectural features, will affect the overall material needs and, consequently, the final cost. Premium materials and finishes will naturally command higher prices.

    Cost Comparison of Siding Materials

    Choosing the right siding material involves weighing initial costs against long-term maintenance and lifespan. Vinyl siding is generally the most affordable upfront, but may not last as long as other options. Wood siding offers a classic look but requires significant ongoing maintenance to prevent rot and insect damage. Fiber cement provides excellent durability and longevity, but comes with a higher initial price tag. Metal siding, while durable, can be susceptible to dents and may be more expensive than vinyl but less so than fiber cement.

    Cost Per Square Foot of Various Siding Materials

    The following table provides estimated costs per square foot for various siding materials, including both material and installation costs. These figures are averages and can vary based on location, installer, and material specifics. It’s crucial to obtain multiple quotes from reputable contractors in your area for accurate pricing.

    Siding Material Material Cost ($/sq ft) Installation Cost ($/sq ft) Total Cost ($/sq ft)
    Vinyl $2 – $6 $3 – $5 $5 – $11
    Wood $6 – $15 $5 – $10 $11 – $25
    Fiber Cement $8 – $18 $6 – $12 $14 – $30
    Metal $7 – $15 $5 – $8 $12 – $23

    Labor Costs and Contractor Selection

    Replacing your home’s siding is a significant investment, and labor costs represent a substantial portion of the total expense. Understanding the factors that influence these costs and employing effective strategies for contractor selection are crucial for a successful and budget-friendly project. This section will explore these key aspects to help you navigate this important phase of your home improvement project.

    Labor costs for siding replacement are influenced by several interconnected factors. The size of your home directly impacts the time and effort required, with larger homes naturally demanding more labor hours. The complexity of the project also plays a significant role. Homes with intricate architectural details, multiple stories, or difficult-to-access areas will necessitate more skilled labor and thus, higher costs. Finally, geographical location influences labor rates. Areas with high costs of living or a shortage of skilled tradespeople tend to have higher labor rates for construction projects. For example, a siding replacement project in a densely populated urban area might cost considerably more than a similar project in a rural region due to higher demand and overhead costs for contractors.

    Factors Influencing Labor Costs

    Several key factors contribute to the overall labor costs associated with siding replacement. Project size, measured in square footage, directly correlates with the number of labor hours required. More complex projects, involving intricate designs, multiple materials, or significant repairs to underlying structures, will naturally command higher labor costs due to increased time and specialized skills needed. The geographical location of the property also plays a crucial role; areas with higher labor costs due to factors such as high demand or local regulations will translate to a higher price tag for the labor component of the project. For instance, a coastal region might have higher labor rates due to a combination of high demand and potentially more stringent building codes. Finally, the type of siding chosen also influences labor costs. Certain materials, such as intricate stone veneer, require more specialized skills and time to install than simpler vinyl siding, resulting in a higher labor expense.

    Strategies for Finding Reliable and Reasonably Priced Contractors

    Securing a reliable and reasonably priced contractor is paramount. Begin by requesting referrals from friends, family, or neighbors who have recently undergone similar projects. Online reviews and ratings on platforms like Yelp or Angie’s List can also provide valuable insights into contractors’ reputations and past performance. It is crucial to obtain at least three detailed bids from different contractors to compare pricing and services. During the bidding process, ensure the bids clearly outline all included materials, labor costs, and any additional fees. Verify that the contractors are properly licensed, insured, and have a proven track record of successful projects.

    Contractor Bidding Processes and Contract Structures

    Contractors typically employ different bidding processes. Some provide fixed-price bids, outlining a total cost for the entire project. Others might offer time-and-materials bids, where the final cost is determined by the actual labor hours and materials used. Fixed-price bids offer greater cost certainty, but they might not account for unforeseen complications. Time-and-materials bids offer flexibility but could potentially lead to higher-than-anticipated costs if the project encounters unexpected challenges. Regardless of the bidding process, the contract should clearly specify the scope of work, payment schedule, timelines, and warranty provisions. Thoroughly reviewing the contract before signing is crucial to protect your interests and ensure a clear understanding of the agreement between you and the contractor. A well-structured contract will clearly define the responsibilities of both parties, outlining payment milestones and addressing potential disputes. It should also include details about permits, insurance coverage, and the warranty period for the completed work. Consider consulting with a legal professional to review the contract before signing, especially for large-scale projects.

    Permits and Inspections

    Securing the necessary permits and passing inspections are crucial steps in any home siding replacement project. These processes ensure your project complies with local building codes and regulations, protecting both your investment and the safety of your property. Failure to obtain the correct permits can lead to significant fines, delays, and even the need to undo completed work.

    Obtaining building permits for a siding replacement typically involves submitting an application to your local building department. This application usually requires detailed plans, specifications of the materials to be used, and sometimes even a contractor’s license number. The review process can vary in length depending on the complexity of the project and the workload of the building department.

    Permitting Process

    The permitting process generally begins with submitting a complete application to your local building department. This application will include detailed information about the project, including the type of siding, the area to be covered, and any structural modifications involved. After the application is reviewed, the department may schedule an inspection of your property to verify the information provided. Upon approval, you’ll receive your permit. This permit grants you legal authorization to proceed with the project. Any work performed without a permit is considered illegal and subject to penalties. It’s important to keep copies of all permits and inspection reports for your records.

    Permit and Inspection Costs

    The cost of permits and inspections varies considerably depending on location, project scope, and the complexity of the work. Permit fees are usually calculated based on factors such as the square footage of the siding to be replaced and the type of materials used. Inspection fees are often charged per inspection, with multiple inspections required at various stages of the project. For example, a typical permit fee for a mid-sized home siding replacement might range from $200 to $1000, while inspection fees could add another $100 to $500. It’s advisable to contact your local building department for a precise estimate based on your specific project details.

    Potential Delays and Complications

    Several factors can cause delays or complications during the permitting process. Incomplete applications, missing documentation, or discrepancies between the application and the actual project can lead to significant delays. Furthermore, unusually high workloads at the building department, changes in local regulations, or unforeseen issues discovered during inspections can also extend the timeline. In some cases, appeals or disputes may arise if the building department denies a permit, further delaying the project. For example, a homeowner might experience a delay of several weeks if they need to resubmit corrected plans or if the building department’s workload is unexpectedly high. Proactive communication with the building department and careful preparation of the application are crucial to minimize potential delays.

    Hidden Costs and Contingencies

    Replacing your home’s siding is a significant undertaking, and while careful planning helps minimize expenses, unforeseen costs can significantly impact your budget. Understanding these potential hidden costs and implementing strategies to account for them is crucial for a successful and stress-free project. Failing to plan for contingencies can lead to project delays, budget overruns, and even compromise the quality of the finished work.

    Unexpected expenses during a siding replacement project are common. These costs often stem from issues discovered only after the project has begun, requiring additional work and materials. Thorough planning, including a contingency budget, helps mitigate the financial impact of these surprises.

    Examples of Unexpected Costs

    Discovering underlying problems during siding removal is a frequent source of unexpected expenses. For example, extensive rotted wood under the existing siding may require significant repair or replacement before new siding can be installed. This could involve replacing damaged sheathing, adding additional structural support, or even addressing underlying moisture problems. Similarly, foundation issues, such as cracks or settling, might be revealed, requiring costly repairs before the siding installation can proceed. Other unexpected costs might include the discovery of lead paint under the old siding, necessitating specialized removal procedures that comply with environmental regulations. Unexpectedly high material costs due to supply chain issues or material shortages can also occur, particularly during periods of high demand. Finally, unforeseen site conditions, such as difficult terrain or the presence of underground utilities that require additional safety measures, could lead to increased labor costs.

    Strategies for Budgeting for Unforeseen Expenses

    A proactive approach to budgeting for unforeseen expenses involves adding a contingency to your overall project cost. This contingency should be a percentage of the total estimated cost, typically ranging from 10% to 20%, depending on the complexity of the project and the age of the home. A higher percentage is advisable for older homes or those with known potential issues. Detailed pre-project inspections by a qualified contractor can help to refine this percentage and identify potential problem areas early on. Regular communication with your contractor throughout the project allows for early identification of potential cost overruns and the development of solutions to keep the project on track. Maintaining a detailed record of all expenses, including receipts and change orders, ensures transparency and facilitates accurate financial tracking. Finally, securing sufficient funding before commencing the project, including the contingency budget, protects you from unexpected financial strain.

    Sample Contingency Budget

    Let’s assume a total estimated cost for a siding replacement project is $15,000. Using a conservative contingency of 15%, the contingency budget would be $2,250. This contingency fund could be allocated as follows:

    Contingency Item Allocated Amount
    Wood Repair/Replacement $750
    Foundation Repair (minor) $500
    Lead Paint Removal (if necessary) $500
    Unexpected Material Cost Increases $500

    Note: This is a sample budget and the actual allocation will vary depending on the specific circumstances of your project.

    Financing Options

    Replacing your home’s siding is a significant investment. Securing the necessary funds can be a crucial step in the process. Several financing options exist, each with its own advantages and disadvantages. Understanding these options will help you choose the best fit for your financial situation and project needs.

    Financing your siding replacement project typically involves securing a loan to cover the upfront costs. The repayment schedule and interest rates will significantly impact your overall expenses. Careful consideration of these factors is essential to avoid financial strain.

    Home Equity Loans

    Home equity loans utilize the equity you’ve built in your home as collateral. This means you borrow against the difference between your home’s value and the amount you still owe on your mortgage. These loans typically offer fixed interest rates and fixed monthly payments, making budgeting easier. However, it’s crucial to remember that you risk losing your home if you default on the loan. The interest rates are usually lower than those of personal loans due to the lower risk for the lender. For example, a homeowner with substantial equity might secure a home equity loan at a rate of 6%, significantly lower than a personal loan’s potential rate of 12% or higher.

    Personal Loans

    Personal loans are unsecured loans, meaning they don’t require collateral. This makes them accessible to individuals who may not qualify for a home equity loan or prefer not to risk their home. However, the interest rates on personal loans are generally higher than home equity loans, reflecting the increased risk for the lender. The repayment terms are also variable, depending on the lender and the borrower’s creditworthiness. A personal loan might offer a higher interest rate, such as 10-15%, but its accessibility makes it a viable option for those with limited equity or less-than-perfect credit.

    Credit Cards

    Using a credit card can be a convenient short-term solution for smaller siding projects or unexpected costs. However, this method carries the highest interest rates and should be avoided for larger projects due to the accumulating debt and high interest charges. It’s generally advisable to use this option only for smaller, unforeseen expenses during the project and not as primary financing.

    Comparison of Financing Options

    Financing Option Interest Rate Pros Cons
    Home Equity Loan Generally lower (e.g., 6%) Lower interest rates, fixed payments, potentially tax deductible Requires home equity, risk of foreclosure
    Personal Loan Generally higher (e.g., 10-15%) No collateral required, accessible to a wider range of borrowers Higher interest rates, less favorable terms
    Credit Cards Very high (e.g., 18-25%) Convenient for small expenses Extremely high interest rates, potential for significant debt accumulation

    Project Timeline and Scheduling

    Planning a realistic timeline for your home siding replacement is crucial for managing expectations and avoiding delays. A well-defined schedule helps ensure the project progresses smoothly and minimizes disruptions to your daily life. Understanding the factors that can influence the timeline allows for proactive adjustments and mitigates potential problems.

    A typical home siding replacement project can take anywhere from a few weeks to several months, depending on several key factors. The size of the house, the complexity of the design, and the chosen materials all play a significant role in determining the overall duration. Furthermore, unforeseen circumstances can extend the timeline, highlighting the importance of building in buffer time.

    Factors Affecting Project Timeline

    Several factors can significantly influence the duration of a siding replacement project. These factors range from predictable elements like weather conditions to less predictable ones such as material availability. Accurate project planning requires careful consideration of these potential delays.

    • Weather Conditions: Inclement weather, such as heavy rain, snow, or extreme heat, can cause significant delays. Exterior work is often weather-dependent, and prolonged periods of unsuitable weather can push back the project schedule considerably. For example, a project planned for the rainy season in a region with frequent downpours might experience several weeks of delays.
    • Material Availability: Delays in material delivery can occur due to supply chain issues, manufacturer backlogs, or transportation problems. Specifying uncommon or specialized siding materials might increase the risk of delays compared to using readily available options. For instance, a project requiring a specific type of imported cedar siding might face delays if shipments are delayed due to port congestion.
    • Contractor Availability and Scheduling: The contractor’s existing workload and scheduling conflicts can influence the project timeline. Choosing a contractor who is already overcommitted might lead to delays as they juggle multiple projects. Similarly, unexpected issues or emergencies arising on other projects may impact their availability for your project.
    • Permitting and Inspection Processes: Obtaining necessary permits and scheduling inspections can sometimes take longer than anticipated, especially if there are unforeseen complications or bureaucratic delays. Lengthy review processes or required revisions to submitted plans can significantly extend the overall project timeline.
    • Unexpected Issues: Unforeseen problems, such as discovering rotted wood under the existing siding or encountering unexpected structural issues, can necessitate additional work and extend the project schedule. Thorough inspections prior to commencement can help minimize these surprises, but they are not always entirely preventable.

    Sample Project Schedule

    The following sample schedule illustrates a potential timeline for a medium-sized home siding replacement project. This schedule assumes favorable weather conditions and readily available materials. It is crucial to remember that this is a sample, and individual projects will vary significantly.

    Phase Milestone Estimated Duration Start Date (Example) End Date (Example)
    Preparation Permit Acquisition & Site Survey 1-2 weeks October 23rd November 5th
    Demolition Removal of Existing Siding 1 week November 6th November 12th
    Preparation & Repair Underlayment Installation & Repairs 1 week November 13th November 19th
    Installation New Siding Installation 2-3 weeks November 20th December 7th
    Finishing Final Inspection & Cleanup 1 week December 8th December 14th

    Waste Removal and Disposal

    Replacing your home’s siding generates a significant amount of waste, and proper disposal is crucial for both budgetary and environmental reasons. This section details the costs associated with waste removal, environmentally sound disposal practices, and relevant local regulations. Failing to plan for waste removal can lead to unexpected expenses and potential legal issues.

    Proper disposal of old siding materials is essential for environmental protection and compliance with local regulations. The costs associated with this process vary depending on several factors, including the type and quantity of waste, the distance to the disposal site, and the chosen disposal method. Understanding these factors is key to accurately budgeting for your siding replacement project.

    Costs Associated with Waste Removal and Disposal

    The cost of waste removal and disposal for a siding replacement project can range considerably. Factors influencing the final cost include the volume of waste generated (determined by the size of your home and the type of siding being removed), the type of waste (e.g., wood, vinyl, asbestos), and the distance the waste needs to be transported to a disposal or recycling facility. A small project might cost a few hundred dollars, while larger projects involving the removal of multiple layers of siding or specialized materials could reach several thousand. Obtaining multiple quotes from waste removal companies is highly recommended to ensure you are getting a competitive price. Many companies offer both dumpster rental services and full-service removal, where they handle all aspects of waste collection and disposal.

    Environmentally Responsible Disposal Methods for Old Siding Materials

    Many siding materials can be recycled or repurposed, reducing landfill waste and minimizing environmental impact. For example, some types of vinyl siding can be recycled through specialized programs, while wood siding may be suitable for use as firewood (after ensuring it’s free of harmful treatments) or repurposed for other construction projects. Asbestos siding, however, requires special handling and disposal due to its hazardous nature. It’s crucial to identify the type of siding being removed to determine the appropriate disposal method. Contractors experienced in siding replacement should be knowledgeable about environmentally sound disposal options and be able to provide information on local recycling programs or disposal facilities that accept construction debris. Choosing a contractor committed to sustainable practices is a valuable step towards responsible waste management.

    Examples of Local Regulations Regarding Waste Disposal for Construction Projects

    Local regulations regarding construction waste disposal vary widely. Many municipalities have specific ordinances concerning the permitted disposal methods, required permits, and potential fines for non-compliance. For example, some cities might mandate the separation of different waste streams (e.g., wood, metal, plastic), while others may have limits on the amount of waste that can be disposed of at a specific location. Before starting your siding replacement project, contact your local building department or waste management authority to obtain information on relevant regulations, required permits, and disposal fees. Understanding these regulations upfront will help you avoid potential delays, fines, and additional expenses associated with improper waste disposal. Failure to comply with these regulations can result in significant penalties, making proactive research a cost-effective measure.

    Insurance and Warranties

    Protecting your investment in a new siding installation requires careful consideration of insurance and warranties. Understanding the coverage offered by both your insurance provider and the siding contractor is crucial to ensuring a smooth and worry-free project. Unexpected issues can arise, and having the appropriate protection in place can save you significant financial burdens.

    Importance of Insurance Coverage During a Home Improvement Project

    Comprehensive insurance coverage is vital during a home siding replacement. General liability insurance held by the contractor protects you from financial losses should accidents occur on your property during the project, such as worker injury or damage to neighboring properties. Additionally, it’s advisable to review your homeowner’s insurance policy to confirm sufficient coverage for damage to your home during the renovation, including potential damage from unforeseen weather events during the construction phase. This could cover expenses related to temporary repairs or additional costs resulting from project delays due to weather-related damage. For example, a sudden hailstorm during installation could damage both the new and existing siding, necessitating additional repair costs that your homeowner’s insurance might cover.

    Types of Warranties Offered by Siding Manufacturers and Contractors

    Siding manufacturers typically offer warranties on their products, covering defects in materials and workmanship for a specified period. These warranties can vary significantly in length and the types of defects covered. Some manufacturers offer limited warranties covering only manufacturing defects, while others offer more comprehensive warranties that also cover issues like fading or cracking due to normal wear and tear, although often with specific conditions and limitations. Contractors also provide warranties on their labor, typically covering issues related to their installation work for a set period, such as improper installation leading to leaks or premature failure of the siding. The length and scope of contractor warranties can vary greatly depending on the contractor’s experience and reputation.

    Comparison of Warranty Options and Coverage

    A manufacturer’s warranty might cover defects in the siding material for 20 years, but exclude damage caused by improper installation. Conversely, a contractor’s warranty might cover installation defects for 10 years but not the underlying material itself. Therefore, understanding the specific terms and conditions of both the manufacturer’s and contractor’s warranties is essential. A strong siding installation typically combines a robust manufacturer’s warranty with a comprehensive contractor’s warranty, providing more extensive protection against potential problems. For example, if a section of siding fails after five years due to a manufacturing defect, the manufacturer’s warranty would likely cover the replacement cost of the siding. However, if the failure is due to improper installation, the contractor’s warranty should cover the repair or replacement. Comparing warranties involves careful review of the fine print, paying close attention to exclusions and limitations, and understanding how the manufacturer’s and contractor’s warranties interact. Some contractors might offer extended warranties at an additional cost, providing even greater peace of mind.

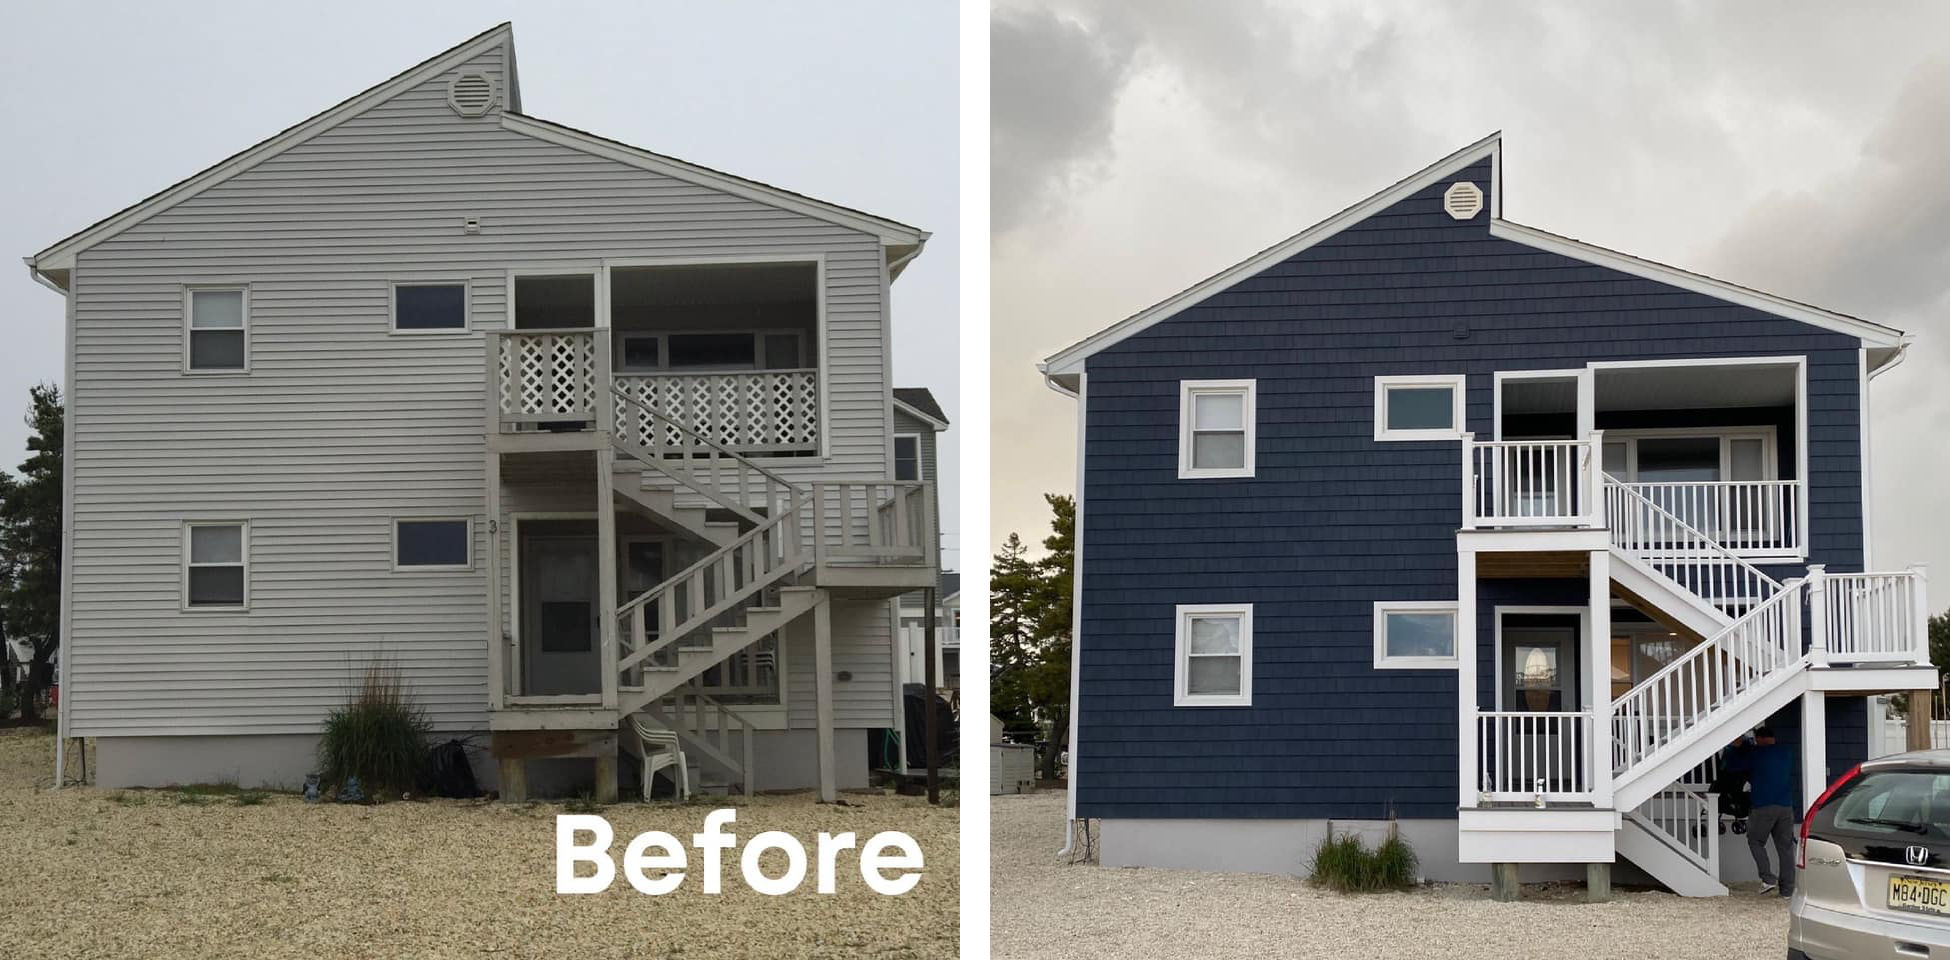
    Visual Aids: Before & After Scenarios

    Choosing new siding is a significant decision impacting your home’s curb appeal and value. Visualizing the transformation is crucial, and before-and-after scenarios can greatly assist in this process. Reviewing examples of different siding types on various home styles allows for a clearer understanding of the potential impact of a full home siding replacement.

    Before and After Scenarios: Siding Types and Home Styles

    The visual impact of a siding replacement varies considerably depending on the original siding, the chosen replacement, and the architectural style of the home. Below are a few examples illustrating these differences.

    Example 1: Ranch Style Home – Vinyl to Fiber Cement

    Before: Imagine a single-story ranch home with aged, faded beige vinyl siding. The siding shows signs of wear, with some discoloration and cracking. The overall appearance is somewhat drab and lacks visual interest.
    After: The same ranch home now features sleek, charcoal gray fiber cement siding. The new siding provides a clean, modern look, enhancing the home’s architectural lines. The dark gray color creates a striking contrast against the lighter-colored trim and foundation, adding depth and visual appeal. The improved texture and consistent color dramatically enhance the home’s curb appeal.

    Example 2: Victorian Style Home – Wood Shake to Engineered Wood

    Before: Picture a Victorian-style home with weathered wood shake siding. The shakes are uneven in color and texture, showing signs of age and damage. The overall appearance is somewhat rustic, but also slightly unkempt.
    After: The same Victorian home is now clad in rich, dark brown engineered wood siding. The new siding maintains the home’s historical character while providing a more polished and updated look. The consistent color and even texture enhance the intricate details of the home’s architecture, creating a more elegant and refined appearance. The improved weather resistance also suggests a longer lasting solution.

    Example 3: Colonial Style Home – Aluminum to Insulated Vinyl

    Before: Consider a colonial-style home with outdated aluminum siding. The aluminum siding is showing significant signs of fading and pitting, with a generally dull and lifeless appearance.
    After: The same colonial home boasts crisp white insulated vinyl siding. The new siding provides a clean, classic look that complements the home’s architectural style. The bright white color creates a feeling of spaciousness and elegance. The improved insulation properties, though not directly visible, are a significant benefit alongside the improved aesthetics. The smooth, consistent surface of the vinyl enhances the overall visual appeal.

    Example 4: Modern Farmhouse – Brick to Board and Batten

    Before: A modern farmhouse with exposed brick showing signs of age and discoloration. The brick might be uneven in color and texture, creating a somewhat inconsistent appearance.
    After: The same farmhouse is now clad in clean, white board and batten siding. The board and batten siding adds a fresh, modern farmhouse aesthetic while maintaining a rustic feel. The crisp white siding contrasts beautifully with darker accents, such as window frames and rooflines, creating a striking and visually appealing result. The vertical lines of the board and batten siding add visual interest and draw the eye upwards.

    Impact on Home Value

    Replacing your home’s siding is a significant investment, but it can offer a substantial return in terms of increased home value. A well-chosen and professionally installed siding system can dramatically improve your home’s curb appeal and overall condition, making it more attractive to potential buyers and increasing its market value. The extent of this increase depends on several key factors.

    The potential increase in home value from a siding replacement varies depending on several factors. A high-quality, durable siding material, like fiber cement or engineered wood, will generally yield a higher return on investment than a less expensive option. Similarly, the overall condition of the home, the location, and the current market trends all play a role. A beautifully updated home in a desirable neighborhood will naturally see a greater increase in value compared to a similar upgrade in a less sought-after area.

    Return on Investment Factors

    Several factors influence the return on investment (ROI) for siding upgrades. These factors should be carefully considered before embarking on the project.

    The choice of siding material significantly impacts the ROI. While less expensive vinyl siding might offer a quicker payback, it may not increase home value as much as higher-end materials such as fiber cement or brick. The longevity and durability of the chosen material also play a crucial role. A longer-lasting siding system will require less maintenance over time, resulting in long-term cost savings and a potentially higher ROI.

    The condition of the existing siding and the overall state of the home influence the return. Replacing severely damaged or outdated siding will yield a greater increase in home value than simply replacing relatively new siding. Addressing other home improvements simultaneously, such as window replacements or landscaping, can further enhance the impact of the siding upgrade. A comprehensive approach to home improvement can result in a synergistic effect, maximizing the return on investment.

    Location and market conditions play a significant role. In a competitive real estate market, a well-maintained home with attractive siding will likely command a higher price than a comparable home with outdated or damaged siding. Conversely, in a buyer’s market, the return on investment might be lower. Consulting with a real estate agent can provide valuable insights into local market trends and the potential impact of siding replacement on home value in your specific area.

    For example, let’s consider two homes in the same neighborhood. Home A has outdated vinyl siding, while Home B undergoes a complete siding replacement with high-quality fiber cement. Assuming all other factors are equal, Home B is likely to sell for a significantly higher price due to the improved curb appeal and perceived higher quality. The higher cost of fiber cement siding would be offset by the increased market value. Similarly, a home in a highly desirable area with updated siding will see a larger increase in its value compared to a similar home in a less desirable area.

    Appraisal Impact

    A professional appraisal can provide a quantifiable assessment of the increase in home value resulting from the siding replacement. An appraiser will consider factors such as the type of siding, the quality of the installation, and the overall condition of the property. The appraisal report will provide a clear indication of the return on investment and can be used to support financing applications or insurance claims. This objective assessment provides valuable data for informed decision-making.

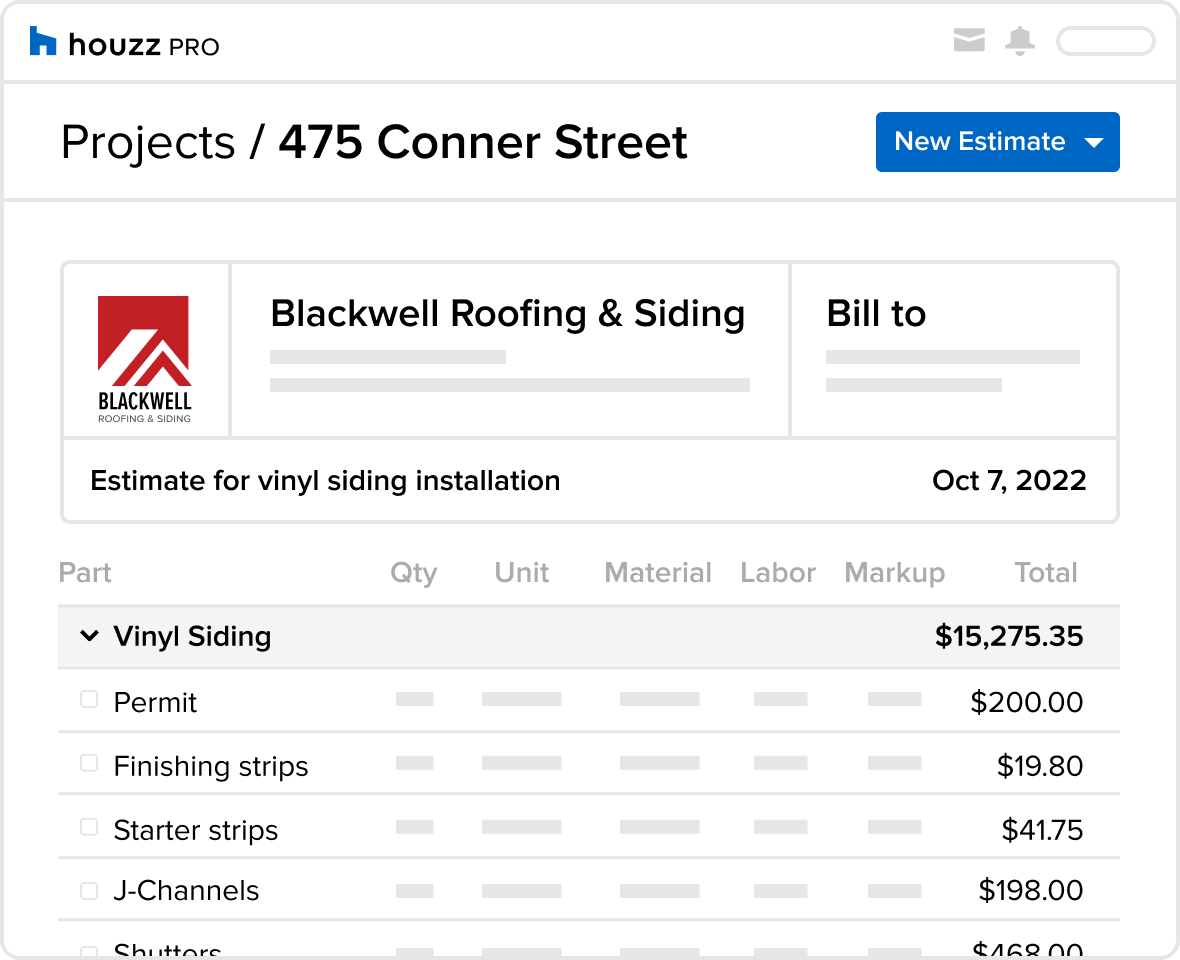
    Creating a Comprehensive Budget Spreadsheet

    A well-organized budget spreadsheet is crucial for managing the costs associated with a full home siding replacement project. This spreadsheet will allow you to track expenses, compare bids, and ensure you stay within your financial limits. A detailed and organized approach will minimize surprises and help you make informed decisions throughout the process.

    Spreadsheet Design and Categories

    The following table outlines a suggested structure for your siding replacement budget spreadsheet. Each category should have its own column, allowing for easy tracking and comparison of costs from different contractors or material suppliers. Remember to update the spreadsheet regularly as the project progresses.

    Category Description Estimated Cost Actual Cost Notes
    Material Costs Siding, trim, flashing, fasteners, etc. Include detailed breakdown of materials and quantities.
    Labor Costs Contractor fees, labor for demolition, installation, etc. Specify hourly rates or lump sum payments.
    Permits and Inspections Building permits, inspection fees Include all relevant permit applications and inspection costs.
    Contractor Selection Bid comparisons, contractor fees, contract review List multiple bids and the reasons for selection.
    Hidden Costs Unexpected repairs, material adjustments, etc. Allocate a contingency for unforeseen expenses.
    Contingency Buffer for unexpected costs (typically 10-20% of total estimated cost) This is crucial for managing risk.
    Financing Options Loan interest, down payment, monthly payments Specify loan terms and repayment schedule.
    Project Timeline and Scheduling Project start and completion dates, milestones Track progress against planned timeline.
    Waste Removal and Disposal Dumpster rental, debris removal fees Include costs for proper waste disposal.
    Insurance and Warranties Contractor’s insurance, material warranties Verify insurance coverage and warranty details.
    Total Estimated Cost Sum of all estimated costs This is your initial project budget.
    Total Actual Cost Sum of all actual costs This will be updated as the project progresses.

    Using Formulas for Accurate Calculations

    The spreadsheet should utilize formulas to automatically calculate totals. For example, the “Total Estimated Cost” can be calculated by summing all the estimated costs in the “Estimated Cost” column. Similarly, the “Total Actual Cost” should be calculated automatically as the project progresses. This will ensure accuracy and reduce the risk of manual calculation errors. For instance, a simple formula for the total estimated cost would be: =SUM(B2:B11) (assuming estimated costs are in column B, rows 2 through 11).

    Visual Aids for Tracking Progress

    Consider adding a visual representation of the budget, such as a bar chart or pie chart, to track progress and identify areas where costs are exceeding or falling short of the estimates. This visual aid can provide a clear and concise overview of the budget’s status at a glance. For example, a bar chart could show the allocated budget for each category versus the actual spent amount. A pie chart could illustrate the proportion of the total budget allocated to each cost category.

    Closure

    Replacing your home’s siding is a significant investment, but with careful planning and budgeting, it can be a rewarding experience. By understanding the various cost components—materials, labor, permits, and potential unforeseen expenses—and exploring available financing options, you can create a realistic budget that aligns with your financial capabilities. Remember to factor in contingency funds for unexpected issues and choose reputable contractors with clear contracts and warranties. The result will be a beautiful, durable, and valuable upgrade to your home, enhancing its curb appeal and potentially increasing its market value.

  • Free Siding Replacement Estimate: What to Expect

    Free Siding Replacement Estimate: What to Expect

    Free Siding Replacement Estimate: What to Expect? Securing a free estimate for siding replacement seems like a great deal, but understanding the nuances is crucial. This process involves more than just a quick price quote; it encompasses material selection, labor costs, potential hidden expenses, and navigating contractual agreements. A well-informed approach ensures a smooth and cost-effective renovation.

    This guide will walk you through each step, from understanding what’s typically included (and excluded) in a free estimate to comparing multiple offers, negotiating contracts, and managing the project timeline. We’ll cover essential factors influencing costs, such as house size, material choices (vinyl, wood, fiber cement, etc.), and regional labor rates. By the end, you’ll be equipped to make informed decisions and avoid potential pitfalls.

    Understanding “Free Siding Replacement Estimate” Offers

    The term “free siding replacement estimate” is a common marketing tactic used by many contractors. While appealing, it’s crucial to understand what’s included and what potential hidden costs might arise. A thorough understanding will empower you to make informed decisions and avoid unpleasant surprises during your home improvement project.

    The typical components included in a free estimate usually involve an on-site inspection of your existing siding, measurements of the area needing replacement, and a detailed breakdown of the proposed materials and labor. A reputable contractor will provide you with different siding options, outlining the price differences and the advantages and disadvantages of each. They should also offer a projected timeline for the project. However, the scope of a “free” estimate can vary significantly between contractors.

    Components of a Free Estimate

    A comprehensive free estimate should clearly list the materials to be used, the labor costs associated with removal and installation, and any permits or fees required by your local municipality. A detailed breakdown of the project timeline should also be included, outlining expected start and completion dates. Some contractors may also include a warranty on their workmanship or materials. However, it’s vital to carefully review all the documents provided to ensure complete transparency.

    Potential Hidden Costs Associated with “Free” Estimates

    While the initial estimate might be free, several hidden costs can quickly accumulate. These can include unforeseen repairs to underlying sheathing or structural issues discovered during the siding removal process. For example, if rotted wood is found beneath the siding, the cost of repairing or replacing this damaged material will be an additional expense. Similarly, if the existing flashing around windows and doors is deteriorated, this will need replacement, adding to the overall cost. Additional costs may also include disposal fees for the old siding, and unexpected increases in material prices due to market fluctuations. Always ask for a detailed list of potential additional costs upfront to avoid any surprises.

    Comparison of Siding Materials and Their Impact on Cost

    Different siding materials significantly impact the overall cost of your replacement project. Vinyl siding, a popular and budget-friendly option, typically falls into a lower price range compared to other materials. However, its lifespan and aesthetic appeal may be less than those of more expensive options. Fiber cement siding offers superior durability and fire resistance, but it’s generally more expensive than vinyl. Wood siding, known for its classic beauty, is often the most costly option, demanding higher initial investment and more ongoing maintenance. Finally, metal siding, while durable and low-maintenance, also typically sits in a higher price bracket than vinyl. The choice of material significantly influences the final cost of the project, necessitating careful consideration of your budget and long-term goals. For instance, a 1,500 square foot home might see a difference of several thousand dollars between vinyl and fiber cement siding installation.

    The Estimation Process

    Obtaining an accurate estimate for siding replacement is crucial for budgeting and planning your project. A thorough estimation process involves several key steps, ensuring you understand the scope of work and associated costs before committing to any contract. This process should be transparent and collaborative between you and the contractor.

    A professional siding replacement estimate typically involves a detailed assessment of your home’s exterior, followed by a comprehensive proposal outlining the materials, labor, and timeline. This allows for a clear understanding of the project’s financial implications and ensures that there are no unexpected surprises down the line.

    Contractor Selection and Initial Contact

    Before any on-site assessment, homeowners should thoroughly research potential contractors. This involves checking online reviews, verifying licenses and insurance, and requesting references. Initial contact should establish the scope of the project – clarifying whether the estimate includes material costs, labor, permits, and waste disposal. A reputable contractor will be happy to answer your questions and provide detailed information upfront.

    On-Site Assessment and Measurements

    The contractor will conduct a thorough inspection of your existing siding, noting its condition, type, and any damage. Precise measurements of your home’s exterior walls will be taken to determine the quantity of materials needed. They will also assess the complexity of the project, considering factors like the presence of windows, doors, and architectural details. For example, a home with intricate trim work or multiple stories will likely require more time and labor.

    Material Selection and Cost Calculation

    After the assessment, the contractor will present various siding options, outlining their costs and benefits. This often involves discussing different materials (vinyl, fiber cement, wood, etc.), colors, and styles. The contractor will then calculate the total cost of materials based on the measurements and your chosen options. Accurate cost calculation also includes factoring in waste, potential material damage during installation, and delivery charges. For example, a high-end fiber cement siding will naturally cost more than standard vinyl siding.

    Labor Cost Estimation and Timeline

    Labor costs are calculated based on the estimated time required for the project. This includes the time for removing the old siding, installing the new siding, and completing any necessary repairs or finishing touches. The contractor will provide an estimated timeline for the project completion, outlining potential delays and unforeseen circumstances. A detailed breakdown of labor costs, including hourly rates and the number of workers involved, should be provided for transparency. A realistic timeline should consider weather conditions, material availability, and potential scheduling conflicts.

    Detailed Estimate and Contract Review

    The final estimate should be a comprehensive document that details all aspects of the project, including a breakdown of material costs, labor costs, permits, and any other associated fees. This document should be reviewed carefully before signing a contract. It’s important to understand all the terms and conditions, payment schedules, and warranty information. A reputable contractor will be happy to clarify any uncertainties and answer any questions you may have before you commit to the project.

    Questions to Ask a Contractor Before Agreeing to an Estimate

    A comprehensive list of questions to ask before agreeing to a siding replacement estimate is essential for a smooth and successful project. These questions cover crucial aspects such as licensing, insurance, experience, materials, and payment terms.

    Sample Homeowner Questionnaire for the Estimation Process

    To ensure a smooth and efficient estimation process, homeowners should prepare a questionnaire to guide their discussions with contractors. This questionnaire will help gather essential information and compare different proposals effectively. The questionnaire should cover aspects such as contractor experience, licensing, insurance coverage, material options, warranty details, payment schedules, and the overall project timeline. This organized approach will help ensure you make an informed decision.

    Question Category Specific Question Examples
    Contractor Information What is your company’s experience with siding replacement? Are you licensed and insured? Can I see copies of your licenses and insurance certificates? May I have references from previous clients?
    Project Scope What is included in the estimate (materials, labor, permits, cleanup)? What is your process for addressing unexpected issues during the project? Will you provide a detailed timeline for the project?
    Materials and Warranties What types of siding do you offer? What are the warranties on the materials and workmanship? What is your process for handling material defects or damage during installation?
    Payment Terms What are your payment terms and schedule? What payment methods do you accept?
    Project Timeline What is your estimated completion time for the project? What is your contingency plan for delays?

    Factors Influencing Estimate Costs

    Several key factors contribute to the final cost of a siding replacement project. Understanding these factors allows homeowners to better prepare for the expense and to have more informed discussions with contractors. These factors interact in complex ways, so it’s crucial to consider them holistically rather than in isolation.

    Several elements significantly impact the overall cost of your siding replacement. These factors are interconnected and their influence varies depending on the specific project details. Accurate cost estimations require a thorough assessment of each aspect.

    House Size and Complexity

    The size of your house is a primary determinant of the overall cost. Larger houses naturally require more materials and labor, leading to a higher estimate. Beyond simple square footage, the complexity of your home’s design significantly influences the cost. A house with many angles, multiple stories, intricate architectural details (such as dormers or bay windows), or varied siding heights will require more time and specialized techniques, increasing labor costs. For example, a simple ranch-style home will likely have a lower estimate than a Victorian-style home with numerous gables and decorative trim. The presence of difficult-to-access areas, such as high gables or narrow sections, also adds to the complexity and expense.

    Labor Costs and Material Availability

    Labor costs represent a substantial portion of the total estimate. These costs vary based on factors such as geographical location, the contractor’s experience and reputation, and the current demand for skilled labor in the construction industry. Areas with higher costs of living or a shortage of qualified contractors will typically have higher labor rates. The type of siding chosen also influences labor costs; some materials, like intricate stone veneer, require more specialized installation techniques and therefore more expensive labor.

    Material availability and pricing fluctuate with market conditions. The type of siding selected (e.g., vinyl, wood, fiber cement, metal) directly impacts the material cost. Certain materials, such as high-end wood siding or specialized metal panels, can be significantly more expensive than standard vinyl siding. Current market conditions, supply chain disruptions, and seasonal demand can all affect material prices. For instance, a sudden increase in demand for a particular type of siding due to a natural disaster could lead to higher costs and potential delays in project completion.

    Comparing Multiple Estimates

    Receiving multiple siding replacement estimates is crucial for making an informed decision. Comparing these estimates effectively ensures you get the best value for your investment and avoid potential pitfalls. A systematic approach, focusing on key factors, will help you navigate this process with confidence.

    Comparing estimates involves more than simply looking at the bottom-line price. Several critical aspects need careful consideration to ensure a fair and accurate comparison. Ignoring these factors can lead to choosing an option that seems cheaper initially but proves more expensive in the long run due to hidden costs or inferior materials.

    Key Factors in Estimate Comparison

    A thorough comparison requires analyzing several key factors. These factors, when considered together, paint a comprehensive picture of the value each estimate offers. Don’t solely focus on the total cost; instead, dissect the individual components to understand what you are paying for.

    Factor Estimate A Estimate B Estimate C
    Total Cost $15,000 $17,500 $16,000
    Materials Used (Brand & Quality) CertainTeed, mid-range James Hardie, premium LP SmartSide, mid-range
    Labor Costs (Hours & Breakdown) 150 hours, detailed breakdown provided 120 hours, limited breakdown 160 hours, no breakdown provided
    Warranty Details (Length & Coverage) 10-year labor, 25-year material Lifetime labor, 30-year material 5-year labor, 20-year material

    The table above illustrates how three hypothetical estimates differ. Note that Estimate B, despite having the highest total cost, offers premium materials and a lifetime labor warranty. Estimate A presents a balance between cost and warranty, while Estimate C offers the lowest initial cost but with shorter warranty periods. A thorough analysis of these factors allows for a more informed decision, beyond simply choosing the cheapest option.

    Contractual Agreements

    Securing a free siding replacement estimate is only the first step in a potentially significant home improvement project. Understanding the contractual agreements involved is crucial to ensuring a smooth and satisfactory experience. A well-drafted contract protects both the homeowner and the contractor, outlining responsibilities, payment schedules, and dispute resolution mechanisms.

    The importance of carefully reviewing and understanding the contract cannot be overstated. This document legally binds both parties, and overlooking key clauses can lead to unforeseen costs, delays, or even legal disputes. Paying close attention to detail and seeking clarification on any ambiguous points is essential before signing.

    Essential Contract Clauses

    A comprehensive siding replacement contract should include several key clauses to protect your interests. These clauses provide clarity and prevent misunderstandings that could arise during the project.

    • Scope of Work: This section should clearly detail all aspects of the project, including materials, labor, and any preparatory or cleanup work. Specifics like the type and quantity of siding, color, and installation methods should be explicitly stated. Vague descriptions should be avoided.
    • Payment Schedule: The contract should outline a clear payment schedule, including the percentage of payment due at different stages of the project. It should also specify the methods of payment accepted (e.g., check, credit card). Avoid contracts that require full payment upfront.
    • Project Timeline: Realistic start and completion dates should be included, along with contingencies for unforeseen delays. The contract should clearly define who is responsible for delays and their potential impact on the project.
    • Warranty Information: The contract must clearly state the warranty offered on both materials and workmanship. This should specify the duration of the warranty and what it covers. A clear understanding of warranty limitations is crucial.
    • Dispute Resolution: The contract should outline a process for resolving disputes that may arise during the project. This might include mediation or arbitration as an alternative to litigation.
    • Permits and Inspections: The contract should clarify who is responsible for obtaining necessary permits and scheduling inspections. The contractor’s responsibility for ensuring compliance with building codes should be explicitly stated.

    Warranty Information and Limitations

    Warranty information is a critical component of any siding replacement contract. Understanding the warranty’s scope, limitations, and duration is vital for protecting your investment. For instance, a warranty might cover defects in materials but exclude damage caused by external factors like severe weather. The contract should clearly define what is and is not covered under the warranty. Pay close attention to the length of the warranty period; longer warranties typically indicate greater confidence in the quality of materials and workmanship. Also, ensure you understand the process for filing a warranty claim.

    Problematic Contract Clauses

    Some contract clauses can be detrimental to homeowners. Understanding these potential pitfalls can help you negotiate favorable terms or avoid problematic contracts altogether.

    • Unclear or Vague Language: Ambiguous wording can create opportunities for disputes. Avoid contracts with unclear definitions or descriptions of work to be performed.
    • Unrealistic Timelines: Excessively short project timelines might indicate a lack of planning or a willingness to cut corners. Be wary of contracts that seem too good to be true in terms of speed of completion.
    • Limited Liability Clauses: Clauses that severely limit the contractor’s liability for damages or defects should be carefully reviewed and potentially negotiated. A fair contract should provide reasonable protection for both parties.
    • Arbitration Clauses Favoring the Contractor: While arbitration can be a useful dispute resolution method, clauses that heavily favor the contractor’s interests should be avoided. The process should be fair and impartial.
    • Lack of a Detailed Payment Schedule: Contracts that lack a clear payment schedule or require substantial upfront payments can be risky. Progress payments tied to specific milestones are generally preferred.

    Permitting and Inspections

    Obtaining the necessary permits and passing inspections are crucial steps in any siding replacement project. These processes ensure your project complies with local building codes, protects your investment, and safeguards the safety and structural integrity of your home. Failure to obtain permits or pass inspections can lead to fines, project delays, and even legal issues.

    The permitting process for siding replacement varies depending on your location and the specifics of the project. Generally, it involves submitting an application to your local building department, providing detailed plans and specifications of the proposed work, and paying associated fees. These plans typically include details about the type of siding being used, the method of installation, and any changes to the exterior structure of the building. The review process can take several weeks or even months, depending on the workload of the building department and the complexity of the project. Some municipalities offer online portals for permit applications, streamlining the process.

    The Permitting Process for Siding Replacement

    The permitting process typically involves these steps:

    1. Application Submission: Gather all necessary documentation, including property ownership information, project plans, and contractor information. Submit the completed application and required fees to your local building department.
    2. Plan Review: The building department reviews the submitted plans to ensure they comply with local building codes and zoning regulations. This may involve consultations with inspectors or engineers.
    3. Permit Issuance: Once the plans are approved, the building department issues a permit authorizing the commencement of work. This permit should be displayed prominently at the work site.

    The Role of Building Inspections

    Building inspections are conducted at various stages of the project to verify that the work is being performed according to the approved plans and in compliance with building codes. These inspections help ensure the quality of the workmanship, the safety of the installation, and the overall structural integrity of the building. Common inspection points include the preparation of the existing siding, the installation of the new siding, and the final inspection upon completion of the project. Failure to pass an inspection may result in a stop-work order until the necessary corrections are made.

    Navigating the Permitting and Inspection Process: A Step-by-Step Guide

    A clear understanding of the process minimizes delays and potential problems. Here’s a practical guide:

    1. Initial Consultation: Contact your local building department early in the planning stages to inquire about the specific requirements for siding replacement permits in your area.
    2. Prepare Detailed Plans: Work with your contractor to develop comprehensive plans that include details of the materials, installation methods, and any structural modifications.
    3. Submit Application and Fees: Complete the application form accurately and submit it along with the required fees. Keep copies of all submitted documents.
    4. Schedule Inspections: Once the permit is issued, schedule inspections with the building department at the appropriate stages of the project (e.g., before, during, and after siding installation).
    5. Address Inspection Issues: If any issues are identified during an inspection, work with your contractor to address them promptly and schedule a re-inspection.
    6. Obtain Final Approval: Once all inspections are passed, obtain the final approval from the building department.

    Siding Material Options

    Choosing the right siding material is a crucial decision in your home’s exterior renovation. The material you select will significantly impact your home’s aesthetic appeal, longevity, and overall cost. This section will compare and contrast popular siding options, helping you make an informed choice.

    Three of the most common siding materials are vinyl, wood, and fiber cement. Each offers unique advantages and disadvantages regarding cost, durability, and aesthetic appeal. Understanding these differences is key to selecting the best option for your home and budget.

    Vinyl Siding

    Vinyl siding is a popular choice due to its affordability and low maintenance requirements. It’s manufactured from polyvinyl chloride (PVC), making it resistant to moisture, rot, and insect infestation. However, vinyl siding can be susceptible to damage from extreme temperatures and strong impacts. Its lifespan typically ranges from 20 to 40 years, depending on the quality and installation. Aesthetically, vinyl siding offers a wide variety of colors and styles, often mimicking the look of wood or other materials. However, it may not be as visually appealing as natural wood siding to some homeowners.

    Wood Siding

    Wood siding, while more expensive than vinyl, offers a classic and timeless aesthetic. It’s a natural material that can add significant curb appeal to a home. Different types of wood, such as cedar, redwood, and pine, offer varying degrees of durability and resistance to rot and insects. Proper maintenance, including regular painting or staining, is crucial to prolong the lifespan of wood siding, which can range from 30 to 50 years or more with proper care. However, wood siding requires more upkeep than vinyl and is susceptible to damage from moisture, insects, and fire.

    Fiber Cement Siding

    Fiber cement siding combines the durability of cement with the workability of wood. It’s a highly durable material resistant to fire, rot, insects, and moisture. It also offers excellent insulation properties, contributing to energy efficiency. Fiber cement siding is more expensive than vinyl but generally less expensive than high-quality wood siding. Its lifespan is typically longer than vinyl or wood, often exceeding 50 years. Aesthetically, fiber cement siding can mimic the look of wood or other materials, offering a variety of textures and colors. However, it is heavier than vinyl siding, requiring more robust installation techniques.

    Siding Material Comparison

    Material Cost Durability Maintenance
    Vinyl Low Moderate (20-40 years) Low
    Wood High Moderate to High (30-50+ years with proper maintenance) High
    Fiber Cement Medium to High High (50+ years) Low

    Understanding Labor Costs

    Labor costs represent a significant portion of your total siding replacement estimate. Understanding how these costs are determined is crucial for making informed decisions about your project. Several factors influence the final labor cost, and it’s important to be aware of them to avoid unexpected expenses.

    Contractor experience and expertise significantly impact labor costs. Highly experienced and skilled contractors often charge higher hourly or daily rates than less experienced ones. This is because their expertise translates to faster, more efficient work, potentially reducing overall project timelines and minimizing the risk of costly mistakes. Furthermore, experienced contractors often possess a deeper understanding of building codes and regulations, leading to smoother project approvals and fewer delays. Conversely, while a less experienced contractor might offer a lower initial price, potential delays, rework, or material waste could ultimately increase the total project cost.

    Regional Variations in Labor Rates

    Labor rates vary considerably across different regions due to several factors. The cost of living, local demand for skilled labor, and prevailing wage rates all play a role. Areas with a high cost of living generally have higher labor costs to attract and retain qualified contractors. Similarly, regions experiencing a surge in construction activity may see increased competition for skilled labor, driving up wages. For example, a siding replacement project in a major metropolitan area might have significantly higher labor costs compared to a similar project in a rural area. The availability of specialized skills also influences rates; a region with a limited pool of experienced installers of a particular siding type (e.g., fiber cement) may command higher labor costs for that specific type of work.

    Examples of Reasonable Labor Cost Ranges

    Providing precise labor cost ranges is difficult without knowing the specifics of a project (size, complexity, siding type, etc.). However, we can offer some general examples. For a smaller project, such as replacing siding on a single-story, average-sized house with standard vinyl siding, labor costs might range from $3,000 to $6,000. Larger projects, such as replacing siding on a multi-story home with more complex features or using specialized materials like stone or brick veneer, could easily exceed $10,000 or even more. It’s important to remember that these are just rough estimates. Always request a detailed breakdown of labor costs from your contractor to understand what you are paying for. Factors such as the amount of demolition and disposal, scaffolding needs, and the intricacy of the installation process all influence the final labor costs. For instance, a project requiring extensive repairs to underlying sheathing or significant removal of overgrown vegetation will naturally increase the labor component of the estimate.

    Potential Problems and Solutions

    While a free siding replacement estimate offers a valuable starting point, several potential problems can arise during the project. Understanding these potential issues and developing strategies to mitigate them is crucial for a smooth and successful renovation. Proactive planning and clear communication with your contractor can significantly reduce the likelihood of unexpected complications.

    Unforeseen issues during siding replacement projects are common, ranging from minor delays to significant cost overruns. These problems often stem from inaccurate initial assessments, unexpected structural damage, or changes in project scope. However, with careful planning and a collaborative approach with your contractor, many of these issues can be effectively managed.

    Unforeseen Structural Damage

    Discovering underlying structural damage, such as rotted wood or insect infestation, during siding removal is a common problem. This necessitates additional repairs, increasing both the project timeline and cost. Mitigation strategies include a thorough pre-project inspection by a qualified professional. This inspection should include a detailed assessment of the existing siding and underlying structure to identify potential problems before demolition begins. Should unforeseen damage be discovered, a revised estimate should be obtained detailing the additional costs and work required. For example, if significant rot is found behind the existing siding, the contractor might need to replace sections of the house’s sheathing, adding several days to the project and potentially thousands of dollars to the overall cost.

    Material Shortages or Delays

    Supply chain disruptions can lead to delays in obtaining necessary siding materials. This can halt the project until the materials arrive. To mitigate this risk, discuss material availability and lead times with your contractor upfront. Consider selecting readily available materials or allowing for potential delays in the project timeline. For instance, a popular siding color might have a longer lead time than a less popular option. Planning for a potential delay of a week or two can help prevent significant disruption to your schedule.

    Weather-Related Delays

    Adverse weather conditions can significantly impact the project timeline. Rain, snow, or extreme temperatures can make it impossible to work safely and efficiently. Mitigation involves scheduling the project during favorable weather conditions and including contingency plans for potential delays. A well-written contract should clearly outline how weather-related delays will be handled, including whether or not additional costs will be incurred. For example, a contractor might need to halt work for several days due to heavy rain, pushing back the completion date.

    Changes in Project Scope

    Once the project begins, you might decide to make changes to the initial plan. These changes, such as adding extra features or altering the design, can lead to cost overruns and delays. To avoid this, clearly define the project scope before work begins. Any changes should be documented in writing and a revised estimate obtained before proceeding. For instance, deciding to add extra insulation during the siding replacement will require additional materials and labor, impacting the final cost.

    Contractor Communication and Oversight

    Lack of clear communication and inadequate oversight can lead to misunderstandings and errors. Regular communication with the contractor, including on-site visits, helps identify and address potential problems early. A detailed contract outlining the scope of work, payment schedule, and dispute resolution process is essential. For example, a lack of communication might result in the contractor using a different type of siding than initially agreed upon, leading to potential disputes.

    Payment Schedules and Financing Options

    Securing financing and understanding payment schedules are crucial aspects of a siding replacement project. The total cost, your budget, and the contractor’s payment terms will all influence your final decision. This section clarifies typical payment structures and financing choices available to homeowners.

    Payment schedules typically involve a series of installments rather than a single lump-sum payment. The exact schedule varies depending on the project’s size, the contractor’s policies, and any financing agreements in place. Contractors often require a down payment upfront to cover initial materials and labor costs. Subsequent payments may be made at predetermined intervals throughout the project, such as after completion of specific phases (e.g., demolition, installation of underlayment, siding installation). A final payment is usually due upon project completion and final inspection.

    Typical Payment Schedules

    Common payment structures include a tiered approach. For example, a 30% down payment might be required at the contract signing, followed by 30% upon completion of the framing and underlayment, and the final 40% upon project completion and satisfactory inspection. Another approach might involve smaller, more frequent payments, perhaps 10% upon signing the contract, then 10% at the beginning of each major phase, with a final payment at the end. These schedules aim to balance the contractor’s need for timely payment with the homeowner’s desire for payment protection. Always review the detailed payment schedule within your contract before signing.

    Financing Options for Siding Replacement

    Homeowners have several financing avenues for large projects like siding replacement. These options can significantly impact the overall project cost, especially when considering interest charges.

    Home Equity Loans or Lines of Credit (HELOC)

    Home equity loans use your home’s equity as collateral. You borrow a lump sum, repaid with interest over a set term. HELOCs provide access to a revolving line of credit, allowing you to borrow and repay as needed within a specific period. Interest rates are typically lower than unsecured loans, but the risk involves potential foreclosure if you default on payments. Example: A homeowner with significant equity might secure a $15,000 home equity loan at a 6% interest rate over 10 years, resulting in monthly payments of approximately $160.

    Personal Loans

    Unsecured personal loans don’t require collateral. Lenders assess your creditworthiness to determine the loan amount, interest rate, and repayment terms. Interest rates are generally higher than home equity loans due to the increased risk for the lender. Example: A homeowner with good credit might qualify for a $10,000 personal loan at an 8% interest rate over 5 years, leading to monthly payments around $190.

    Contractor Financing

    Some contractors offer in-house financing plans. These often have higher interest rates than traditional loans but can streamline the process and potentially offer more flexible payment options. It’s crucial to compare these options with those from banks or credit unions before committing. Example: A contractor might offer a 0% interest financing plan for 12 months, followed by a higher interest rate for the remaining loan term.

    Credit Cards

    While convenient, using credit cards for a large project like siding replacement can be costly due to high interest rates and potential for accumulating debt. This is generally not recommended unless you can pay off the balance in full before accruing significant interest charges. Example: A homeowner using a credit card with a 18% APR to finance $10,000 could end up paying substantially more than the initial cost due to high interest charges.

    Impact of Payment Plans on Project Cost

    Financing options significantly impact the total project cost. While loans provide upfront capital, interest charges add to the overall expense. Carefully comparing interest rates, loan terms, and monthly payments across different options is vital to choosing the most financially responsible approach. Choosing a longer loan term reduces monthly payments but increases the total interest paid over time. Conversely, shorter-term loans have higher monthly payments but lower overall interest costs.

    Timeline and Project Management

    Understanding the timeline for your siding replacement project is crucial for planning and managing expectations. A realistic schedule considers various factors, including weather conditions, material availability, and the size and complexity of the job. Proper project management ensures a smooth and efficient process, minimizing disruptions and delays.

    The typical siding replacement project involves several distinct phases, each with its own estimated timeframe. These phases are interconnected, and delays in one area can impact the overall project completion date. Careful planning and communication between the contractor and homeowner are key to staying on schedule.

    Project Phases and Timeframes

    A typical siding replacement project can be broken down into several key phases. The duration of each phase can vary depending on the size of the house, the complexity of the job, and weather conditions. However, this sample schedule provides a realistic estimate for a medium-sized single-family home.

    Project Phase Estimated Timeframe Description
    Preparation and Site Survey 1-2 days This involves measuring the house, assessing the existing siding, and identifying any potential problems. The contractor will also discuss the project scope and details with the homeowner.
    Material Ordering and Delivery 1-2 weeks Once the scope of work is finalized, the contractor orders the necessary siding materials. Delivery times can vary depending on material availability and supplier logistics.
    Removal of Old Siding 2-5 days This phase involves carefully removing the existing siding, disposing of the old materials responsibly, and preparing the house for the new siding installation. The duration depends on the type and amount of siding being removed.
    Siding Installation 7-14 days This is the most time-consuming phase, involving the installation of the new siding, ensuring proper flashing and sealing, and maintaining a high-quality finish. The duration depends on the size of the house and the type of siding chosen. For example, installing vinyl siding is generally faster than installing cedar shake siding.
    Final Cleanup and Inspection 1-2 days After the installation is complete, the contractor performs a final cleanup, ensuring the work area is left clean and tidy. A final inspection is conducted to ensure the work meets the agreed-upon specifications.

    Note: This is a sample schedule, and actual timelines may vary depending on specific project circumstances. It is crucial to discuss a detailed project timeline with your contractor before work begins.

    Last Point

    Replacing your siding is a significant investment, and understanding the intricacies of obtaining and evaluating free estimates is paramount. By carefully considering the factors discussed—from material selection and labor costs to contractual agreements and project timelines—you can ensure a successful renovation that meets your budget and expectations. Remember to always compare multiple estimates, ask clarifying questions, and thoroughly review any contract before signing. A well-planned approach will transform your home’s exterior while safeguarding your financial interests.

  • What Factors Affect the Cost of Siding Replacement?

    What Factors Affect the Cost of Siding Replacement?

    What Factors Affect the Cost of Siding Replacement? This question is crucial for homeowners considering this significant home improvement project. Replacing your siding is a substantial investment, and understanding the various cost drivers ensures a realistic budget and prevents unpleasant surprises. From material selection and labor costs to permits and unforeseen repairs, numerous factors contribute to the final price tag. This guide delves into each aspect, providing a comprehensive overview to empower you with the knowledge needed to make informed decisions.

    The cost of siding replacement is influenced by a complex interplay of factors. Material choice significantly impacts the initial investment, with options ranging from budget-friendly vinyl to more durable but expensive materials like fiber cement and metal. Labor costs vary depending on geographic location, contractor experience, project complexity, and the extent of necessary repairs to the underlying structure. Permitting and inspection fees are also essential considerations, varying based on local regulations and the scope of the project. Finally, unexpected issues, such as rotted wood or insect infestations, can add unforeseen expenses, highlighting the importance of thorough inspections and contingency planning.

    Material Costs

    The cost of siding replacement is significantly influenced by the chosen material. Different materials offer varying degrees of durability, aesthetics, and maintenance requirements, leading to substantial differences in overall project expense. Understanding these variations is crucial for making an informed decision that aligns with your budget and long-term goals.

    Siding Material Cost Variations

    Several factors contribute to the price differences between siding materials. These include the raw material costs, manufacturing processes, installation complexity, and regional availability. Generally, vinyl siding is the most budget-friendly option, while materials like wood and fiber cement tend to be more expensive. Metal siding can also be a costly choice depending on the type of metal used. The following provides average price ranges per square foot, but these can fluctuate based on location, supplier, and material quality. These figures represent estimates and should be verified with local contractors for accurate pricing.

    Siding Material Average Cost per Square Foot Lifespan (Years) Maintenance Requirements
    Vinyl $3 – $12 20-40 Low; occasional cleaning
    Wood $10 – $30+ 25-50+ (with proper maintenance) High; regular painting, staining, and sealing
    Fiber Cement $8 – $20+ 50+ Moderate; occasional cleaning and repainting
    Metal (Aluminum or Steel) $10 – $30+ 40-75+ Low; occasional cleaning

    Longevity and Maintenance Impact on Long-Term Costs

    The initial cost of siding is only one factor to consider. Long-term costs associated with maintenance and eventual replacement significantly influence the overall expense. Materials with longer lifespans and lower maintenance requirements, such as fiber cement and metal siding, can result in lower long-term costs despite higher initial investment. Conversely, materials like wood, while aesthetically pleasing, require significant ongoing maintenance, which can add up over time. Vinyl siding offers a balance, with a moderate lifespan and minimal maintenance needs. The choice should reflect the balance between upfront investment and long-term cost considerations. For example, a homeowner might choose a more expensive, longer-lasting fiber cement siding to avoid the repeated costs of repainting wood siding every few years.

    Labor Costs

    Labor costs represent a significant portion of the overall expense in siding replacement projects. These costs are influenced by a variety of factors, making it crucial to understand these elements to accurately budget for your project. Understanding these factors will allow for more informed decision-making and realistic cost projections.

    The cost of labor for siding replacement is highly variable. Several key factors contribute to the final price a homeowner will pay. These include the geographic location of the project, the experience and reputation of the contractor, and the complexity of the job itself. These factors often interact, creating a range of possible labor costs that can be difficult to predict without a detailed assessment of the specific project.

    Geographical Location’s Influence on Labor Costs

    Labor rates for skilled tradespeople, including siding installers, vary considerably across different regions of the country. Areas with a higher cost of living typically have higher labor rates to attract and retain qualified workers. For example, a siding installation in a major metropolitan area like New York City will likely cost significantly more in labor than a similar project in a rural area of the Midwest. This difference reflects the higher demand for skilled labor and the increased expenses associated with living and operating a business in high-cost areas. The availability of qualified installers also plays a role; areas with a shortage of skilled workers may command higher prices.

    Contractor Experience and its Impact on Labor Costs

    Experienced and reputable contractors often charge higher hourly or project rates than less experienced ones. Their expertise translates to efficiency, quality workmanship, and a lower risk of errors or delays. While the initial cost may seem higher, the potential for long-term savings due to reduced repair needs or increased property value often justifies the investment. Conversely, a less experienced contractor may offer lower rates, but the risk of subpar work, delays, or the need for costly repairs down the line should be carefully considered.

    Project Complexity and its Effect on Labor Costs

    The complexity of a siding replacement project significantly impacts labor costs. Simple projects involving the direct replacement of existing siding with a similar material on a straightforward structure will typically require less labor than more complex jobs. A project requiring extensive repairs to the underlying structure, removal of difficult-to-access siding, or the installation of specialized siding materials will necessitate more time and labor, resulting in a higher overall cost.

    Factors Increasing or Decreasing Labor Costs

    Understanding the factors that can influence labor costs is essential for accurate budgeting. The following list outlines elements that can either increase or decrease the overall labor expenses.

    • Factors that Increase Labor Costs:
      • Extensive repairs to underlying sheathing or framing.
      • Removal of difficult-to-remove siding (e.g., asbestos siding).
      • Complex architectural features (e.g., many dormers, angles, or intricate trim).
      • High material costs necessitating longer handling and installation times.
      • Working on multiple stories or difficult-to-access areas (e.g., steep roofs).
      • Additional work required due to unforeseen issues (e.g., rotted wood).
      • Working in inclement weather conditions (potential for delays and added safety measures).
    • Factors that Decrease Labor Costs:
      • Simple, straightforward house design.
      • Use of readily available, easy-to-install siding materials.
      • Good condition of the underlying structure, requiring minimal repairs.
      • Large-scale projects (economies of scale can sometimes lower per-unit labor costs).
      • Efficient project management and coordination by the contractor.

    For instance, replacing simple vinyl siding on a ranch-style home with minimal underlying damage would likely have lower labor costs compared to replacing cedar shake siding on a Victorian home with significant rot and needing extensive repairs to the underlying structure. The added complexity of the Victorian home necessitates more skilled labor and more time, significantly impacting the overall labor cost.

    Permits and Inspections

    Obtaining the necessary permits and passing inspections are crucial steps in any siding replacement project. These processes, while sometimes perceived as bureaucratic hurdles, are vital for ensuring the safety and legality of the work, protecting your investment, and maintaining compliance with local building codes. Ignoring these steps can lead to significant fines, delays, and even the need for costly rework.

    Permitting and inspection costs vary widely depending on several factors, including the scope of the project, the location, and the specific requirements of local authorities. Understanding these factors beforehand can help you accurately budget for your siding replacement.

    Permit Acquisition Process and Associated Costs

    The process of obtaining a permit typically begins with submitting an application to your local building department. This application usually requires detailed plans and specifications of the proposed siding replacement, including materials to be used and the overall scope of the project. The application fee itself varies considerably; a small residential project might incur a fee of a few hundred dollars, while a larger commercial project could cost several thousand. Following the application, a review process takes place where the building department assesses the plans for compliance with local building codes. Any revisions needed will extend the timeline and potentially add to the overall costs. Once approved, the permit is issued, allowing the work to commence. Failure to obtain a permit before starting work can result in significant penalties. For instance, a homeowner in a suburb of Chicago might expect to pay between $300 and $800 for a permit to replace the siding on a single-family home, while a larger multi-unit building could cost upwards of $2000.

    Influence of Local Regulations and Building Codes on Permit and Inspection Fees

    Local regulations and building codes significantly influence both permit and inspection fees. Stricter codes, often found in areas with higher population density or stringent environmental regulations, may necessitate more rigorous inspections and, consequently, higher fees. For example, areas prone to hurricanes or wildfires might have stricter building codes concerning wind resistance or fire-retardant materials, leading to more extensive inspections and higher associated costs. Conversely, areas with less stringent codes might have lower permit fees and fewer inspections. The specific materials used can also impact costs; using unconventional or less-common materials might require additional review and inspection, potentially leading to increased fees.

    Examples of Varied Permit Costs

    Permit costs can vary dramatically based on several factors. A simple siding replacement on a small single-family home in a rural area with minimal building codes might cost as little as $100-$200 for the permit. However, a larger project involving complex design elements, multiple buildings, or the use of specialized materials in a densely populated urban area with stringent codes could easily cost $1000 or more. Similarly, the addition of features like new windows or doors alongside siding replacement can significantly increase permit costs, as these additions require separate permits and inspections. A historical district might require even more extensive review and potentially higher fees due to the need to preserve architectural integrity.

    Waste Removal

    Responsible disposal of old siding materials is a crucial, yet often overlooked, aspect of siding replacement projects. The cost associated with this step can significantly impact the overall project budget, and choosing the most appropriate method requires careful consideration of both environmental responsibility and financial practicality. Failing to account for waste removal can lead to unexpected expenses and potential legal ramifications.

    The cost of disposing of old siding varies considerably depending on several factors, primarily the volume of waste generated and the chosen disposal method. Different siding materials also present unique challenges and costs. For example, asbestos-containing siding requires specialized handling and disposal, significantly increasing expenses. Proper disposal prevents environmental contamination and ensures compliance with local regulations.

    Waste Disposal Method Costs

    Several methods exist for disposing of old siding, each with its own cost structure. Dumpster rental offers a convenient solution for larger projects, allowing for on-site disposal. However, the cost depends on the dumpster size and rental duration. Hauling, on the other hand, involves hiring a contractor to remove and transport the waste to a designated disposal site. This method typically costs more per cubic yard than dumpster rental, but it may be more efficient for smaller projects or when access is limited. Recycling options, where available, can offer cost savings but may require sorting and preparation of materials.

    Scenario: Impact of Siding Volume on Waste Disposal Costs

    Consider a homeowner replacing the siding on a 2,000 square foot house. If the old siding is vinyl, a relatively lightweight material, the volume of waste might be approximately 10 cubic yards. Renting a 10-cubic-yard dumpster for a week could cost between $300 and $500, depending on location and rental company. However, if the house had wood siding, known for its higher density, the same project might generate 15-20 cubic yards of waste, increasing dumpster rental costs to $500-$800 or even necessitating the use of multiple dumpsters. Alternatively, hiring a hauling service could cost significantly more, potentially ranging from $800 to $1500 or more, depending on the distance to the disposal site and the labor involved. This scenario highlights how the type and amount of siding removed directly impact waste disposal costs.

    Preparation and Repair Costs

    Preparing your home for new siding is often more involved than simply removing the old material. Hidden costs associated with this preparatory phase can significantly impact the overall project budget. Understanding these potential expenses is crucial for accurate cost estimation and avoiding unexpected financial burdens.

    The condition of your existing house structure directly influences the preparation costs. Issues such as damaged sheathing, rotted wood, insect infestation, or water damage necessitate repairs before new siding can be installed. Ignoring these problems will lead to premature failure of the new siding and potentially more extensive, costly repairs down the line. A thorough inspection is vital for accurate cost projection.

    Assessment of Existing Damage and Associated Costs

    A comprehensive assessment of the existing house structure is the first step in estimating preparation costs. This involves a visual inspection to identify areas needing repair, followed by a more detailed assessment, possibly including probing suspect areas to determine the extent of damage. For example, a visual inspection might reveal damaged or rotted wood around windows, while probing might reveal extensive water damage beneath the surface. The cost will vary depending on the type and extent of damage. Minor repairs, such as patching small holes in the sheathing, might cost a few hundred dollars, while extensive rot repair requiring sheathing replacement could run into thousands.

    Examples of Preparation Costs

    Consider a scenario where a homeowner discovers rotted wood around several windows during the siding assessment. Replacing the damaged wood framing and sheathing around two windows might cost between $500 and $1000 depending on material costs and labor rates. If the problem is more widespread, involving several areas of the house, and requires significant sheathing replacement, the costs could easily exceed $3000. Furthermore, the presence of insect infestation, such as termites, would necessitate additional treatment and repair, adding another layer of expense. The cost of pest control and remediation could range from $500 to several thousand dollars depending on the severity of the infestation and the size of the house. Similarly, extensive water damage behind the siding may require costly repairs to the underlying structure, including moisture mitigation and mold remediation, before new siding can be installed.

    Estimating Preparation Costs

    Estimating preparation costs requires a detailed assessment. This can be done by a contractor, who will typically provide a written estimate based on their inspection. Homeowners can also attempt a rough estimate by considering the following:

    The area of damaged sheathing (in square feet) multiplied by the cost per square foot of replacement sheathing and labor.

    The number of windows or doors requiring repair multiplied by an estimated cost per window or door repair.

    The cost of pest control and/or mold remediation, if necessary.

    It is crucial to remember that these are estimates, and unforeseen problems may arise during the preparation process, leading to additional costs. It is always advisable to include a contingency buffer of 10-20% in the overall budget to account for such eventualities. This will help ensure that the project remains within budget and avoids unpleasant surprises.

    Additional Features and Upgrades

    Upgrading your siding installation beyond the basic replacement can significantly impact the final cost. However, these additions often provide long-term benefits, such as increased energy efficiency, improved curb appeal, and enhanced home protection. Carefully considering these options and their associated costs is crucial for making informed decisions about your siding project.

    Adding features like insulation, flashing, or trim during siding replacement involves additional material and labor costs. The extent of the price increase depends on the scope of the upgrades and the complexity of the installation. For instance, adding extra insulation to the exterior walls requires more materials and time, leading to a higher overall project cost. Similarly, intricate trim work demands specialized skills and precision, resulting in increased labor expenses.

    Insulation and Energy Efficiency

    Including insulation during siding replacement can substantially improve a home’s energy efficiency. This is particularly true when upgrading to more energy-efficient siding materials. For example, installing rigid foam insulation boards under vinyl or fiber cement siding can significantly reduce heat transfer, lowering energy bills and improving comfort. The added cost of the insulation materials and the slightly increased labor time are often offset by long-term savings on heating and cooling expenses. A homeowner might expect to see a return on investment through lower utility bills within a few years, depending on factors such as climate, home size, and existing insulation levels. A case study of a similar project in a comparable climate zone revealed that adding insulation reduced energy costs by approximately 15% annually.

    Flashing and Water Protection

    Proper flashing is essential for preventing water damage. While basic flashing is often included in standard siding installations, upgrading to more robust or specialized flashing can add to the project cost. For example, using self-adhering flashing membranes or installing additional flashing around windows and doors provides enhanced protection against water infiltration, minimizing the risk of costly repairs down the line. This added cost can be viewed as an investment in the long-term durability and maintenance of the home’s exterior. The cost of this upgrade depends on the size of the home and the complexity of the roofline.

    Trim and Finishing Details

    Adding decorative trim or upgrading to higher-quality trim significantly enhances a home’s aesthetic appeal. However, this also increases the overall project cost due to the additional materials and the skilled labor required for precise installation. Choosing elaborate trim designs or materials like cedar or composite will be more expensive than using basic vinyl or aluminum trim. The added cost is often justified by the increased property value and enhanced curb appeal. For example, upgrading from basic vinyl trim to custom-milled cedar trim could increase the overall siding cost by 10-20%, depending on the amount of trim used.

    Upgrading to Energy-Efficient Siding

    Upgrading to energy-efficient siding options, such as fiber cement or insulated vinyl siding, involves higher upfront costs compared to standard vinyl siding. However, these materials offer superior insulation properties, leading to lower energy bills and a potential return on investment over time. Fiber cement siding, for example, is more durable and energy-efficient than vinyl, but it also comes with a higher initial cost. The long-term cost savings from reduced energy consumption can outweigh the higher initial investment. A study comparing energy consumption in homes with different siding materials showed a significant reduction in energy usage with fiber cement siding compared to standard vinyl siding.

    Contractor Fees and Contracts

    Choosing the right contractor is crucial for a successful siding replacement project. Their fees and the contract terms significantly impact the final cost. Understanding different pricing models and contract details empowers homeowners to make informed decisions and avoid unexpected expenses.

    Contractor pricing models vary, directly influencing the overall project cost. Two common methods are hourly rates and per-square-foot pricing. Hourly rates offer transparency for labor costs but can be difficult to predict accurately for the entire project. Per-square-foot pricing provides a more straightforward upfront estimate, but may not account for complexities or unforeseen issues that arise during the project. For instance, a complex project with extensive repairs might exceed the initial per-square-foot estimate, leading to unexpected additional costs if not clearly outlined in the contract. Some contractors may also use a combination of these methods, charging per square foot for materials and hourly for labor.

    Contractor Pricing Models and Their Impact on Total Cost

    Hourly rates offer clarity regarding labor charges, allowing homeowners to easily track expenses. However, this method requires accurate time estimation, which can be challenging, leading to potential cost overruns if the project takes longer than anticipated. Per-square-foot pricing, while providing a seemingly simpler upfront cost estimate, may overlook project intricacies. Unexpected complexities, such as extensive rotted wood requiring significant repair, could inflate the final cost beyond the initial estimate. A hybrid approach, combining per-square-foot pricing for materials and an hourly rate for labor, aims to balance transparency and predictability. It’s important to compare quotes from contractors using different pricing models to determine the most cost-effective and transparent option for your specific project.

    Contract Review and Key Considerations

    Thoroughly reviewing the contract before signing is paramount. The contract should explicitly detail all included and excluded services, materials, and payment schedules. Overlooking crucial details can lead to disputes and extra expenses later. A comprehensive contract protects both the homeowner and the contractor. For example, a contract might specify the type and quality of siding materials, the scope of demolition and waste removal, and any warranties offered. It should also clearly define the payment schedule, including any down payments, progress payments, and final payment terms. Ambiguous clauses can be exploited, resulting in unexpected charges.

    Checklist for Comparing Contractor Bids

    Before making a decision, comparing bids from multiple contractors is essential. A structured approach ensures a fair and informed comparison.

    The following checklist aids in this process:

    • Detailed Scope of Work: Ensure each bid precisely describes the project’s scope, including materials, labor, and any additional services.
    • Pricing Model Clarity: Verify the pricing method (hourly, per-square-foot, or hybrid) and understand any potential cost fluctuations.
    • Payment Schedule: Compare payment terms, including down payments, progress payments, and final payment conditions.
    • Materials Specifications: Check the quality and type of siding materials proposed, and ensure they meet your expectations.
    • Warranty Information: Review the warranty provided on materials and workmanship. Longer warranties typically indicate greater contractor confidence.
    • References and Reviews: Check references and online reviews to assess the contractor’s reputation and past performance.
    • Permits and Insurance: Confirm that the contractor is licensed, insured, and will obtain necessary permits.
    • Timeline and Completion Date: Compare estimated project timelines to ensure they align with your schedule.
    • Contract Terms and Conditions: Carefully review all clauses to understand your rights and obligations.

    Seasonal Variations

    The cost of siding replacement, like many home improvement projects, is significantly influenced by seasonal factors. These factors primarily relate to weather conditions impacting work feasibility and contractor availability, leading to fluctuations in both labor and material costs throughout the year. Understanding these seasonal variations can help homeowners plan their projects for optimal cost-effectiveness.

    Seasonal fluctuations affect both labor and material costs. During peak seasons, typically spring and summer, demand for siding replacement services is high. This increased demand leads to higher labor costs as contractors are in high demand and can charge premium rates. Simultaneously, material prices might also increase due to higher overall demand and potential supply chain constraints. Conversely, during the off-peak seasons of autumn and winter, contractors often have more availability, leading to potentially lower labor rates. However, weather conditions might present challenges, potentially leading to project delays and increased costs associated with weather-related damage or protection measures.

    Peak Season Costs

    Peak seasons, usually spring and summer, present a higher cost profile for siding replacement. The increased demand for contractors’ services during these months results in higher labor rates. Contractors are often booked months in advance, and the competition for their services drives up prices. Material costs can also be higher due to increased demand and potential supply chain pressures. For example, a siding replacement project estimated at $10,000 during the off-season might cost $12,000-$15,000 during the peak season, reflecting a 20-50% increase in labor and potential material surcharges. This increase is primarily attributed to the higher demand and limited contractor availability.

    Off-Season Costs

    Conversely, off-peak seasons (autumn and winter) typically offer more favorable pricing. Reduced demand allows homeowners to negotiate better rates with contractors who are more readily available. While material costs might remain relatively stable, the lower labor costs can significantly reduce the overall project expense. However, it’s crucial to consider potential weather-related delays and associated costs. For instance, prolonged periods of rain or snow can halt progress, potentially extending the project timeline and incurring additional costs for protective measures or weather-related repairs. A project that might cost $12,000 during peak season could be completed for $9,000-$11,000 during the off-season, depending on the specific location and weather conditions.

    Weather Delays and Their Impact

    Unforeseen weather events can significantly impact the timeline and cost of siding replacement projects. Rain, snow, extreme heat, or high winds can cause delays, potentially extending the project duration and leading to increased labor costs. Furthermore, weather-related damage to materials or partially completed work might require additional repairs and replacement, adding to the overall expense. For instance, a heavy rainstorm could damage exposed sheathing, requiring additional repairs before siding installation can resume, increasing both the time and cost of the project. To mitigate these risks, homeowners should carefully review contracts for clauses addressing weather-related delays and potential cost implications. A detailed project schedule, incorporating contingency plans for potential weather disruptions, is crucial for managing both the timeline and budget effectively.

    Unexpected Issues and Repairs

    Siding replacement projects, while planned meticulously, can encounter unforeseen complications. These unexpected issues can significantly impact both the timeline and the overall cost of the project. Understanding these potential problems and incorporating contingency planning is crucial for responsible budgeting and managing expectations.

    Unexpected problems during siding replacement often stem from hidden damage or conditions not readily apparent during the initial inspection. Addressing these issues promptly and effectively is vital to prevent further damage and ensure the longevity of the new siding. Failing to account for these possibilities can lead to significant budget overruns and project delays.

    Potential Unexpected Problems and Their Cost Impact

    The following table outlines some common unexpected problems encountered during siding replacement, their potential causes, and their estimated cost impact. These estimates are averages and can vary widely depending on the severity of the issue, location, and the chosen contractor. It’s important to remember that these are just examples, and other unforeseen circumstances may arise.

    Unexpected Problem Potential Cause Estimated Cost Impact Example
    Rotted Wood Sheathing Water damage, insect infestation, poor initial construction $500 – $5,000+ Extensive rot requiring replacement of multiple sections of sheathing behind a large area of siding. This could involve labor to remove the rotted wood, purchase of replacement lumber, and additional time for proper installation and drying.
    Insect Infestation Carpenter ants, termites, or other wood-boring insects $1,000 – $10,000+ A significant infestation requiring professional pest control treatment before siding installation, potentially followed by repairs to damaged wood framing. The cost depends on the extent of the infestation and the necessary treatment.
    Mold or Mildew Growth Moisture trapped behind siding, poor ventilation $300 – $2,000+ Mold remediation may require specialized cleaning and potentially the removal and replacement of affected materials. The cost depends on the size of the affected area and the level of remediation required.
    Damaged or Deteriorated Underlayment Age, moisture damage, previous repairs $200 – $1,000+ Repair or replacement of damaged house wrap or other underlayment materials is necessary to ensure proper moisture protection for the new siding. This involves removing the damaged material and installing new underlayment, adding to both labor and material costs.

    Contingency Planning for Unexpected Expenses

    Incorporating a contingency plan into your siding replacement budget is essential. This plan should account for the possibility of unexpected issues. A reasonable approach is to allocate a percentage of the total project cost specifically for unforeseen repairs. This percentage can vary, but a range of 10-20% is often recommended, depending on the age and condition of your home. This allows for flexibility in addressing unforeseen problems without jeopardizing the overall project. For example, if the estimated cost of your siding replacement is $10,000, allocating $1,000 – $2,000 as a contingency fund would provide a buffer for unexpected repairs. It’s crucial to discuss potential unexpected costs with your contractor upfront and ensure they are factored into the overall quote or contract.

    Ending Remarks

    Replacing your siding is a considerable undertaking, but with careful planning and a thorough understanding of the cost factors involved, you can approach the project with confidence. By considering material costs, labor expenses, permitting requirements, waste disposal, necessary repairs, and potential upgrades, you can create a realistic budget and select a contractor who aligns with your needs and financial constraints. Remember to factor in potential unexpected issues and always review contracts meticulously before commencing the project. A well-informed approach ensures a smooth and successful siding replacement, enhancing your home’s curb appeal and protecting it for years to come.

  • Cost of Replacing Old Aluminum Siding with New Materials

    Cost of Replacing Old Aluminum Siding with New Materials

    Cost of Replacing Old Aluminum Siding with New Materials is a significant undertaking for homeowners, impacting both aesthetics and long-term value. This comprehensive guide explores the multifaceted costs involved, from material selection and labor expenses to permits, waste disposal, and potential unforeseen challenges. We’ll delve into a detailed cost comparison of various siding materials, analyze labor requirements, and illuminate the financial implications of choosing different options. Understanding these costs upfront is crucial for budgeting effectively and making informed decisions about this substantial home improvement project.

    This analysis will cover a range of factors impacting the total cost, including material pricing variations (vinyl, fiber cement, wood, etc.), regional labor rates, permit fees, waste disposal methods, and the potential for unexpected repairs. We will also examine the long-term cost implications, considering warranty periods, maintenance requirements, and the potential impact on energy efficiency and home value. By the end, you’ll have a clear understanding of the financial landscape surrounding siding replacement and be better equipped to plan your project.

    Material Costs Comparison

    Replacing aluminum siding involves a significant investment, and choosing the right material is crucial. This section details the cost differences between various siding options, helping you make an informed decision. We will compare the price per square foot, considering factors that influence the overall expense.

    Cost Breakdown of Siding Materials

    The cost of siding materials varies significantly depending on the type of material chosen. Aluminum siding, while relatively inexpensive initially, often requires more frequent replacement than other options. Here’s a comparison of material costs per square foot, keeping in mind that these are estimates and can fluctuate based on location, quality, and brand. Prices typically range from a low to high end, accounting for various grades and manufacturers.

    Material Cost per Square Foot (Low End) Cost per Square Foot (High End) Installation Cost per Square Foot (Estimate)
    Vinyl Siding $2.00 $6.00 $3.00 – $5.00
    Fiber Cement Siding $4.00 $12.00 $5.00 – $8.00
    Wood Siding $6.00 $20.00+ $7.00 – $12.00+
    Aluminum Siding $1.50 $4.00 $2.00 – $4.00

    Factors Influencing Material Costs

    Several factors contribute to the variation in siding material costs. Understanding these factors will help you better estimate the total cost of your project.

    Quality significantly impacts pricing. Higher-quality materials, such as those with enhanced durability, weather resistance, and aesthetic appeal, generally command higher prices. For example, a premium grade of vinyl siding with a longer warranty will cost more than a basic grade. Similarly, fiber cement siding with a thicker profile and enhanced durability will be more expensive than thinner options. Brand recognition also plays a role. Established brands often charge a premium for their reputation and perceived quality.

    Regional availability affects pricing. Materials that are readily available in a particular region will generally be less expensive than those that need to be transported long distances. For example, wood siding sourced locally will often be cheaper than wood siding imported from another country. Finally, the current market conditions, including material availability and labor costs, also influence pricing. Economic fluctuations can lead to price increases or decreases in the short term.

    Total Estimated Costs

    The total estimated cost of siding replacement includes both material and installation costs. Using the data in the table above, we can illustrate the potential total cost for a 1000 square foot home.

    Material Total Material Cost (1000 sq ft, Low End) Total Material Cost (1000 sq ft, High End) Total Installation Cost (1000 sq ft, Estimate) Total Estimated Cost (Low End) Total Estimated Cost (High End)
    Vinyl Siding $2000 $6000 $3000 – $5000 $5000 – $8000 $9000 – $11000
    Fiber Cement Siding $4000 $12000 $5000 – $8000 $9000 – $14000 $17000 – $20000
    Wood Siding $6000 $20000+ $7000 – $12000+ $13000 – $22000+ $27000 – $32000+
    Aluminum Siding $1500 $4000 $2000 – $4000 $3500 – $6000 $6000 – $8000

    Labor Costs Analysis

    Labor costs represent a significant portion of the total expense when replacing aluminum siding. Understanding the factors that influence these costs is crucial for accurate budgeting and realistic project planning. Several key variables impact the final labor bill, including the project’s scope, geographical location, and the experience level of the chosen contractor.

    Factors Affecting Labor Costs for Siding Replacement

    Project Size and Complexity

    The size of the house and the complexity of the siding job directly affect the labor hours required. A larger house with intricate architectural details, such as multiple gables, dormers, or bay windows, will naturally demand more time and therefore, higher labor costs than a smaller, simpler structure. For example, a 1,500 square foot ranch-style home will require considerably less labor than a 3,000 square foot Victorian home with numerous architectural features. Additional factors influencing complexity include the need for extensive repairs to underlying sheathing or the presence of obstacles like difficult-to-access areas.

    Geographic Location

    Labor costs vary significantly across different regions of the country. Areas with a higher cost of living generally have higher labor rates for skilled tradespeople. For instance, contractors in major metropolitan areas like New York City or San Francisco will typically charge more per hour than those in smaller towns or rural areas. This difference reflects the higher demand for skilled labor and the increased operational expenses faced by businesses in these high-cost regions.

    Contractor Experience and Expertise

    The experience and reputation of the contractor also play a critical role in determining labor costs. Highly experienced and reputable contractors often command higher hourly rates due to their expertise, efficiency, and commitment to quality workmanship. While a less experienced contractor might offer a lower hourly rate, the potential for delays, mistakes, and the need for rework could ultimately increase the overall project cost. Choosing a qualified and experienced contractor may seem more expensive upfront, but it can often save money and stress in the long run.

    Labor Hours for Removal and Installation

    Removing aluminum siding typically requires more labor than installing new siding materials. Aluminum siding is often fastened securely and can be difficult to remove without damaging the underlying sheathing. Careful removal is essential to avoid unnecessary repairs or replacements. In contrast, installing new siding is generally a more straightforward process, although the specific techniques vary depending on the chosen material (e.g., vinyl, fiber cement, wood). For example, removing aluminum siding on a 2,000 square foot house might take two experienced workers two days, while installing vinyl siding on the same house could take them one and a half days.

    Labor Cost Ranges Per Square Foot

    The labor cost per square foot for siding replacement varies considerably based on the factors discussed above. However, a general range can be provided as a starting point for budgeting purposes.

    Siding Material Labor Cost Per Square Foot (USD)
    Vinyl Siding $1.50 – $4.00
    Fiber Cement Siding $3.00 – $6.00
    Wood Siding $4.00 – $8.00+

    Note: These are approximate ranges, and actual costs may vary depending on the specific project details and location. Always obtain multiple detailed quotes from reputable contractors before making a decision.

    Permits and Inspections

    Replacing your aluminum siding necessitates navigating the often-unfamiliar world of building permits and inspections. These processes, while sometimes perceived as bureaucratic hurdles, are crucial for ensuring your project adheres to local building codes, protects your investment, and safeguards your property’s value. Understanding the associated costs upfront is essential for accurate budgeting.

    Permitting and inspection costs for siding replacement projects are highly variable and depend on several key factors. The location of your property significantly influences fees, as each municipality or county establishes its own pricing structure. Project scope also plays a crucial role; a large-scale replacement will naturally incur higher costs than a smaller, localized repair. Additionally, the complexity of the project, including any structural modifications required, can affect the number and type of inspections needed, thus impacting the overall expense.

    Permit Fees

    Permit fees are typically calculated based on the project’s estimated value. This value is often determined by the cost of materials and labor. For instance, a small siding replacement project might cost $5,000, resulting in a permit fee of around $100 to $300, depending on the local jurisdiction. A larger, more extensive project costing $20,000 might incur a permit fee between $300 and $1000 or even more in some areas. It’s advisable to contact your local building department to obtain precise fee information, which may be available online or in person. Some municipalities offer online permit applications, streamlining the process and providing immediate fee estimates.

    Inspection Fees

    Inspection fees are usually separate from permit fees and are charged for each inspection required throughout the project. Common inspections include initial plan review, framing inspection (if structural changes are involved), and final inspection once the siding is installed. The number of inspections varies depending on project complexity and local regulations. These fees typically range from $50 to $150 per inspection, potentially adding up to several hundred dollars for a comprehensive siding replacement.

    Sample Cost Breakdown for Permits and Inspections

    Let’s consider a hypothetical siding replacement project for a single-family home with approximately 1,500 square feet of siding.

    Item Cost Estimate
    Permit Application Fee $200
    Plan Review Inspection Fee $75
    Framing Inspection Fee (if applicable) $100
    Final Inspection Fee $75
    Total Estimated Cost for Permits and Inspections $450

    This is a sample breakdown, and actual costs may vary considerably depending on the factors discussed earlier. Always obtain specific quotes from your local building department to ensure accurate budgeting. It’s also prudent to factor in potential delays related to permitting and inspections; unforeseen issues may require additional inspections or amended applications, potentially increasing costs and extending the project timeline.

    Waste Removal and Disposal

    Replacing your aluminum siding generates significant waste, and responsible disposal is crucial both environmentally and financially. The cost of waste removal and disposal can vary considerably depending on factors such as the volume of waste, the type of materials, local regulations, and the chosen disposal method. Understanding these costs is essential for accurate budgeting.

    Proper disposal of old aluminum siding and construction debris is not only environmentally responsible but also often legally mandated. Failing to comply with local regulations can result in significant fines. Moreover, choosing environmentally friendly options can reduce your carbon footprint and contribute to a more sustainable future. The following sections detail various disposal methods and their associated costs.

    Costs Associated with Waste Disposal

    The cost of disposing of old aluminum siding and construction debris depends on several factors. The volume of waste is a primary driver of cost; larger projects naturally generate more waste and require more extensive removal services. The type of waste also plays a role; aluminum siding, while recyclable, may require specialized handling compared to regular construction debris like wood or drywall. Local regulations concerning waste disposal significantly influence costs, with some areas having stricter rules and higher fees than others. Finally, the chosen disposal method, whether it involves a dumpster rental, specialized hauling services, or recycling programs, directly impacts the overall expense. For example, a small residential project might cost between $200 and $500 for waste removal, while a larger commercial project could easily exceed $1000 or more.

    Environmentally Friendly Disposal Options

    Recycling is a key component of environmentally responsible waste disposal. Aluminum siding, being a highly recyclable material, can be processed and reused, minimizing landfill waste. Many recycling centers accept aluminum siding, often at a cost lower than simply disposing of it in a landfill. However, the cost of transportation to the recycling center should be considered. Another environmentally conscious approach involves utilizing construction debris for fill material on the property, if feasible and permitted. This reduces the amount of waste that needs to be transported off-site, thus minimizing transportation costs and carbon emissions. This option is contingent upon the project scale and local regulations. Composting of organic waste generated during the project, such as wood scraps, is another sustainable practice that reduces landfill waste.

    Waste Removal and Disposal Methods and Costs

    The following list outlines common waste removal and disposal methods and their associated cost implications. Costs are estimates and can vary widely depending on location and project specifics.

    • Dumpster Rental: This is a common method for disposing of large volumes of construction debris. Costs range from $300 to $800 or more, depending on the dumpster size and rental duration. This often includes delivery and pickup.
    • Specialized Hauling Services: For projects with specific waste disposal needs, such as hazardous materials or large quantities of aluminum siding, specialized hauling services are often necessary. These services typically charge by the weight or volume of waste, resulting in costs that can vary significantly. Expect to pay a premium for this service compared to dumpster rentals.
    • Recycling Centers: Recycling aluminum siding can significantly reduce disposal costs compared to landfill disposal. Costs vary depending on the recycling center’s fees and the amount of aluminum being recycled. Some centers may even pay for the recyclable aluminum.
    • On-site Material Reuse: If appropriate and permitted, reusing construction debris (like wood or broken pieces of siding for backfill) as fill material can significantly reduce waste disposal costs, potentially eliminating the need for other methods altogether.

    Unexpected Expenses

    Replacing your aluminum siding is a significant undertaking, and while careful planning can minimize costs, unforeseen expenses are a common reality. These unexpected costs can significantly impact your budget, so it’s crucial to be prepared for potential surprises. Understanding the potential causes and ranges of these expenses will help you better manage your project’s finances.

    Unexpected expenses often stem from issues discovered only after the old siding is removed. This reveals the underlying structure of your home, exposing problems that may have been hidden for years. For example, extensive water damage might necessitate more extensive repairs than initially anticipated, increasing both material and labor costs. Similarly, structural problems like damaged sheathing or framing may require significant repairs before new siding can be installed. The age and condition of your home play a crucial role in determining the likelihood and extent of these unexpected costs.

    Unforeseen Structural Issues

    Discovering unforeseen structural problems during siding removal is a common cause of budget overruns. These problems could include rotted wood sheathing, damaged framing, or insect infestation. The extent of the damage dictates the necessary repairs, ranging from simple patching to extensive replacement of sections of the wall. For instance, finding significant water damage behind a section of siding might necessitate replacing multiple boards of sheathing, adding several hundred dollars to the project cost, depending on the extent of the damage and the cost of materials and labor in your area. In severe cases, it could even involve structural reinforcement, substantially increasing the total cost.

    Hidden Water Damage

    Water damage, often hidden beneath the old siding, can be a significant source of unexpected expenses. Mold growth, rotted wood, and damaged insulation are all possibilities. The cost to repair water damage can vary widely, depending on the severity and location of the problem. A small area of water damage might cost a few hundred dollars to repair, while extensive damage could cost thousands. For example, water damage requiring the replacement of a large section of wall sheathing, along with insulation and vapor barrier, could easily add $1,000 – $3,000 or more to the overall project cost.

    Unexpected Material Needs

    The initial material estimate may not fully account for all necessary supplies. This can happen due to unforeseen issues like discovering damaged areas requiring more materials than anticipated or needing specialized materials for unexpected repairs. For instance, discovering rotted wood behind the siding might necessitate purchasing additional lumber and treatments for proper repair, adding to the initial material cost. Also, if specialized flashing or sealant is required for unexpected conditions, this can add an unexpected cost to the budget.

    Additional Labor Costs

    Unforeseen complications can significantly increase labor costs. Discovering extensive damage, requiring more time and effort for repairs, is a frequent cause. For instance, if unexpected structural issues require extensive repairs, the labor costs can increase substantially as more time is needed for demolition, repair, and installation. This could add hundreds or even thousands of dollars to the original labor estimate. Similarly, dealing with unexpected obstacles, such as difficult-to-access areas or complex configurations, will also drive up labor costs.

    Potential Unexpected Costs and Their Ranges

    It is important to note that these are estimates and actual costs can vary widely depending on location, the extent of the damage, and the contractor’s rates.

    Unexpected Expense Likely Cost Range
    Repairing rotted sheathing $200 – $2,000+
    Repairing water damage $100 – $3,000+
    Addressing insect infestation $300 – $1,500+
    Unforeseen structural repairs $500 – $5,000+
    Additional material costs $100 – $1,000+
    Increased labor costs $200 – $2,000+

    Warranty and Maintenance Costs

    Choosing new siding involves a significant investment, and understanding the long-term costs associated with warranties and maintenance is crucial for making an informed decision. Different siding materials offer varying warranty periods and require different levels of upkeep, directly impacting your overall expenses over the lifespan of your home’s exterior. This section compares the warranty coverage and maintenance requirements of several popular siding options to help you assess the total cost of ownership.

    Warranty Periods for Different Siding Materials

    Warranty periods vary considerably depending on the manufacturer, material type, and specific product. For example, vinyl siding often comes with a 20-30 year warranty against manufacturing defects, while fiber cement siding may offer a 50-year warranty, though this often excludes certain aspects like paint finish. Aluminum siding warranties are typically shorter, ranging from 15-25 years. The length of the warranty doesn’t necessarily reflect the material’s lifespan; it primarily covers defects in manufacturing and materials. It’s crucial to carefully review the specific terms and conditions of each warranty before making a purchase.

    Maintenance Requirements and Associated Costs

    The maintenance needs of different siding materials vary significantly, impacting long-term costs. Vinyl siding is generally low-maintenance, requiring only occasional cleaning with soap and water. However, more extensive cleaning might be needed to remove stubborn stains or mildew. Fiber cement siding requires more attention; it may need periodic repainting to maintain its appearance and protect it from the elements. Aluminum siding, while durable, can be susceptible to dents and scratches, potentially requiring repairs or replacement of individual panels. Regular inspection for damage and prompt repairs are key to minimizing long-term expenses.

    Long-Term Cost Implications

    Considering maintenance and potential repairs over a 20-year period provides a clearer picture of the overall cost of each siding option. For example, while vinyl siding may have lower initial costs, frequent repainting of fiber cement siding over two decades might offset this initial savings. Aluminum siding’s potential for damage and the need for individual panel replacements could also lead to considerable costs over the long term. Unforeseen events, such as severe weather damage, could necessitate repairs or replacements irrespective of the material choice. Proper planning and budgeting for these eventualities are essential.

    Warranty and Maintenance Cost Comparison (20-Year Period)

    Siding Material Warranty Period (Years) Estimated Annual Maintenance Cost Estimated Total Maintenance Cost (20 Years)
    Vinyl 25-30 $50 $1000 – $1200
    Fiber Cement 50 (material, paint separate) $150 – $200 (includes repainting every 7-10 years) $3000 – $4000
    Aluminum 15-25 $75 – $100 (includes potential minor repairs) $1500 – $2000

    *Note: These are estimated costs and can vary based on factors such as home size, climate, and specific product choices. Actual costs may be higher or lower.

    Financing Options

    Replacing your home’s siding is a significant investment, and securing appropriate financing can make the project more manageable. Several options exist, each with its own advantages and disadvantages concerning interest rates and repayment terms. Choosing the right financing method depends on your financial situation and the overall cost of your project.

    Financing a siding replacement project typically involves either loans specifically designed for home improvements or using existing credit lines like credit cards. Home improvement loans often offer lower interest rates than credit cards, making them a more cost-effective choice for larger projects. However, credit cards can provide quicker access to funds, which might be beneficial if you need to start the project immediately.

    Home Improvement Loans

    Home improvement loans are specifically designed to finance projects like siding replacement. These loans typically offer fixed interest rates and repayment terms ranging from several months to several years. The interest rate offered will depend on several factors, including your credit score, the loan amount, and the lender. Lenders often require a down payment, and the loan amount is usually capped at a certain percentage of your home’s value.

    Credit Card Financing

    Using a credit card to finance a siding replacement project offers immediate access to funds. However, credit cards typically carry higher interest rates than home improvement loans, making them more expensive in the long run. Interest charges can quickly accumulate if the balance isn’t paid off promptly. It’s crucial to understand the APR (Annual Percentage Rate) and any associated fees before using a credit card for such a significant expense.

    Examples of Financed Siding Replacement Costs

    Let’s consider a hypothetical siding replacement project costing $15,000. Below are examples illustrating the total cost when financed with different loan terms and interest rates. These are simplified examples and do not include any potential closing costs or fees. Actual costs will vary based on lender specifics and individual circumstances.

    Loan Type Loan Amount Interest Rate Loan Term (Years) Approximate Monthly Payment Total Cost (Principal + Interest)
    Home Improvement Loan $15,000 6% 5 $286.97 $17,218.20
    Home Improvement Loan $15,000 8% 5 $299.78 $17,986.80
    Credit Card $15,000 18% 5 $373.96 $22,437.60

    Note: These are estimates only. Actual payments and total costs may vary depending on the lender and specific loan terms. Always compare offers from multiple lenders before making a decision.

    Insulation and Energy Efficiency

    Replacing your old aluminum siding presents a valuable opportunity to enhance your home’s energy efficiency. The choice of siding material significantly impacts your home’s insulation properties, directly affecting heating and cooling costs. By carefully considering the thermal resistance (R-value) of different materials, you can make an informed decision that leads to long-term cost savings.

    Improved insulation reduces the amount of energy needed to maintain a comfortable indoor temperature. This translates to lower energy bills and a smaller carbon footprint. The initial investment in new siding with superior insulation can be offset by these savings over the lifespan of the material. The payback period, or the time it takes for the energy savings to equal the initial investment, varies depending on factors such as energy prices, climate, and the R-value of the chosen siding.

    Comparison of Siding Material Insulation Properties

    Different siding materials offer varying levels of insulation. For example, vinyl siding typically boasts an R-value between 0.5 and 1.0, while fiber cement siding ranges from 0.1 to 0.3. Wood siding, depending on its thickness and type, can offer R-values from 0.8 to 1.3. However, the overall insulation of the wall system is a combination of the siding and the underlying insulation, making the siding’s contribution relative. The most effective approach involves maximizing the insulation within the wall cavity, regardless of the exterior siding material. This means focusing on proper installation of appropriate insulation batt thickness for your climate zone.

    Energy Savings Calculation: A Hypothetical Example

    Let’s consider a hypothetical example to illustrate the potential energy savings. Assume a 2,000 square foot home in a climate with average annual heating and cooling costs of $2,000. Replacing the aluminum siding (with negligible insulation value) with vinyl siding (R-value of 0.8) might reduce energy consumption by 5%, leading to annual savings of $100 ($2000 x 0.05). However, if the same home uses fiber cement siding (R-value of 0.2) and also improves the wall insulation with additional batt insulation (e.g., from R-13 to R-21), the energy savings could be significantly higher, perhaps reaching 15% or $300 annually. These savings accumulate over time, potentially offsetting the higher initial cost of the siding and insulation upgrade. It’s crucial to note that actual savings will vary based on numerous factors, including the home’s construction, climate, and energy usage patterns. A detailed energy audit can provide a more accurate prediction of potential savings.

    Offsetting Initial Costs Through Energy Savings

    The initial cost of replacing siding, including labor and materials, can be substantial. However, the cumulative energy savings realized over the lifespan of the new siding can significantly offset this expense. For instance, if the energy savings from a siding upgrade amount to $300 annually and the siding is expected to last 30 years, the total savings would be $9000. This figure could easily surpass the initial cost of the project, resulting in a net positive return on investment. This makes energy efficiency a critical consideration when planning a siding replacement project. A simple payback calculation can help determine if the long-term savings justify the upfront investment.

    Home Value Impact

    Replacing your home’s siding can significantly impact its overall value, often providing a substantial return on investment. The choice of material plays a crucial role in determining how much this impact will be, influencing both the perceived aesthetic appeal and the perceived durability of the home. A well-chosen siding upgrade can enhance curb appeal and attract potential buyers, leading to a higher selling price.

    The choice of siding material directly influences the perceived value of a home. Higher-end materials, such as fiber cement or engineered wood, tend to command a greater premium than vinyl or aluminum siding. This is because these materials are often associated with increased durability, longevity, and a more upscale aesthetic. Conversely, while vinyl siding can be an affordable option, it may not add as much value to a home as more premium materials.

    Siding Material and Resale Value

    Different siding materials affect the potential resale value of a property in varying ways. For instance, a home with newly installed fiber cement siding, known for its durability and fire resistance, might see a larger increase in value compared to a home with newly installed vinyl siding. This is because fiber cement is perceived as a higher-quality, more long-lasting material. Similarly, a home featuring cedar or other natural wood siding, if properly maintained, can significantly enhance its perceived value due to its aesthetic appeal and association with luxury. However, the increased maintenance required for natural wood siding should be considered. Conversely, aluminum siding, while durable, might not increase the home’s value as dramatically as other materials due to its more common and less-expensive nature.

    Examples of Resale Value Impact

    Consider a hypothetical scenario: Two identical homes in the same neighborhood are listed for sale. One home features original aluminum siding showing signs of age and wear, while the other has recently been sided with high-quality fiber cement. The home with the upgraded fiber cement siding is likely to command a higher price and sell faster due to its improved curb appeal and the perceived increase in quality and longevity. Another example could involve a home with older vinyl siding replaced with cedar shake siding. The cedar shake, while more expensive initially, might significantly increase the home’s value due to the upscale appearance and the inherent appeal of natural materials, assuming proper maintenance. The final sale price difference between these comparable homes could easily reach several thousand dollars, reflecting the impact of siding choice on resale value. These examples demonstrate the financial benefits of investing in higher-quality siding materials, even though the initial cost may be higher.

    Ultimate Conclusion

    Replacing old aluminum siding offers a fantastic opportunity to enhance your home’s curb appeal, improve energy efficiency, and potentially increase its value. However, navigating the associated costs requires careful planning and consideration of various factors. This guide has provided a comprehensive overview of the financial aspects, from material costs and labor expenses to permits, waste disposal, and potential unforeseen expenses. By understanding the potential cost ranges for different materials and factoring in long-term implications, homeowners can make informed decisions that align with their budget and long-term goals. Remember to obtain multiple quotes from reputable contractors to ensure you’re getting the best value for your investment.

  • DIY vs. Professional Siding Repair: Which Is Better?

    DIY vs. Professional Siding Repair: Which Is Better?

    DIY vs. Professional Siding Repair: Which Is Better? This question faces many homeowners needing siding repairs. Weighing the costs, time commitment, and skill requirements is crucial for making an informed decision. This article explores the pros and cons of each approach, helping you determine the best path for your specific situation and budget, considering factors like material selection, warranty, safety, and long-term durability.

    From minor repairs to extensive damage, understanding the complexities involved is key. We’ll delve into the details of each option, providing a clear comparison to help you confidently choose between tackling the project yourself or hiring a professional.

    Cost Comparison

    Repairing siding, whether you tackle it yourself or hire a professional, involves a significant investment. The total cost depends heavily on the type of siding, the extent of the damage, and the chosen labor route. This section will break down the cost differences between DIY and professional siding repair for common siding materials.

    Cost Breakdown by Siding Material and Repair Method

    The following table provides estimated cost ranges for professional and DIY siding repair for three common siding materials: vinyl, wood, and fiber cement. These are averages and can vary based on location, labor rates, and material costs. Permits are not always required for minor repairs, but are included here for comprehensive cost assessment.

    Siding Material Repair Method Labor Cost Material Cost Permit Cost (Estimated)
    Vinyl Professional $500 – $2000+ (depending on area and damage extent) $100 – $500 (depending on amount of replacement needed) $50 – $200
    DIY $0 $100 – $500 $50 – $200
    Wood Professional $1000 – $5000+ (more complex repairs increase cost significantly) $200 – $1500+ (depending on wood type and quantity) $50 – $200
    DIY $0 $200 – $1500+ $50 – $200
    Fiber Cement Professional $1500 – $7000+ (labor intensive due to material weight and handling) $300 – $2000+ (material costs are higher) $50 – $200
    DIY $0 $300 – $2000+ $50 – $200

    Hidden Costs of Siding Repair

    Unexpected expenses can significantly impact the final cost of any home repair project. Both DIY and professional repairs have potential hidden costs.

    For professional repairs, unforeseen issues like extensive rot (in wood siding), underlying water damage, or the need for more extensive repairs than initially assessed can lead to substantial cost overruns. For example, a seemingly minor repair might uncover water damage requiring extensive wall sheathing replacement, dramatically increasing the final bill.

    DIY repairs often incur hidden costs related to tool rentals, unexpected material needs (purchasing extra materials due to miscalculations or damage), and potential waste disposal fees. For instance, a homeowner might underestimate the amount of vinyl siding needed, requiring a second trip to the home improvement store. Improper disposal of old siding materials can also result in additional costs. Furthermore, a lack of experience can lead to mistakes requiring additional materials or even professional intervention to correct, negating any initial cost savings.

    Time Commitment

    Repairing your home’s siding, whether you tackle it yourself or hire a professional, demands a significant time investment. The total time required varies drastically depending on the size of your house, the extent of the damage, and the chosen method. This section will compare the time commitment for both DIY and professional siding repair, offering realistic estimates to aid your decision-making process.

    The time required for siding repair is directly proportional to the project’s scope. A small repair, such as replacing a few damaged panels, will naturally take less time than a complete siding overhaul. Similarly, the complexity of the damage – whether it involves simple replacement or intricate repairs around windows and doors – significantly impacts the duration. Consider factors such as material sourcing and weather conditions which can further influence the overall timeline.

    DIY Siding Repair Time Commitment

    A standard-sized single-family home requiring minor siding repairs (e.g., replacing 10-20 damaged panels) might take a skilled DIYer 1-2 weekends (16-32 hours) to complete. This estimate includes time for material procurement, preparation, repair, and cleanup. However, larger projects involving extensive damage or the need to replace significant portions of the siding could easily extend this timeframe to several weekends or even weeks, particularly for individuals lacking prior experience. For instance, a homeowner replacing all the siding on a two-story house might realistically spend several weeks, working several hours each weekend, depending on their skill level and available time. The complexity of the work – such as working around intricate architectural details or dealing with difficult-to-access areas – will increase the time required significantly.

    Professional Siding Repair Time Commitment

    Professional siding contractors typically work more efficiently due to their experience and access to specialized tools. A small repair job on a standard-sized house could be completed within a single day (8 hours) or less. Larger projects, however, might require a team of professionals and several days to complete. A full siding replacement on a large house could take a professional crew a week or more, depending on the size of the house, the type of siding being installed, and weather conditions. For example, a company specializing in large-scale siding replacement might allocate a team of three to four people for a week to complete the siding work on a large two-story home. This estimate accounts for preparation, material delivery, installation, and cleanup. Professional crews are usually able to work more quickly and efficiently than a DIYer.

    Skill and Expertise Required

    Successfully repairing siding, whether as a DIY project or by hiring a professional, hinges significantly on the skills and expertise involved. Understanding the differences in required skill sets and the potential consequences of inadequate expertise is crucial in determining the best approach for your specific situation. This section will detail the skills needed for DIY repairs and the expertise offered by professional contractors, comparing the potential for errors and resulting damage.

    DIY siding repair and professional siding repair require vastly different levels of skill and knowledge. While simple repairs might be manageable for a homeowner with basic handiness, more complex issues demand the expertise of a seasoned professional. The choice between DIY and professional repair significantly impacts the final outcome, both in terms of aesthetics and longevity.

    DIY Siding Repair Skills and Tools

    Undertaking DIY siding repair requires a combination of practical skills and the right tools. The complexity of the task dictates the specific skills and tools required. For instance, minor repairs might only necessitate basic hand tools, while more extensive projects necessitate specialized equipment and a deeper understanding of construction techniques.

    Essential skills typically include the ability to accurately measure and cut materials, operate power tools safely (such as drills, saws, and nail guns), and understand basic carpentry principles like proper fastening techniques and the importance of weather sealing. Tools needed might include a measuring tape, utility knife, hammer, screwdriver, level, saw (hand or power), drill, and appropriate fasteners (nails, screws). For specific siding types (e.g., vinyl, wood, fiber cement), specialized tools and knowledge of their proper handling are necessary. For example, working with vinyl siding requires understanding its flexibility and avoiding damage through improper force application.

    Professional Siding Contractor Expertise

    Professional siding contractors possess a far broader range of skills and expertise compared to the average homeowner. Years of experience provide them with in-depth knowledge of various siding materials, installation techniques, and repair methods. This expertise extends beyond basic tool usage; it includes a deep understanding of building codes, structural integrity, and potential underlying issues that might require attention beyond the immediate siding repair.

    Professional contractors typically possess advanced skills in diagnosing the root cause of siding damage, selecting appropriate materials for repairs, and ensuring a watertight and structurally sound installation. They are also proficient in using specialized tools and equipment, such as scaffolding, lifts, and specialized caulking guns, to efficiently and safely complete the job. Their experience also allows them to identify and address potential problems, such as underlying water damage or pest infestations, preventing future issues.

    Likelihood of Errors and Damage

    The likelihood of errors and damage varies greatly depending on whether the repair is undertaken by a DIYer or a professional. While minor repairs may be successfully completed by a capable homeowner, more complex tasks carry a higher risk of mistakes. These mistakes can range from improper installation leading to water damage and structural compromise to aesthetic flaws that detract from the home’s appearance. Improper use of power tools can also result in injury.

    Professional contractors, due to their extensive experience and knowledge, significantly reduce the likelihood of errors. Their expertise minimizes the risk of damage, ensuring a quality repair that protects the home’s structure and aesthetics. They are also insured, offering an additional layer of protection against unforeseen issues or accidents. For instance, a homeowner attempting a complex repair might inadvertently damage underlying sheathing or cause water infiltration, resulting in costly secondary repairs. A professional, on the other hand, would likely identify and address these potential issues proactively.

    Material Selection and Sourcing

    Choosing the right siding materials and sourcing them effectively is crucial for a successful repair project, regardless of whether you’re tackling it yourself or hiring a professional. The material’s durability, aesthetic appeal, and ease of installation all play a significant role in the overall outcome and cost. Sourcing also impacts both the price and the timeline of your project.

    The selection of siding materials depends heavily on factors such as budget, the existing siding type, the home’s architectural style, and the climate. Different materials offer varying levels of maintenance, longevity, and aesthetic appeal. Furthermore, the complexity of installation significantly influences whether a DIY approach is feasible.

    Siding Material Types and Suitability

    Several siding materials are commonly used, each possessing unique properties. Vinyl siding is a popular choice for DIY projects due to its affordability, ease of installation, and low maintenance. However, it’s less durable than other options and can be susceptible to damage from impacts. Fiber cement siding offers superior durability and fire resistance, but it is more challenging to install and requires more specialized tools, making it more suitable for professional installation. Wood siding, while aesthetically pleasing, necessitates significant maintenance and is prone to rot and insect infestation, often making it less ideal for DIY repairs. Metal siding, such as aluminum or steel, is extremely durable and low-maintenance but can be more expensive and more difficult to install than vinyl.

    Sourcing Materials: Big-Box Stores vs. Specialized Suppliers

    Big-box home improvement stores offer convenience and a wide selection of common siding materials, particularly vinyl and some fiber cement options. However, their expertise may be limited, and the selection of specialized materials or colors might be restricted. Prices are generally competitive, but the potential for lower quality or less durable products exists. Specialized siding suppliers, on the other hand, offer a broader range of materials, including less common types and custom colors. They often possess greater expertise and can provide valuable advice on material selection and installation. However, their prices might be higher, and the sourcing process may take longer due to less readily available stock. The selection of a supplier depends on the project’s scale, material requirements, and budget constraints. For example, a small DIY repair using readily available vinyl siding might benefit from a big-box store, while a large-scale professional repair using specialized fiber cement might necessitate a specialized supplier.

    Warranty and Insurance

    Choosing between DIY and professional siding repair involves careful consideration of long-term implications beyond the initial cost and effort. Warranty coverage and insurance protection represent significant factors influencing this decision. A professional job typically comes with a warranty, offering peace of mind and recourse should problems arise. Conversely, DIY repairs lack this crucial safeguard.

    Professional siding repair often involves significant financial investment, and the protection offered by insurance is paramount. Insurance covers potential accidents, damage to property, and liability issues, protecting both the homeowner and the contractor. DIY repairs, however, leave the homeowner entirely responsible for any unforeseen circumstances or consequences.

    Warranty Coverage Comparison

    Professional contractors typically offer warranties on their workmanship and materials. These warranties vary in length and scope, but generally cover defects in materials or installation for a specified period, often one to two years, sometimes longer depending on the materials used. For example, a reputable contractor might offer a two-year warranty on labor and a five-year warranty on specific siding materials. This warranty provides a safety net should the repair fail prematurely due to faulty workmanship or defective materials. In contrast, DIY repairs carry no such warranty. If a DIY repair fails, the homeowner bears the entire cost of rectifying the problem.

    Insurance Implications

    Professional contractors are typically insured for liability and workers’ compensation. Liability insurance protects the homeowner from potential lawsuits arising from accidents or injuries occurring during the repair process. Workers’ compensation insurance covers medical expenses and lost wages for any contractor employees injured on the job. This protection is crucial for homeowners, as they are not held liable for accidents caused by the contractor’s negligence or employees’ injuries. In contrast, DIY repairs leave the homeowner entirely responsible for any injuries sustained during the repair process, and any damages caused to their own property or the property of others. For instance, if a homeowner falls from a ladder while performing a DIY repair, they would be responsible for all medical expenses and any resulting legal costs. Furthermore, if damage occurs to a neighbor’s property during the DIY repair, the homeowner would be liable for the costs of repair.

    Safety Considerations

    Siding repair, whether undertaken by a homeowner or a professional, presents several potential safety hazards. Understanding these risks and implementing appropriate precautions is crucial for preventing injuries and ensuring a successful project. The level of risk varies depending on the complexity of the repair, the height of the work area, and the tools and materials involved.

    Both DIY and professional siding repair share some common safety concerns, although professionals typically have more experience and access to advanced safety equipment. However, even experienced professionals can be exposed to risks if proper precautions are not taken. The following sections will outline the key safety hazards and appropriate mitigation strategies.

    Potential Safety Hazards

    Working at heights is a primary concern in siding repair, regardless of whether the work is DIY or professional. Falls from ladders or roofs are a significant source of injury. Additionally, the use of power tools, such as nail guns, saws, and drills, presents risks of cuts, lacerations, and electrical shock. Working with sharp objects like knives and metal sheets can also lead to injuries. Furthermore, exposure to the elements, such as extreme heat or cold, and the potential for falling debris should not be overlooked. Finally, the presence of asbestos in older siding materials necessitates careful handling and potentially professional asbestos abatement if disturbed.

    Safety Precautions for DIY Repairs

    Before commencing any DIY siding repair, it is essential to plan thoroughly and acquire the necessary safety equipment. This includes a sturdy ladder or scaffolding appropriate for the height of the work, a safety harness and lanyard for working at heights above 6 feet, safety glasses to protect the eyes from flying debris, work gloves to protect hands, and a dust mask to prevent inhalation of harmful particles. Appropriate hearing protection should be used when operating power tools. Furthermore, proper footwear with good grip is essential to prevent slips and falls. It is crucial to inspect all equipment before use and ensure it is in good working condition. If undertaking tasks beyond one’s skill level, professional assistance should be sought to avoid potential risks. Finally, a first-aid kit should be readily available on-site to address minor injuries.

    Working at Heights Safety Measures

    When working at heights, always use a stable and properly positioned ladder or scaffolding. Never overreach or attempt to work from an unstable platform. Ensure the ladder is placed on a level surface and has a secure footing. For heights above 6 feet, the use of a safety harness and lanyard connected to a secure anchor point is mandatory. Regularly inspect the ladder and harness for any signs of wear or damage. If working on a roof, consider using a roof safety system, which includes a lifeline and anchor points. Prior to commencing work at heights, ensure that all tools and materials are readily accessible to minimize the need to move around while elevated. Regular breaks should be taken to avoid fatigue, a major contributor to accidents at heights.

    Project Scope and Complexity

    The scope and complexity of a siding repair project significantly influence the decision of whether to tackle it as a DIY project or hire a professional. Simple repairs are often manageable for homeowners with basic DIY skills, while more extensive or intricate work demands the expertise and specialized tools of a professional contractor. Understanding the distinctions between these project types is crucial for ensuring a successful and safe outcome.

    The suitability of a DIY approach versus professional intervention hinges largely on the nature and extent of the damage. Minor repairs, such as replacing a few damaged or loose siding panels, are generally within the capabilities of a competent DIYer. However, more involved projects requiring significant structural work, specialized equipment, or in-depth knowledge of building codes should be left to experienced professionals.

    Types of Siding Repairs Suitable for DIY Projects Versus Professional Work

    Minor repairs, such as replacing individual damaged or loose siding panels, patching small holes, or caulking gaps around windows and doors, are generally suitable for DIY projects. These tasks often require basic tools like a hammer, screwdriver, saw, and caulk gun, along with a reasonable level of dexterity and attention to detail. However, even these seemingly simple tasks can become problematic if the underlying structure is compromised or if the homeowner lacks the necessary understanding of proper installation techniques. For instance, improperly installed replacement siding could lead to water damage and further complications down the line.

    Conversely, extensive repairs involving significant structural damage, complex water damage remediation, or the replacement of large sections of siding necessitate the skills and equipment of a professional. These projects often require specialized tools, a thorough understanding of building codes and safety regulations, and experience in diagnosing and addressing underlying issues.

    Examples of Complex Repairs Requiring Professional Expertise

    Several scenarios necessitate the intervention of professional siding contractors. For example, repairs involving significant water damage that has penetrated the underlying sheathing or framing requires expertise in moisture detection, remediation, and proper structural repair. This might involve removing and replacing damaged sections of sheathing, installing vapor barriers, and ensuring proper ventilation to prevent future water damage. Furthermore, repairs involving extensive rot or insect infestation in the underlying structure are beyond the scope of most DIY projects. These situations often require specialized treatments and the expertise to identify and address the root cause of the problem. Another example would be repairing damage caused by severe weather events, such as hail or strong winds, which may involve significant structural damage and the need for specialized equipment to safely access and repair high areas of the building. Finally, any repair that involves significant alterations to the existing siding system, such as changing the type of siding or making extensive modifications to the underlying structure, should always be handled by a professional to ensure compliance with building codes and to maintain the structural integrity of the building.

    Environmental Impact

    Choosing between DIY and professional siding repair involves considering the environmental consequences. Both approaches have potential impacts on waste generation and resource consumption, although the extent varies depending on factors like material selection, project scale, and waste disposal practices. Professional contractors often have established systems for responsible waste management, potentially minimizing environmental harm. However, DIY projects, while potentially more resource-efficient on a small scale, can lead to improper waste disposal if not managed carefully.

    The environmental impact of siding repair hinges significantly on the materials used. Sustainable options minimize environmental harm throughout their lifecycle, from extraction and manufacturing to disposal. Conversely, less sustainable materials contribute to increased pollution and resource depletion. Furthermore, the transportation of materials to and from the project site contributes to the overall carbon footprint. Careful planning and selection of locally sourced, recycled, or rapidly renewable materials can significantly reduce the environmental impact of both DIY and professional siding repair.

    Siding Material Sustainability Comparison

    The table below compares the sustainability of various common siding materials, considering factors such as material sourcing, manufacturing processes, lifespan, recyclability, and embodied carbon. Note that the values are relative and can vary based on specific product characteristics and manufacturing practices.

    Siding Material Source Sustainability Manufacturing Impact End-of-Life Recyclability
    Wood (Cedar, Redwood) Potentially high, depending on sustainable forestry practices; risk of deforestation if not sourced responsibly. Relatively low impact if sustainably harvested and processed; potential for chemical treatments to increase lifespan but with associated environmental concerns. Moderate; can be reused or repurposed, but often ends up in landfills.
    Vinyl Moderate; derived from petroleum, a non-renewable resource. High; energy-intensive manufacturing process with potential for air and water pollution. Low; difficult to recycle effectively, often ending up in landfills.
    Fiber Cement Moderate; composed of cement, wood fibers, and other materials; some components may be sourced sustainably. Moderate; energy-intensive manufacturing, but generally less polluting than vinyl. Low; limited recycling options; disposal often involves landfill.
    Aluminum Moderate; sourced from bauxite ore, a mined resource. Moderate; energy-intensive manufacturing process, but aluminum is highly recyclable. High; highly recyclable with minimal environmental impact during recycling.
    Steel Moderate; sourced from iron ore, a mined resource. Moderate; energy-intensive manufacturing process, but steel is highly recyclable. High; highly recyclable with minimal environmental impact during recycling.

    Long-Term Durability

    The longevity of your siding repair, whether DIY or professionally done, significantly impacts the overall value and curb appeal of your home. A poorly executed repair, regardless of who performed it, can lead to premature deterioration, costly future repairs, and even structural damage. Understanding the factors influencing long-term durability is crucial for making an informed decision.

    Professional siding repairs generally offer superior long-term durability compared to DIY attempts. This difference stems primarily from the expertise, experience, and access to high-quality materials professionals possess. While a DIY approach might seem cost-effective initially, overlooking crucial aspects like proper installation techniques and material selection can lead to shorter lifespan and increased maintenance needs in the long run.

    Material Quality and Its Impact on Siding Lifespan

    High-quality materials are fundamental to achieving long-lasting siding. Professionals typically source materials from reputable suppliers, ensuring adherence to industry standards and warranties. They often have access to premium materials that are more resistant to weather damage, insect infestation, and fading. In contrast, DIY projects might utilize less durable or less suitable materials, leading to quicker degradation and necessitating more frequent repairs or replacements. For example, using low-grade vinyl siding might result in cracking and fading within a few years, whereas professional-grade vinyl siding with UV inhibitors can last for decades. Similarly, using treated lumber for wood siding, a choice often made by professionals, offers significantly better protection against rot and insect damage compared to untreated lumber commonly available at DIY stores.

    Proper Installation Techniques and Their Role in Long-Term Durability

    Correct installation techniques are equally crucial for the longevity of siding repairs. Professionals possess the skills and experience to ensure proper flashing, sealing, and alignment, preventing water intrusion and other forms of damage. They understand the nuances of different siding types and apply the appropriate installation methods for optimal performance. A DIY approach might lack this precision, leading to gaps, misalignments, or improper sealing, which can compromise the siding’s weather resistance and accelerate deterioration. For instance, incorrect flashing around windows and doors can lead to water leakage, causing rot and mold growth beneath the siding. Professional installers understand the importance of proper ventilation to prevent moisture buildup, a crucial factor in preventing premature damage, particularly in wood siding.

    Comparison of Lifespan Expectations

    While precise lifespan predictions vary greatly depending on factors like climate, material type, and maintenance, professional repairs generally extend the life of siding considerably. A professionally repaired section of vinyl siding might last another 20-30 years, whereas a DIY repair using inferior materials or improper techniques might only last 5-10 years before requiring replacement. Similarly, a professionally repaired wood siding section with proper treatment and installation can last for several decades, while a DIY repair might show significant signs of deterioration within a much shorter timeframe, especially in harsh weather conditions. This difference in lifespan directly impacts the long-term cost-effectiveness of each approach.

    Permitting and Regulations

    Siding repair projects, even seemingly minor ones, often fall under local building codes and may require permits. Understanding these regulations is crucial to avoid legal issues and ensure the safety and quality of the work. The specific requirements vary significantly depending on your location, the extent of the repairs, and the type of siding involved.

    Permitting requirements for siding repairs are determined at the local level, typically by your city or county government. This means there’s no single, nationwide standard. Some jurisdictions might require permits for any siding repair exceeding a certain dollar amount or square footage, while others may have stricter rules based on the type of repair (e.g., replacing damaged sections versus a complete siding overhaul). It’s always best to check with your local building department before starting any project. They can provide specific information about the necessary permits, application procedures, fees, and inspection requirements.

    Permitting Processes and Required Documentation

    The process for obtaining a permit usually involves submitting an application form, along with any necessary supporting documentation. This might include detailed plans or specifications for the repair, proof of ownership of the property, and possibly proof of insurance. The building department will review the application to ensure the proposed work complies with local codes and regulations. Once approved, you’ll receive a permit allowing you to proceed with the repairs. Failure to obtain the necessary permits can lead to delays, fines, and even legal action. The specific documents required will vary depending on your location and the scope of the project. For example, some areas may require detailed drawings of the affected area, while others may only need a brief description of the work to be done.

    Consequences of Unpermitted Siding Repairs

    Undertaking siding repairs without the necessary permits carries several potential consequences. Firstly, your local authorities may issue a stop-work order, forcing you to halt the project until the permit is obtained. This can significantly delay the completion of the repairs. Secondly, you could face substantial fines, the amount of which varies depending on the severity of the violation and the local ordinances. These fines can be considerably higher than the cost of obtaining a permit in the first place. Thirdly, unpermitted work might not be covered by insurance in case of accidents or damage during or after the repairs. Finally, if you later decide to sell your property, the unpermitted work could affect the sale, potentially leading to disputes or reducing the property’s value. In some cases, unpermitted work might even need to be undone and redone to meet code, adding significant additional costs and time.

    Aesthetic Considerations

    Maintaining a consistent and pleasing aesthetic appearance is paramount when undertaking siding repair. A poorly executed repair job, even if functionally sound, can significantly detract from the overall curb appeal and property value of a home. The goal is to seamlessly blend the repaired section with the existing siding, ensuring a uniform look that enhances, rather than diminishes, the home’s beauty.

    The visual impact of siding repair extends beyond mere functionality; it directly influences the perception of the property’s condition and value. Improper techniques can create noticeable discrepancies, leading to an uneven or patched appearance that is aesthetically unappealing.

    Examples of Negative Aesthetic Impacts from Improper Repair

    The success of a siding repair project is heavily dependent on meticulous attention to detail and the application of appropriate techniques. Failure to do so can result in several undesirable visual consequences.

    • Mismatched Color or Texture: Using replacement siding that doesn’t precisely match the existing siding in color or texture creates a stark and noticeable difference. This is especially problematic with older homes where finding an exact match can be challenging. The repaired area will stand out jarringly, disrupting the visual flow of the siding.
    • Uneven Gaps and Overlapping: Incorrect installation can lead to uneven gaps between siding panels or noticeable overlaps. These inconsistencies create an unprofessional and unfinished look, immediately drawing the eye to the repair area.
    • Visible Patching and Seams: Poorly blended repair work leaves visible seams or patching, making the repair itself the focal point instead of the overall house. This is often the case when attempting to cover larger damaged areas with smaller pieces of siding, creating a patchwork effect.
    • Distorted Siding Alignment: Incorrectly installed replacement siding can lead to distortions in the overall alignment of the siding panels, creating a wavy or uneven appearance across a larger section of the wall. This can make the entire house look out of proportion or poorly maintained.
    • Improper Caulking and Sealant Application: Visible lines of caulk or sealant, or caulk that has shrunk or cracked, draws attention to the repair and detracts from the overall neatness of the siding. This can look particularly messy if the sealant is a different color from the siding.

    Final Thoughts

    Ultimately, the choice between DIY and professional siding repair depends on your individual circumstances. While DIY offers potential cost savings, it requires significant time, skill, and carries inherent risks. Professional repair, while more expensive, ensures quality workmanship, warranty protection, and minimizes safety concerns. By carefully considering the factors discussed – cost, time, skill, and potential risks – you can make a well-informed decision that best suits your needs and budget, leading to a successful and aesthetically pleasing siding repair.