Tag: Wood Siding

  • Best Sealants and Stains for Protecting Wood Siding

    Best Sealants and Stains for Protecting Wood Siding

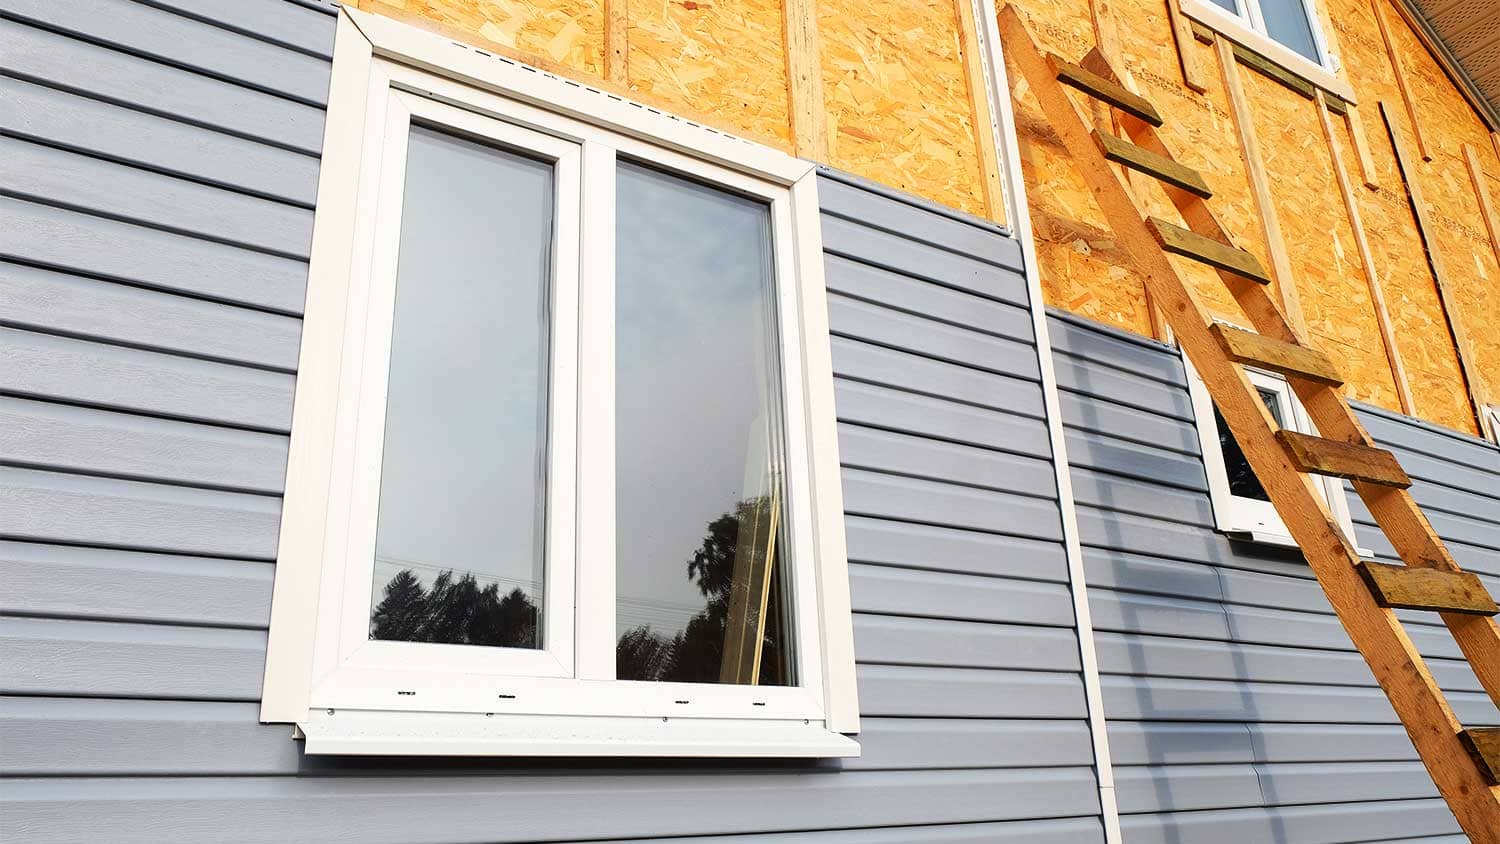
    Best Sealants and Stains for Protecting Wood Siding: Protecting your home’s exterior wood siding requires careful consideration of the right sealants and stains. This comprehensive guide explores various types, application methods, and maintenance strategies to ensure long-lasting protection and enhance the aesthetic appeal of your wood siding. We’ll delve into the differences between oil-based, water-based, and solvent-based sealants, examine the nuances of solid, semi-transparent, and transparent stains, and help you choose the perfect product for your specific needs and budget. Understanding the impact of climate, wood type, and proper surface preparation will be key to achieving optimal results and extending the life of your siding.

    Types of Wood Siding Sealants

    Choosing the right sealant for your wood siding is crucial for its longevity and aesthetic appeal. Different sealants offer varying levels of protection against the elements, and understanding their properties will help you make an informed decision. The type of sealant you select will depend on factors such as the type of wood, climate, and desired finish.

    Oil-Based Sealants

    Oil-based sealants, often composed of linseed oil or tung oil, penetrate deeply into the wood, enhancing its natural beauty and providing excellent water repellency. They offer good UV protection, but their durability can vary depending on the specific product and application. Oil-based sealants tend to be more flexible than some other options, allowing them to accommodate the natural expansion and contraction of wood due to moisture changes. However, they require more frequent reapplication compared to other types of sealants, typically every 1-3 years depending on exposure. They also have a longer drying time and a strong odor during application.

    Water-Based Sealants

    Water-based sealants are becoming increasingly popular due to their low VOC (volatile organic compound) content, making them environmentally friendly and easier to work with. They are typically easier to clean up than oil-based sealants. Water-based sealants offer good protection against moisture and UV damage, but their penetration depth is generally less than oil-based sealants. Durability and longevity can vary significantly depending on the specific formulation, with some offering protection for up to 5 years. They usually have a less noticeable odor compared to oil-based options.

    Solvent-Based Sealants

    Solvent-based sealants, often containing mineral spirits or other solvents, offer excellent water repellency and durability. They form a strong protective barrier on the wood’s surface, providing long-lasting protection against the elements. These sealants often have a higher gloss finish compared to oil or water-based options. However, they typically have a strong odor during application and require proper ventilation. Solvent-based sealants are generally less flexible than oil-based sealants, potentially leading to cracking or peeling if the wood undergoes significant expansion and contraction. Their high VOC content also makes them less environmentally friendly than water-based alternatives.

    Comparison of Sealant Types

    The following table summarizes the key characteristics of oil-based, water-based, and solvent-based wood siding sealants:

    Characteristic Oil-Based Water-Based Solvent-Based
    Penetration Deep Moderate Surface
    Durability Moderate (1-3 years) Moderate to High (up to 5 years) High (longer lifespan)
    Flexibility High Moderate Low
    UV Resistance Good Good Good
    VOC Content High Low High
    Odor Strong Low Strong
    Clean-up Difficult Easy Moderate

    Types of Wood Siding Stains

    Choosing the right wood stain for your siding is crucial for both aesthetics and protection. Different stain types offer varying levels of color depth, wood grain visibility, and longevity, impacting the overall look and lifespan of your siding. Understanding these differences will help you make an informed decision.

    Solid Stains

    Solid stains provide the most color coverage, completely obscuring the natural wood grain. They offer a painted look with the added benefit of some wood protection. This makes them ideal for homeowners who want a bold, uniform color and are less concerned with showcasing the wood’s natural texture. Solid stains are generally thicker than other stain types and require more thorough preparation of the wood surface before application. However, they are more likely to chip or peel over time compared to other options, requiring more frequent maintenance.

    Semi-Transparent Stains

    Semi-transparent stains offer a balance between color and wood grain visibility. They provide a richer color than transparent stains while still allowing the wood’s natural texture to show through. This creates a more natural look than solid stains, with good protection against the elements. The depth of color varies depending on the product and the number of coats applied. Semi-transparent stains are a popular choice for homeowners who want a subtle color enhancement while retaining some of the wood’s natural beauty. Maintenance is generally less frequent than with solid stains but more frequent than with transparent stains.

    Transparent Stains

    Transparent stains, also known as penetrating stains, offer the least color coverage. Their primary function is to protect the wood from the elements while enhancing its natural color and grain. They penetrate deep into the wood, providing excellent protection against UV damage and moisture. The color enhancement is subtle, often just darkening the wood’s natural tone. While they offer excellent protection, they may require more frequent reapplication compared to semi-transparent or solid stains to maintain their protective properties.

    Comparison of Wood Stain Longevity and Weather Resistance

    The longevity and weather resistance of wood stains vary significantly depending on the type of stain, the quality of the product, and the climate. Proper surface preparation and application techniques also play a crucial role.

    Stain Type Longevity (Years) Weather Resistance Maintenance
    Solid 3-5 Moderate High (repainting may be needed)
    Semi-Transparent 5-7 Good Moderate (re-staining every few years)
    Transparent 2-4 Good (UV protection varies) High (frequent reapplication needed)

    Factors Affecting Sealant/Stain Selection

    Choosing the right sealant or stain for your wood siding is crucial for its longevity and aesthetic appeal. Several interconnected factors influence this decision, requiring careful consideration to ensure optimal protection and a beautiful finish. Ignoring these factors can lead to premature deterioration of the siding, necessitating costly repairs or replacements.

    Wood Type

    The type of wood significantly impacts sealant and stain selection. Different woods possess varying densities, porosities, and natural resistances to weathering. For instance, cedar and redwood, known for their natural durability, may require less frequent applications than softer woods like pine or fir. Hardwoods generally require less frequent maintenance than softwoods due to their denser structure. The specific characteristics of the wood will dictate the type of sealant or stain best suited for its protection. A highly porous wood will absorb more stain, requiring a higher-quality product to prevent premature fading or cracking. A less porous wood may benefit from a thinner, more penetrating sealant.

    Climate Considerations

    Climate plays a dominant role in sealant and stain performance. Areas with high humidity and frequent rainfall require sealants with excellent water resistance to prevent moisture damage and mold growth. In contrast, arid climates may necessitate products that offer superior UV protection to prevent fading and cracking from prolonged sun exposure. Extreme temperature fluctuations can also affect sealant and stain performance, requiring products formulated to withstand such conditions. For example, a sealant designed for a hot, desert climate would need to be highly flexible to prevent cracking from expansion and contraction, whereas a sealant for a cold, snowy climate would need to be resistant to freezing and thawing cycles.

    Budgetary Constraints

    Budget is a practical factor influencing sealant and stain choices. High-quality products generally offer superior protection and longevity, but they come at a higher price. However, the long-term cost savings associated with less frequent reapplication can outweigh the initial investment. Lower-cost options might require more frequent applications, ultimately increasing the overall cost over time. It’s important to balance the initial cost with the long-term maintenance requirements to make an informed decision that aligns with your budget.

    Surface Preparation

    Proper surface preparation is paramount for optimal sealant and stain performance. This involves cleaning the wood surface to remove dirt, debris, mildew, and loose paint or previous sealant. Power washing is often effective, but care must be taken to avoid damaging the wood. After cleaning, allowing the wood to dry completely is crucial before applying any sealant or stain. Any remaining moisture can trap underneath the finish, leading to blistering, peeling, or mold growth. Sanding may be necessary to smooth rough surfaces and ensure proper adhesion. This meticulous preparation maximizes the effectiveness of the chosen sealant or stain, ensuring a long-lasting and attractive finish.

    Application Methods for Sealants and Stains

    Applying wood sealants and stains to your siding requires careful preparation and technique to ensure even coverage, longevity, and a professional finish. Proper application minimizes drips, runs, and uneven color absorption, leading to a more attractive and protected surface. The following steps outline the process for achieving optimal results.

    Successful application depends on choosing the right tools and following a methodical approach. Remember that working in small sections allows for better control and prevents the sealant or stain from drying before it can be evenly distributed. Always follow the manufacturer’s instructions on the specific product you are using, as drying times and application methods may vary.

    Surface Preparation

    Thorough preparation is crucial for successful sealant and stain application. Begin by cleaning the siding to remove dirt, mildew, loose paint, and other debris. A pressure washer can be effective for this, but use caution to avoid damaging the wood. Allow the siding to dry completely before proceeding. Any loose or damaged wood should be repaired before applying the sealant or stain. This ensures a smooth, even surface for better adhesion and a more uniform finish. For heavily weathered wood, a light sanding may be necessary to create a better surface for the sealant or stain to bond to.

    Applying Sealant or Stain

    Once the surface is prepared, apply the sealant or stain using a brush, roller, or sprayer. For larger areas, a sprayer can be efficient, but a brush or roller often provides more control and prevents drips, especially on vertical surfaces. Work in small sections, applying the product in the direction of the wood grain. Avoid overloading the brush or roller; a thin, even coat is preferable to a thick, uneven one. Maintain a wet edge to prevent lap marks and ensure even color distribution. Allow sufficient drying time between coats, as specified by the manufacturer’s instructions. Multiple thin coats are generally better than one thick coat.

    Essential Tools and Materials

    Having the right tools and materials on hand will make the application process smoother and more efficient. The following list outlines the essential items:

    • Wood sealant or stain (choose the appropriate type based on your needs and the type of wood)
    • Paint brushes (various sizes for different areas and details)
    • Roller and roller tray (for larger areas)
    • Sprayer (optional, for large surfaces, but requires careful control)
    • Drop cloths or plastic sheeting (to protect surrounding areas)
    • Putty knife or scraper (for removing loose paint or debris)
    • Sandpaper (for smoothing rough surfaces)
    • Pressure washer (optional, for cleaning the siding)
    • Safety glasses and gloves (to protect yourself from chemicals and debris)
    • Ladder (if necessary to reach higher areas)

    Preventing Drips and Runs

    Drips and runs are common problems when applying sealants and stains, especially on vertical surfaces. To minimize this, avoid overloading your applicator, work in small sections, and apply the product evenly. Use a high-quality brush or roller that holds the product well without dripping. If drips do occur, immediately wipe them away with a clean cloth before they dry. Applying thin coats and allowing adequate drying time between coats will also help prevent runs.

    Maintenance and Re-application

    Proper maintenance and timely re-application of sealants and stains are crucial for preserving the beauty and longevity of your wood siding. Neglecting this can lead to premature weathering, damage from moisture, and a significant decrease in the aesthetic appeal of your home’s exterior. The frequency of re-application depends on several interacting factors, including the type of wood, the climate, and the quality of the products used.

    The lifespan of wood siding sealants and stains can vary greatly. Factors such as sun exposure, rainfall, temperature fluctuations, and the type of wood all play a significant role in how quickly the protective layer degrades. Regular inspection is key to determining when re-application is necessary. A proactive approach to maintenance will not only extend the life of your siding but also save you money in the long run by preventing costly repairs.

    Sealant and Stain Re-application Frequency

    The frequency of re-application for wood siding sealants and stains is highly variable. For example, in regions with harsh, sunny climates and frequent rainfall, re-application might be needed every 1-2 years, especially for softer woods like cedar or redwood. Harder woods, such as redwood or ipe, might require less frequent maintenance, potentially lasting 3-5 years between applications in milder climates. However, regular inspection is always recommended. Southern yellow pine, a commonly used siding material, may need re-application every 2-3 years in areas with significant sun exposure and moisture. In areas with less harsh weather, the interval could extend to 3-5 years. Always refer to the manufacturer’s instructions for specific recommendations.

    Assessing the Condition of Existing Sealant and Stain

    Regular visual inspection is the most effective method for determining if your wood siding needs re-application. Look for signs of fading, cracking, peeling, or blistering of the sealant or stain. If you notice any significant discoloration, especially in areas exposed to direct sunlight, it may indicate that the protective layer is failing. Another crucial indicator is the ability of the wood to absorb water. A simple test involves sprinkling a small amount of water onto the surface. If the water beads up and rolls off, the sealant is likely still effective. However, if the water is quickly absorbed, it’s a strong indication that re-application is necessary. The texture of the wood is also important; if it feels rough or dry to the touch, it could indicate a need for re-application.

    Tips for Extending the Lifespan of Sealants and Stains

    Proper preparation is crucial before applying sealants and stains. This includes cleaning the siding thoroughly to remove dirt, mildew, and loose debris. Power washing can be effective, but it’s essential to use the correct nozzle and pressure to avoid damaging the wood. Using a high-quality sealant or stain that is specifically designed for exterior wood applications will significantly extend its lifespan. Following the manufacturer’s instructions for application, including the proper drying time between coats, is essential. Regularly cleaning the siding to remove dirt, pollen, and other debris will help prevent premature deterioration of the sealant or stain. Finally, consider trimming overhanging branches that could trap moisture against the siding. This simple step can dramatically reduce the risk of rot and decay, thus extending the lifespan of the sealant or stain.

    Cost Considerations for Sealants and Stains

    Protecting your wood siding involves a financial investment, and understanding the cost factors is crucial for making informed decisions. The initial cost of sealants and stains is just one piece of the puzzle; long-term costs, including maintenance and potential repairs due to inadequate protection, must also be considered. Choosing the right product can significantly impact your overall expenditure.

    Sealant and Stain Cost Comparison

    The price of wood siding sealants and stains varies considerably depending on the type, brand, quality, and quantity purchased. Generally, oil-based products tend to be more expensive than water-based options, while high-quality, professional-grade products command a higher price than those found in home improvement stores. The following table provides a general price range; actual prices may vary based on location and retailer.

    Product Type Cost per Gallon (USD) Cost per Liter (USD) (approx.) Notes
    Water-Based Stain $25 – $50 $6.60 – $13.20 Often offers good value for money.
    Oil-Based Stain $40 – $80 $10.60 – $21.20 Provides superior protection but is more expensive.
    Water-Based Sealant $30 – $60 $7.90 – $15.80 Good for moisture protection, often less expensive than oil-based.
    Oil-Based Sealant $50 – $100 $13.20 – $26.40 Offers superior durability and water resistance.

    Factors Affecting Overall Cost

    Several factors influence the total cost of protecting your wood siding beyond the price of the sealant or stain itself. These include the size of the area to be treated, the number of coats required, labor costs (if hiring a professional), the need for surface preparation (cleaning, sanding, etc.), and the cost of any necessary equipment rentals (sprayers, etc.). For example, a large two-story home will naturally require more product and potentially more labor than a small shed. Thorough surface preparation, while adding to upfront costs, can significantly extend the lifespan of the sealant or stain, ultimately saving money in the long run.

    Long-Term Cost Savings of High-Quality Products

    Investing in high-quality sealants and stains may seem expensive initially, but it often translates to significant long-term cost savings. Superior products offer better protection against the elements, reducing the frequency of reapplication and minimizing the risk of costly wood damage from rot, decay, or insect infestation. For instance, a high-quality stain might last 7-10 years, whereas a cheaper alternative might require reapplication every 2-3 years, leading to higher overall costs over the lifespan of your siding. This difference in longevity makes the initial higher cost of premium products a worthwhile investment in many cases.

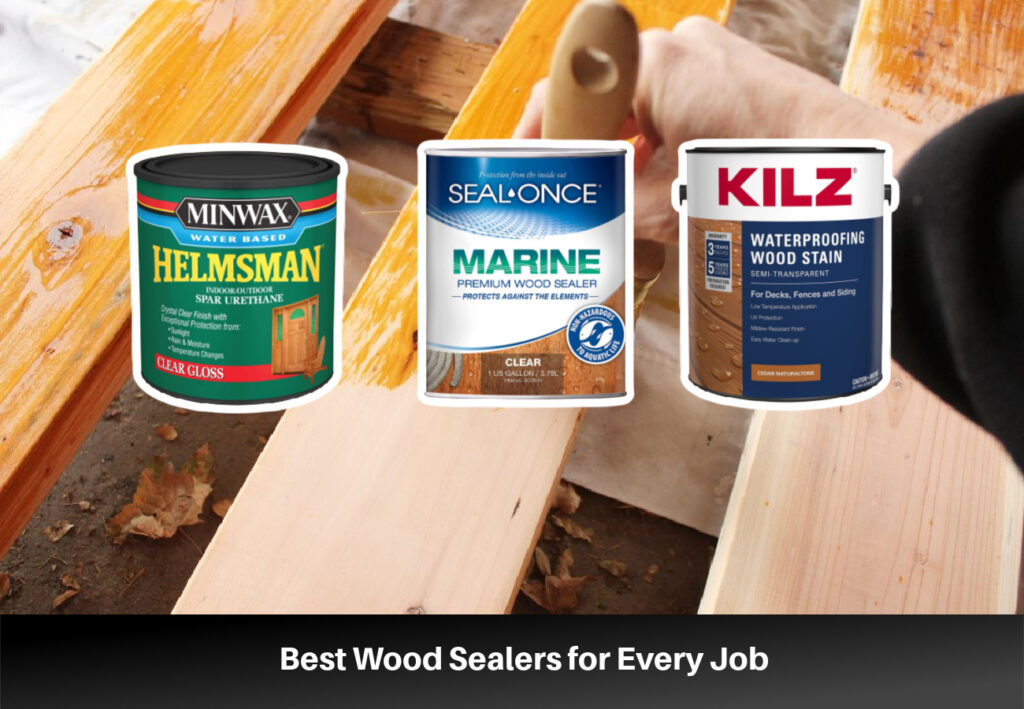
    Popular Brands and Products

    Choosing the right wood sealant or stain can significantly impact the longevity and aesthetic appeal of your siding. Many reputable brands offer high-quality products, each with its own strengths and weaknesses. Understanding these differences will help you make an informed decision based on your specific needs and budget. This section highlights several popular brands and their key product offerings.

    Reputable Brands of Wood Sealants and Stains

    Several manufacturers consistently receive high praise for their wood protection products. These brands are known for their commitment to quality ingredients, innovative formulations, and excellent customer service. The following list represents a selection of these reputable brands, but it is not exhaustive.

    • Cabot: A long-standing brand with a wide range of stains and sealants known for their durability and color retention.
    • Olympic: Offers a diverse selection of products, including stains, sealants, and primers, catering to various wood types and project needs.
    • Sherwin-Williams: A well-established paint and coatings company that also produces high-quality wood stains and sealants, often integrated into their broader paint systems.
    • Behr: Provides a broad spectrum of products for both professional and DIY users, with a focus on user-friendly application and long-lasting protection.
    • Benjamin Moore: Known for premium-quality paints, their wood stains and sealants are similarly high-performing and offer a wide array of color choices.

    Popular Product Examples and Their Features

    The following examples illustrate the diversity of products available from these brands. Specific product availability and formulations may vary by region.

    • Cabot Australian Timber Oil: This penetrating oil is lauded for its ability to enhance the natural beauty of wood while providing excellent protection against weathering. It offers a low-luster finish and is suitable for various exterior wood applications.
    • Olympic Elite Exterior Wood Stain & Sealant: This product combines stain and sealant in one, offering convenience and protection. It’s known for its rich color and long-lasting durability, resisting fading and peeling.
    • Sherwin-Williams SuperDeck Solid Color Stain: This solid-color stain provides complete opacity, hiding imperfections and creating a uniform look. It is formulated for exceptional durability and resistance to mildew.
    • Behr Premium Advanced Decking Stain and Sealer: This product offers a combination of stain and sealant, providing both color and protection against the elements. It is formulated to resist fading, peeling, and mildew.
    • Benjamin Moore Arborcoat Exterior Wood Sealer: This water-based sealer is designed to protect wood from moisture damage while allowing the natural grain to show through. It offers excellent mildew resistance and is easy to apply.

    Performance Comparison of Top-Selling Products

    Direct comparison of all products is challenging due to variations in formulation, application methods, and environmental conditions. However, key performance characteristics can be generalized. For example, solid-color stains generally offer superior hiding power compared to semi-transparent stains, but semi-transparent stains better highlight the wood grain. Oil-based products often provide deeper penetration and better water resistance than water-based products, but water-based options are typically lower in VOCs (Volatile Organic Compounds) and easier to clean up. The ultimate choice depends on individual project requirements and preferences. Consulting product specifications and reviews will assist in making informed decisions.

    Environmental Impact

    Choosing sealants and stains for your wood siding involves considering not only their protective qualities but also their environmental impact. The manufacturing process, ingredients, and eventual disposal all contribute to the overall footprint of these products. Understanding these impacts allows for more informed and environmentally conscious decisions.

    The environmental impact of wood siding sealants and stains stems primarily from their chemical composition. Many traditional products contain volatile organic compounds (VOCs), which contribute to air pollution and smog formation. Some also contain biocides, designed to prevent mold and mildew growth, that can have detrimental effects on aquatic life if improperly disposed of. The manufacturing process itself can also generate waste and consume energy. Furthermore, the extraction and processing of raw materials used in these products can have associated environmental consequences.

    Eco-Friendly Options for Wood Siding Protection

    Several eco-friendly options are available for protecting wood siding, minimizing environmental harm. These options often utilize natural ingredients and employ manufacturing processes that reduce their overall environmental impact. For example, linseed oil, a natural oil derived from flax seeds, provides water resistance and UV protection without the harsh chemicals found in many synthetic products. Other natural options include tung oil and milk paint, both offering a more sustainable alternative to traditional chemical-based sealants and stains. When selecting eco-friendly options, look for products certified by organizations such as Green Seal or the Environmental Protection Agency (EPA) to ensure they meet certain environmental standards. These certifications verify that the products have been assessed for their environmental impact across their entire life cycle.

    Proper Disposal of Leftover Materials

    Proper disposal of leftover sealants and stains is crucial to minimizing environmental harm. Never pour leftover materials down the drain or into the ground. These materials can contaminate water sources and harm wildlife. Instead, contact your local waste management facility to determine the proper disposal method for your specific products. Many facilities offer hazardous waste disposal programs that accept these materials safely. Some retailers also participate in take-back programs for certain types of paint and sealant products, offering a convenient way to dispose of leftover materials responsibly. Thoroughly cleaning containers before disposal is also important, reducing the risk of accidental spills and environmental contamination. By following these guidelines, you can ensure that leftover materials do not contribute to environmental pollution.

    Troubleshooting Common Problems

    Protecting your wood siding with sealants and stains is an investment that should last for years. However, various issues can arise during application and maintenance, impacting the longevity and aesthetic appeal of your siding. Understanding these common problems and their solutions is crucial for achieving optimal results. This section details common problems, their causes, and preventative measures to ensure your wood siding remains protected and beautiful.

    Peeling or Blistering Sealant or Stain

    Peeling or blistering indicates a problem with adhesion, often stemming from improper surface preparation or unsuitable weather conditions during application. Moisture trapped beneath the sealant or stain can cause blistering, while poor adhesion to a dirty or previously treated surface can lead to peeling.

    Uneven Color Application

    Inconsistent color can result from several factors. These include applying the sealant or stain unevenly, using an inappropriate application method (e.g., spraying on a windy day), or failing to adequately stir the product before use. Variations in the wood itself can also contribute to subtle color differences.

    Premature Fading or Degradation

    Exposure to UV radiation from sunlight is a major cause of premature fading and degradation of wood sealants and stains. Choosing a product with high UV protection and applying it correctly can mitigate this. Using a low-quality product or applying too thin a coat will also lead to quicker deterioration. For example, a stain rated for 5 years of UV protection will visibly fade and lose its protective properties sooner if applied thinly compared to a thicker application.

    Mold and Mildew Growth

    Mold and mildew thrive in damp environments. Poor ventilation, inadequate surface preparation (leaving old, decaying material), or the use of a sealant or stain that doesn’t offer sufficient mildew resistance can lead to fungal growth. This is especially prevalent in shaded areas with poor air circulation.

    Solutions for Addressing Common Problems

    Addressing these issues often requires removing the affected areas and reapplying the sealant or stain correctly. For peeling or blistering, gently scrape away the loose material, clean the surface thoroughly, and then reapply, ensuring the surface is dry and clean. Uneven color may require sanding and re-staining, or applying a second coat to achieve a uniform finish. For mold and mildew, a thorough cleaning with a suitable fungicide is necessary before reapplication.

    Preventative Measures

    Preventative measures are key to avoiding these problems. Proper surface preparation, including cleaning, sanding, and allowing sufficient drying time, is crucial. Selecting high-quality products designed for the specific type of wood and climate is essential. Following the manufacturer’s instructions carefully regarding application methods, drying time, and re-application intervals will significantly reduce the likelihood of problems. Regular inspection and prompt attention to minor issues can prevent them from escalating into major problems. For instance, addressing small areas of peeling immediately prevents the damage from spreading.

    Safety Precautions

    Working with wood sealants and stains requires careful attention to safety to prevent health hazards and accidents. These products often contain chemicals that can be harmful if inhaled, ingested, or absorbed through the skin. Proper preparation and the use of appropriate safety equipment are crucial for a safe and successful project.

    Proper handling and storage of wood sealants and stains are essential to minimize risks. Always follow the manufacturer’s instructions printed on the product label, as these instructions provide specific safety guidelines tailored to the individual product. Never mix different types of sealants or stains unless explicitly stated as safe to do so by the manufacturer. Improper mixing can lead to unpredictable chemical reactions, creating hazardous fumes or reducing the effectiveness of the product.

    Personal Protective Equipment

    Safe handling of wood sealants and stains necessitates the use of appropriate personal protective equipment (PPE). This equipment acts as a barrier between you and potentially harmful chemicals, significantly reducing the risk of exposure. Inadequate protection can lead to skin irritation, respiratory problems, or eye damage.

    • Gloves: Use chemical-resistant gloves, such as nitrile or neoprene gloves, to protect your hands from contact with the sealant or stain.
    • Eye Protection: Safety glasses or chemical splash goggles are essential to prevent eye irritation or injury from splashes or fumes.
    • Respiratory Protection: A respirator with appropriate cartridges for the specific chemicals in the sealant or stain is recommended, especially in poorly ventilated areas. This is crucial to prevent inhalation of harmful fumes.
    • Clothing Protection: Wear long sleeves, long pants, and closed-toe shoes to protect your skin from contact with the product. Consider using disposable coveralls for added protection.

    Ventilation and Workspace

    Adequate ventilation is critical when working with wood sealants and stains. These products often release volatile organic compounds (VOCs) which can be harmful if inhaled. Working outdoors in a well-ventilated area is ideal. If working indoors, ensure proper ventilation by opening windows and doors, or using exhaust fans to remove fumes. Never work in an enclosed space without adequate ventilation. Poor ventilation can lead to headaches, dizziness, nausea, and more serious health problems.

    Storage and Disposal

    Store sealants and stains in their original containers, tightly sealed, in a cool, dry place, away from children and pets. Keep them away from sources of ignition, as many are flammable. Proper disposal is equally important. Never pour sealants or stains down the drain or into the trash. Check with your local waste management authority for proper disposal guidelines, as regulations vary by location. Improper disposal can contaminate water sources and harm the environment.

    Choosing the Right Finish for Different Aesthetics

    The final appearance of your wood siding is significantly impacted by the choice of sealant and stain. Understanding the subtle yet impactful differences between various finishes allows for a personalized aesthetic that complements your home’s architectural style and personal preferences. The interplay of color, sheen, and texture created by these products can dramatically alter the perceived age, character, and overall mood of the exterior.

    Different sealants and stains offer a wide spectrum of aesthetic possibilities, from enhancing the natural beauty of the wood to creating a completely transformed look. Clear sealants, for instance, protect the wood while allowing its natural grain and color to shine through, while pigmented stains add depth and color, altering the wood’s appearance significantly. The level of sheen also plays a crucial role, with options ranging from matte to high-gloss, each contributing to a distinct visual effect.

    Effects of Different Finishes on Wood Appearance

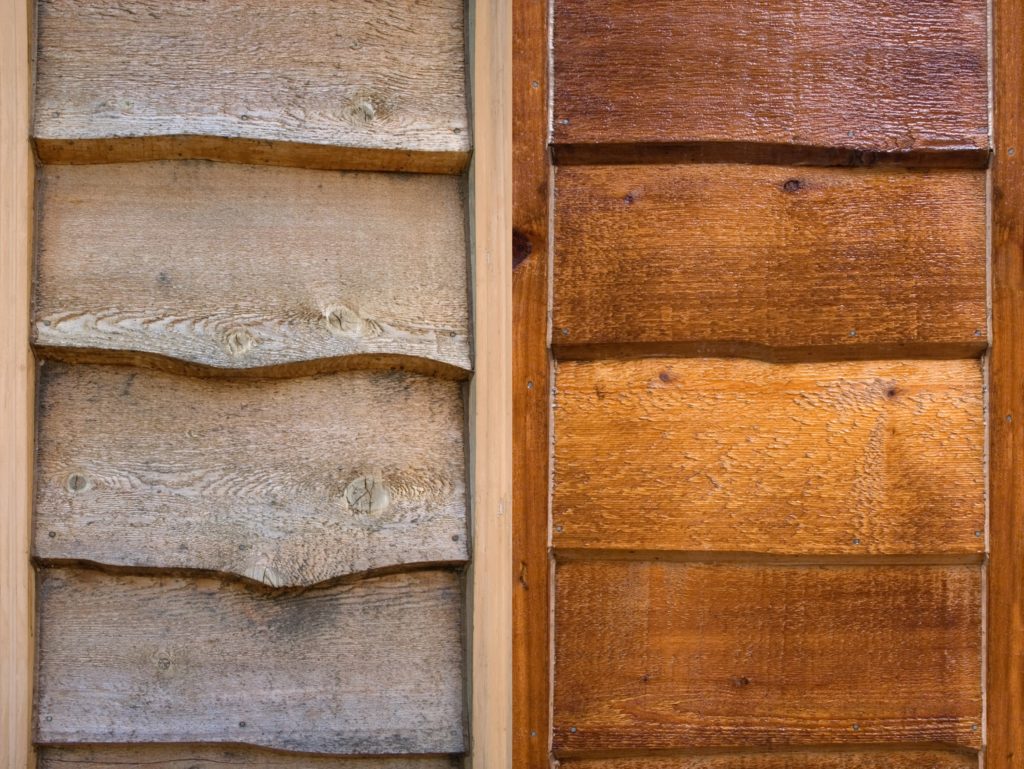
    Clear sealants preserve the natural beauty of the wood, highlighting its grain and color variations. A semi-transparent stain allows some of the wood’s natural color to show through while adding a subtle tint, enhancing its character. Solid-color stains, on the other hand, completely obscure the wood grain and provide a uniform, opaque finish. The choice between a matte, satin, or gloss finish further modifies the visual impact, with matte finishes offering a more natural and understated look, while gloss finishes create a more polished and reflective surface. For example, a clear sealant on cedar siding will accentuate the wood’s rich reddish tones and prominent grain, while a dark brown solid stain on the same siding would create a completely different, more dramatic and modern aesthetic.

    Aesthetic Considerations for Different Architectural Styles

    The selection of sealant and stain should harmonize with the architectural style of the house. A traditional colonial home might benefit from a semi-transparent stain in a warm, earthy tone, allowing the wood grain to show through while adding depth and richness. This would complement the home’s classic and timeless aesthetic. Conversely, a modern minimalist home might be better suited to a solid-color stain in a sleek, neutral tone, creating a clean and contemporary look. A rustic farmhouse might use a weathered gray stain to enhance the feeling of age and character. The choice of sheen also plays a role; a high-gloss finish might be jarring on a rustic home but perfectly suitable for a sleek, contemporary design. For instance, a glossy white stain on a Victorian home might seem incongruous, while a matte finish on a Craftsman-style house would feel more harmonious.

    Examples of Finish Choices and Their Visual Impact

    Consider a home with redwood siding. A clear sealant would emphasize the redwood’s natural reddish hue and grain pattern, creating a warm and inviting appearance. Applying a semi-transparent stain in a honey tone would subtly deepen the color while still allowing the grain to be visible. A solid-color stain in a deep brown or gray, however, would completely transform the look, creating a more dramatic and modern feel. Similarly, the sheen level can drastically change the perception. A matte finish on a light-colored stain would give a more relaxed, natural look, while a high-gloss finish on a dark stain would create a sleek, almost luxurious effect.

    Final Conclusion

    Ultimately, selecting the best sealants and stains for your wood siding involves a careful balancing act between aesthetics, durability, cost-effectiveness, and environmental considerations. By understanding the properties of different products, following proper application techniques, and implementing a regular maintenance schedule, you can significantly extend the lifespan of your siding and maintain its beauty for years to come. Remember to always prioritize safety and follow manufacturer instructions for best results. Investing in high-quality products and proper application will save you money and effort in the long run, ensuring your wood siding remains a stunning feature of your home.

  • DIY vs. Professional Wood Siding Maintenance: Pros & Cons

    DIY vs. Professional Wood Siding Maintenance: Pros & Cons

    DIY vs. Professional Wood Siding Maintenance: Pros and Cons – Choosing between tackling wood siding maintenance yourself or hiring a professional is a significant decision for homeowners. This comprehensive guide explores the advantages and disadvantages of both approaches, helping you weigh the factors of cost, time commitment, skill level, and potential risks to make an informed choice. We’ll delve into the necessary steps, from initial assessment and cleaning to repairs, painting, and long-term maintenance strategies, providing you with the knowledge to confidently decide what’s best for your home and budget.

    Initial Assessment & Planning

    Proper planning is crucial for successful wood siding maintenance, whether you’re tackling the project yourself or hiring a professional. A thorough initial assessment will determine the scope of work, the necessary materials, and ultimately, the cost and time commitment. This process is equally important for both DIY and professional approaches, ensuring efficient and effective maintenance.

    A comprehensive inspection of your wood siding is the foundation of any effective maintenance plan. This involves a systematic examination of the entire surface area, paying close attention to details that might indicate damage or deterioration. Careful observation will prevent small issues from escalating into costly repairs.

    Thorough Inspection of Wood Siding

    Before beginning any maintenance, a meticulous inspection is necessary. This involves a visual examination of all sides of the house, including hard-to-reach areas. Use binoculars or a ladder to access higher sections safely. The inspection should focus on identifying potential problems early, preventing larger, more expensive repairs down the line. This proactive approach saves both time and money in the long run.

    Tools and Materials for Wood Siding Maintenance

    The tools and materials required will vary depending on the scope of the maintenance. DIY projects may necessitate a more basic toolkit, while professional jobs often involve specialized equipment. However, some essential items are common to both.

    • DIY: A sturdy ladder, paint scraper, wire brush, putty knife, sandpaper (various grits), paintbrushes/rollers, drop cloths, safety glasses, work gloves, caulking gun, wood filler, exterior paint/stain, cleaning solutions (e.g., TSP).
    • Professional: Power washer, scaffolding, specialized paint sprayers, advanced diagnostic tools (moisture meters, infrared cameras), potentially more extensive safety equipment and potentially specialized cleaning agents for severe mildew or mold.

    Wood Siding Condition Checklist

    A systematic checklist ensures a thorough evaluation of the siding’s condition. This checklist helps identify areas needing immediate attention and guides the maintenance plan. Regular use of this checklist prevents minor issues from developing into significant problems.

    Condition Description Severity
    Rot Decayed or softened wood, often dark in color and spongy to the touch. Minor (small areas), Moderate (larger areas), Severe (extensive decay)
    Cracks Splits or fissures in the wood, varying in size and depth. Minor (small, superficial cracks), Moderate (larger cracks, affecting structural integrity), Severe (deep cracks compromising siding integrity)
    Insect Damage Holes, tunnels, or frass (insect droppings) indicating infestation. Minor (few isolated holes), Moderate (multiple holes, signs of active infestation), Severe (extensive damage, significant structural compromise)
    Paint Condition Peeling, blistering, fading, or chalking of the paint. Minor (minor chipping, slight fading), Moderate (significant peeling or blistering), Severe (extensive paint failure, bare wood exposed)

    Sample Wood Siding Maintenance Schedule

    A regular maintenance schedule is vital for preserving the longevity and aesthetic appeal of your wood siding. This schedule outlines tasks and their recommended frequency. Adjust the schedule based on your climate and siding type.

    Task Frequency
    Visual Inspection Annually
    Cleaning (pressure washing or scrubbing) Annually or as needed
    Caulking and Repair of Minor Cracks Annually or as needed
    Repainting or Restraining Every 3-5 years (depending on paint/stain type and climate)
    Major Repairs (rotted boards replacement) As needed

    Cleaning Methods

    Maintaining the beauty and longevity of your wood siding, whether you’ve tackled the installation yourself or hired a professional, requires regular cleaning. Different cleaning methods offer varying levels of effectiveness, cost, and risk of damage. Choosing the right approach depends on the type of wood, the finish, the extent of soiling, and your comfort level with different cleaning techniques.

    Several methods exist for cleaning wood siding, each with its own set of advantages and disadvantages. Pressure washing offers speed and efficiency, while hand scrubbing provides more control and minimizes the risk of damage. The choice ultimately depends on the specific needs of your siding and your personal preferences.

    Cleaning Method Comparison

    The following table compares three common wood siding cleaning methods: pressure washing, scrubbing with a brush and cleaning solution, and a combination approach. Note that the cost and potential for damage can vary depending on factors such as the size of the area, the type of equipment used, and the experience level of the person performing the cleaning.

    Method Effectiveness Cost Potential Damage
    Pressure Washing High, removes heavy dirt and grime quickly Moderate to High (equipment rental or professional service) High, risk of damaging wood fibers, removing paint or stain, and causing water damage if not used properly
    Hand Scrubbing Moderate, effective for light to moderate dirt and grime Low (cleaning solution and brush) Low, minimal risk of damage if done carefully
    Combination (Pressure Wash then Scrub) High, effective for removing heavy dirt and grime while allowing for careful cleaning of delicate areas Moderate (equipment rental or professional service, cleaning solution and brush) Moderate, risk of damage reduced by careful pressure washing and follow-up scrubbing

    Pressure Washing Techniques

    Pressure washing can be highly effective but requires careful technique to avoid damage. Using excessive pressure or an improperly angled nozzle can easily damage the wood fibers, remove paint or stain, or force water behind the siding, leading to rot.

    To minimize damage, use a pressure washer with adjustable pressure settings. Start with the lowest setting possible and gradually increase it as needed. Maintain a distance of at least 12-18 inches between the nozzle and the siding. Use a wide-angle nozzle to distribute the water evenly and avoid concentrating the pressure on a single point. Always work from the bottom up to prevent streaking and allow the cleaner to work its way down. For particularly delicate areas, consider hand scrubbing instead of using a pressure washer.

    Cleaning Solution Preparation

    The choice of cleaning agent depends on the type of wood and finish on your siding. For untreated wood, a mild solution of water and a biodegradable cleaner is often sufficient. For painted or stained wood, use a cleaner specifically designed for that type of finish. Always test any cleaning solution on an inconspicuous area first to ensure it doesn’t damage the finish. Avoid harsh chemicals, as they can strip away protective finishes or damage the wood.

    Example cleaning solutions:

    • Untreated Wood: Mix a solution of warm water and a mild dish soap (like a biodegradable option). A ratio of 1 tablespoon of dish soap per gallon of water is a good starting point.
    • Painted Wood: Use a cleaner specifically formulated for painted wood siding. Follow the manufacturer’s instructions carefully.
    • Stained Wood: Use a cleaner designed for stained wood. Again, follow the manufacturer’s instructions carefully.

    Hand Scrubbing Process

    Hand scrubbing is a gentler approach suitable for light to moderate dirt and grime, or for areas where pressure washing is too risky. This method requires more time and effort but minimizes the chance of damage.

    1. Prepare your cleaning solution according to the instructions above.
    2. Use a soft-bristled brush to apply the solution to the siding, working in small sections at a time.
    3. Allow the solution to dwell on the siding for the recommended time (usually 5-10 minutes).
    4. Gently scrub the siding with the brush, using a back-and-forth motion. Avoid scrubbing too hard, as this could damage the wood.
    5. Rinse the siding thoroughly with a garden hose or low-pressure sprayer. Ensure all traces of cleaning solution are removed.
    6. Allow the siding to air dry completely before applying any protective finishes.

    Repairing Damaged Siding

    Maintaining wood siding involves addressing damage that occurs over time. Understanding common problems and repair techniques is crucial for preserving the aesthetic appeal and structural integrity of your home. This section details methods for repairing minor and major damage, ensuring your siding remains in optimal condition.

    Wood siding is susceptible to various types of damage, often stemming from exposure to the elements and age. Common problems include cracks and splits, caused by expansion and contraction due to fluctuating temperatures and humidity; rot, resulting from prolonged water exposure and fungal growth; and insect infestation, leading to structural weakening and potential collapse. These issues can range from minor cosmetic blemishes to significant structural compromises, requiring different repair approaches.

    Repairing Minor Cracks and Splits

    Minor cracks and splits, often appearing as hairline fractures or small separations in the wood, can usually be repaired with wood filler. First, clean the damaged area thoroughly to remove dirt and debris. Then, apply a high-quality exterior-grade wood filler, ensuring it is firmly packed into the crack. Once the filler has dried completely, sand the area smooth and apply a coat of exterior-grade paint or stain that matches the existing siding to seamlessly blend the repair. For larger splits, consider using wood glue in addition to filler to improve strength and prevent further splitting. This method provides a cost-effective solution for minor damage, preventing further deterioration and maintaining the siding’s appearance.

    Replacing Damaged or Rotten Siding Boards

    More extensive damage, such as rot or significant structural compromise, necessitates replacing the affected siding board. This involves carefully removing the damaged board using a pry bar or other suitable tool, taking care not to damage adjacent boards. Measure the length and width of the removed board to accurately select a replacement. Install the new board, ensuring it fits snugly against adjacent boards and is properly fastened using appropriate nails or screws. Caulking around the edges of the new board seals gaps and prevents water penetration, extending the life of the replacement board. This process requires more skill and potentially specialized tools, making it a task best suited for those with some DIY experience or professional assistance. For example, replacing a rotten board near a window requires careful consideration of flashing and proper sealing to prevent water damage around the window frame.

    Caulking and Sealing Gaps and Cracks

    Proper caulking and sealing are essential for preventing water intrusion, a major cause of wood siding damage. Inspect the siding for gaps and cracks around windows, doors, and joints between boards. Use a high-quality exterior-grade caulk that is paintable and flexible. Apply the caulk smoothly into the gaps, ensuring complete coverage and a watertight seal. Tool the caulk with a wet finger or caulking tool to create a smooth, even finish. Once the caulk has dried, paint or stain it to match the surrounding siding. This simple yet effective technique significantly enhances the siding’s weather resistance and extends its lifespan. For instance, failing to caulk around a window frame can lead to water damage, causing rot in the surrounding wood siding and potentially requiring more extensive and costly repairs.

    Painting and Staining

    Choosing between paint and stain for your wood siding is a crucial decision impacting both aesthetics and the longevity of your home’s exterior. Both options offer protection from the elements, but they achieve this in different ways and have distinct advantages and disadvantages. Understanding these differences will help you make an informed choice tailored to your specific needs and preferences.

    Painting Versus Staining Wood Siding

    Paint forms a solid, opaque layer over the wood, completely hiding the natural grain and texture. Stain, on the other hand, penetrates the wood, enhancing its natural beauty while providing protection. Painting offers greater color flexibility, allowing you to achieve virtually any color you desire. Staining provides a more natural look, preserving the wood’s character. However, paint generally offers better protection against UV damage, moisture, and insect infestation, requiring less frequent reapplication than stain, which typically needs refreshing every few years. The durability of paint also makes it a more suitable choice for areas with harsh weather conditions.

    Preparing Wood Siding for Painting or Staining

    Proper preparation is key to achieving a long-lasting and attractive finish. This involves several steps, beginning with a thorough cleaning to remove dirt, mildew, and loose paint or stain. Power washing is often effective, but care must be taken to avoid damaging the wood. After cleaning, allow the siding to dry completely. Next, any damaged or rotting wood should be repaired or replaced. Sanding is crucial to create a smooth surface for better paint or stain adhesion. Use a medium-grit sandpaper to smooth out any imperfections and then a fine-grit sandpaper for a final smoothing. Finally, priming is recommended, especially for bare wood or when switching from stain to paint. Primer improves adhesion, provides a uniform surface, and helps prevent the wood from absorbing too much paint or stain, leading to uneven coverage and faster deterioration.

    Applying Paint or Stain to Wood Siding

    Applying paint or stain requires careful technique to ensure even coverage and a professional finish. For both, using a high-quality brush or sprayer is recommended, depending on the size of the area and personal preference. When using a brush, apply thin, even coats, working in the direction of the wood grain. Avoid overloading the brush, as this can lead to drips and runs. With a sprayer, maintain a consistent distance and overlap each pass slightly to prevent streaking. Multiple thin coats are always preferable to one thick coat, allowing each layer to dry thoroughly before applying the next. For staining, applying stain with a rag or brush can provide a more natural look, as opposed to the smoother finish produced by sprayers. This allows for better penetration and less surface buildup.

    Choosing Appropriate Paint or Stain

    The choice of paint or stain should consider both the type of wood and the climate. For example, cedar and redwood are naturally resistant to rot and decay, so a high-quality stain might be sufficient. However, softer woods like pine might require a more durable paint for optimal protection, especially in areas with heavy rainfall or extreme temperature fluctuations. Oil-based paints offer superior durability and water resistance, but they have a stronger odor and require longer drying times compared to water-based options. Similarly, oil-based stains penetrate deeper but take longer to dry. Water-based paints and stains are more environmentally friendly and have lower VOCs (volatile organic compounds), making them a preferable choice for health-conscious individuals. In hot, sunny climates, choosing a paint or stain with high UV protection is essential to prevent fading and cracking. In areas with high humidity, mildew-resistant formulations are recommended.

    Cost Comparison

    The financial implications of DIY versus professional wood siding maintenance are significant and should be carefully considered before embarking on a project. Understanding the associated costs, including labor, materials, and potential unforeseen expenses, is crucial for effective budgeting and project planning. This section will provide a detailed comparison to help you make an informed decision.

    Several factors significantly influence the overall cost of maintaining your wood siding. The size of your house directly impacts the amount of materials needed and the time required for both DIY and professional work. The current condition of your siding plays a crucial role; extensive damage necessitates more extensive repairs, increasing costs. Finally, the choice of materials, such as the type of paint, stain, or wood sealant, will affect the price. High-quality, long-lasting products are typically more expensive upfront but can save money in the long run by reducing the frequency of maintenance.

    Cost Breakdown: DIY vs. Professional

    Task DIY Cost Professional Cost Time Savings
    Cleaning (pressure washing, scrubbing) $50 – $150 (for cleaning supplies) $200 – $500 (depending on house size) Several hours to a full day
    Repairing Damaged Siding (minor repairs) $50 – $200 (for materials like wood filler, caulk) $300 – $800 (per damaged area, depending on complexity) Half a day to a full day per area
    Painting/Staining (average-sized house) $300 – $800 (for paint/stain, brushes, rollers) $1500 – $4000 (depending on house size and number of coats) Several days to a week
    Unexpected Expenses (e.g., rotted wood replacement) Variable, can significantly increase DIY cost Often included in professional estimates, but can still add to the cost Time depends on the extent of the unexpected repairs

    Note: These cost estimates are approximate and can vary greatly based on location, material choices, and the specific needs of your home. Always obtain multiple quotes from professionals before making a decision.

    Factors Influencing Overall Cost

    The overall cost of wood siding maintenance is influenced by several key factors. For example, a larger house will naturally require more materials and labor, increasing both DIY and professional costs. The condition of the existing siding is another critical factor; extensive damage from rot, insect infestation, or severe weathering will significantly increase repair costs. Finally, the choice of materials plays a substantial role. High-quality paints, stains, and sealants offer superior protection and longevity but come at a higher initial cost. Choosing less expensive options might seem attractive initially, but could lead to more frequent maintenance and higher costs in the long run.

    For instance, a 2000 sq ft home in good condition might cost $500-$1000 for DIY maintenance, while a similar-sized home requiring extensive repairs could easily exceed $2000. Professional costs would be proportionally higher, ranging from $1500 to $5000 or more depending on the extent of the work.

    Time Commitment

    Maintaining wood siding, whether you tackle it yourself or hire a professional, demands a significant time investment. The total time required varies greatly depending on several factors, most notably the size of the area needing attention and the complexity of the necessary repairs or treatments. This section will explore the time commitment differences between DIY and professional approaches.

    The time commitment for a DIY wood siding maintenance project is highly variable. A small project, such as cleaning and staining a single section of siding, might only take a weekend for a moderately skilled individual. However, a larger project encompassing the entire exterior of a house, including extensive repairs, could easily consume several weeks, even for someone with experience. This is because DIY projects often involve multiple stages, requiring time for material acquisition, preparation, execution, and cleanup. Unforeseen issues, such as discovering significant rot or damage, can further extend the timeframe considerably.

    DIY Wood Siding Maintenance Time Estimates

    A small project, such as cleaning and light staining a 100 square foot section of siding, might take a skilled DIYer approximately 8-12 hours spread over a weekend. A more substantial project involving cleaning, repairing minor damage, and repainting or restaining 500 square feet of siding could easily take 40-60 hours, spread over multiple weekends or even several weeks, depending on the individual’s pace and skill level. Larger, more complex projects involving significant repairs or the replacement of damaged sections can require substantially more time. For instance, repairing extensive water damage and replacing rotten siding boards on a large house could take several weeks or even months of dedicated work.

    Professional Wood Siding Maintenance Time Estimates

    Professional contractors typically work more efficiently due to experience and specialized tools. They can often complete a project significantly faster than a DIY enthusiast. A professional crew might complete the cleaning and staining of a 500 square foot area in a single day or less, depending on the crew size and the complexity of the project. Larger, more complex projects, such as those involving significant repairs or replacements, will still take longer, but the overall timeline is generally shorter compared to a DIY approach. For example, a project that might take a DIYer several weeks could be completed by a professional team in a matter of days, particularly if they have multiple workers on site. However, scheduling with a professional team might require more lead time due to their existing workload.

    Skill and Experience

    Successfully maintaining wood siding, whether DIY or professionally, hinges significantly on the appropriate skillset and experience. Undertaking this task requires a blend of practical abilities and theoretical knowledge, impacting both the final result and the safety of the project. A lack of sufficient expertise can lead to costly mistakes and even safety hazards.

    Understanding the necessary skills and experience is crucial for making an informed decision about whether to tackle wood siding maintenance as a DIY project or to hire a professional. This section will outline the essential skills needed and the potential negative consequences of attempting this work without the proper qualifications.

    Necessary Skills for DIY Wood Siding Maintenance

    Successful DIY wood siding maintenance demands a combination of practical skills and knowledge. These skills aren’t necessarily learned overnight; they often require practice and experience. Improper techniques can lead to damage to the siding, compromising its protective qualities and the overall aesthetic appeal of your home.

    • Basic Carpentry Skills: This includes the ability to use hand tools such as hammers, screwdrivers, and saws safely and effectively. Familiarity with power tools like drills, nail guns, and sanders is also beneficial but requires proper training and safety precautions.
    • Understanding of Wood and its Properties: Knowledge of different wood types, their susceptibility to rot, insect infestation, and the impact of weather conditions is vital. This knowledge helps in identifying potential problems and selecting the appropriate treatment methods.
    • Painting and Staining Techniques: Proper surface preparation, including cleaning, priming, and applying paint or stain according to manufacturer’s instructions, is crucial for achieving a durable and aesthetically pleasing finish. Uneven application or improper surface preparation can lead to premature peeling or fading.
    • Ladder Safety and Working at Heights: Working on ladders requires careful attention to safety procedures. Incorrect ladder placement or usage can lead to serious injuries. Understanding safe working practices and using appropriate safety equipment is paramount.
    • Problem-Solving and Troubleshooting: Identifying and addressing issues such as rot, insect damage, or loose siding requires problem-solving skills. Being able to diagnose the problem accurately and choose the appropriate solution is essential.

    Potential Risks of Insufficient Skills

    Attempting DIY wood siding maintenance without sufficient skills can result in a range of negative consequences, including financial losses and safety hazards. These risks should be carefully considered before embarking on the project.

    • Damage to Siding: Improper use of tools or incorrect repair techniques can cause further damage to the siding, potentially requiring more extensive and costly repairs.
    • Increased Repair Costs: Mistakes made during DIY maintenance can lead to more extensive and expensive repairs later on. For instance, improperly applied stain can lead to premature deterioration, necessitating costly repainting or replacement.
    • Safety Hazards: Working at heights without proper safety training and equipment significantly increases the risk of falls and injuries. Improper handling of power tools can also lead to accidents.
    • Voiding Warranties: Some siding manufacturers’ warranties may be voided if maintenance is not performed according to their specifications. This could leave you responsible for costly repairs.
    • Compromised Home Protection: Improperly maintained siding can compromise the home’s protection against the elements, leading to water damage, mold growth, and other structural issues. This can cause significant and costly damage in the long run.

    Safety Precautions

    Maintaining wood siding, whether DIY or professionally done, involves inherent risks. Prioritizing safety is crucial to prevent accidents and injuries. This section details essential safety precautions to ensure a smooth and hazard-free maintenance process. Careful planning and adherence to these guidelines will minimize potential risks.

    Wood siding maintenance often requires working at heights, handling potentially hazardous chemicals, and using sharp tools. Understanding and mitigating these risks is paramount. Ignoring safety measures can lead to serious injuries, including falls, cuts, chemical burns, and eye injuries. Proper planning and the use of appropriate safety equipment are essential for a safe and successful project.

    Ladder Safety

    Safe ladder use is paramount when working on wood siding, especially for multi-story homes. Always ensure the ladder is on a stable, level surface and extends at least three feet above the roofline. Never overreach while on a ladder; instead, reposition the ladder as needed. Inspect the ladder before each use for any signs of damage or wear and tear. Consider using a ladder stabilizer for added security, especially on uneven ground. A spotter can also be invaluable for added safety and support.

    Protective Gear

    Appropriate protective gear is essential to minimize the risk of injury. This includes safety glasses or goggles to protect eyes from flying debris, dust, and chemical splashes. Gloves should always be worn to protect hands from splinters, cuts, and chemical irritants. A dust mask or respirator is necessary when working with sanding materials or applying paints and stains to prevent inhaling harmful particles or fumes. Sturdy work boots provide protection against punctures and slips. For working at heights, a safety harness might be necessary, depending on the project’s complexity and height.

    Chemical Handling

    Many cleaning and painting products used in wood siding maintenance contain hazardous chemicals. Always read and follow the manufacturer’s instructions carefully. Wear appropriate protective gear, including gloves, goggles, and a respirator, as indicated on the product label. Work in a well-ventilated area, or use appropriate ventilation equipment. Never mix different cleaning products, as this can create dangerous fumes or reactions. Store chemicals safely and securely, out of reach of children and pets. Dispose of leftover chemicals according to local regulations and guidelines. In case of accidental spills or contact, follow the instructions on the product label and seek medical attention if necessary.

    Potential Hazards and Safety Measures

    Several potential hazards are associated with wood siding maintenance. Understanding these hazards and implementing appropriate safety measures is crucial for a safe working environment.

    Hazard Safety Measure
    Falls from ladders or heights Use a stable ladder, extend it sufficiently, maintain three points of contact, use a safety harness for significant heights, and have a spotter.
    Cuts and splinters Wear gloves, use sharp tools carefully, and inspect siding for loose or protruding nails or splinters before starting work.
    Chemical exposure Wear appropriate personal protective equipment (PPE), including gloves, goggles, and a respirator, work in a well-ventilated area, and follow product instructions carefully.
    Eye injuries Wear safety glasses or goggles at all times.
    Inhalation of dust and fumes Use a dust mask or respirator when sanding or working with chemicals.
    Electrical hazards Keep electrical cords away from water and ensure that all electrical equipment is properly grounded.
    Fire hazards Keep flammable materials away from ignition sources and use caution when working with power tools.

    Warranty Considerations

    Maintaining your wood siding properly is crucial not only for its longevity and aesthetic appeal but also for preserving any existing warranties. The type of maintenance performed—DIY or professional—significantly impacts the validity and coverage of these warranties. Understanding these implications is vital for homeowners.

    Manufacturers often include warranties covering defects in materials and workmanship for a specific period. However, these warranties typically contain clauses that void coverage if damage results from improper maintenance or repairs. This is where the distinction between DIY and professional maintenance becomes critical.

    Impact of DIY Maintenance on Warranties

    Improper DIY maintenance can easily invalidate your wood siding warranty. For example, using the wrong cleaning solutions, applying paint or stain incorrectly, or performing repairs without the necessary skill can lead to premature deterioration and damage. If a manufacturer determines that damage resulted from such improper maintenance, they may refuse to honor warranty claims. This can leave you responsible for costly repairs or replacements, even if the initial siding defect was covered under the warranty. Consider a scenario where improper pressure washing leads to damage. A manufacturer might easily argue that this damage was not caused by a defect in the siding itself, but rather by improper maintenance, thus voiding the warranty.

    Protection of Warranties Through Professional Maintenance

    Professional siding maintenance offers a significant advantage in protecting your warranties. Reputable contractors are trained and experienced in the proper care and repair of wood siding. They use appropriate cleaning methods, materials, and techniques, minimizing the risk of damage that could be attributed to improper maintenance. Furthermore, professional maintenance often includes detailed documentation, which can be crucial in supporting warranty claims should a problem arise. If a defect is discovered, the documentation of proper professional maintenance strengthens your case for warranty coverage. For instance, a professional’s report detailing regular cleaning and preventative maintenance can provide compelling evidence that any subsequent damage wasn’t caused by neglect or improper handling.

    Warranty Clauses and Specifics

    It’s imperative to carefully review your siding manufacturer’s warranty documentation. Pay close attention to clauses related to maintenance and repair. These clauses often specify acceptable maintenance practices and may even recommend using specific cleaning products or contractors. Understanding these specifics will help you make informed decisions about your maintenance approach and protect your investment. Failing to adhere to these specified guidelines could significantly impact your ability to file a successful warranty claim.

    Environmental Impact

    Maintaining wood siding, whether through DIY or professional methods, carries environmental implications. The choices made regarding waste disposal and material selection significantly influence the overall environmental footprint of the project. Understanding these impacts allows for informed decision-making towards more sustainable practices.

    The environmental impact of DIY versus professional wood siding maintenance hinges primarily on waste generation and the responsible sourcing of materials. DIY projects often result in smaller quantities of waste, as materials are typically purchased only as needed. However, improper disposal of leftover paint, stains, and wood scraps can negate this advantage. Professional services, while potentially generating more waste due to larger-scale operations, often have established systems for responsible waste management, including recycling and proper disposal of hazardous materials. The choice of materials also plays a critical role; sustainably sourced wood and low-VOC paints minimize the environmental burden.

    Waste Disposal Practices

    Responsible waste disposal is crucial in minimizing the environmental impact of wood siding maintenance. Improper disposal of leftover paints, stains, and wood scraps can contaminate soil and water sources. DIYers should research local regulations regarding hazardous waste disposal and utilize designated drop-off centers. Professionals typically adhere to stricter environmental regulations and have established procedures for the safe disposal of waste materials. This often includes recycling wood scraps whenever possible and using specialized containers for hazardous waste. Examples of responsible disposal include separating paint cans from regular trash, using designated recycling bins for wood, and properly labeling and transporting hazardous waste to authorized facilities. Failure to do so can lead to fines and environmental damage.

    Material Selection and Sourcing

    The selection of materials significantly influences the environmental impact. Choosing sustainably sourced wood, certified by organizations like the Forest Stewardship Council (FSC), ensures that the wood comes from responsibly managed forests. Similarly, opting for low-VOC (volatile organic compound) paints and stains reduces air pollution and minimizes the release of harmful chemicals into the environment. Professionals often have access to a wider range of eco-friendly materials and may be more knowledgeable about sustainable sourcing options. For example, using reclaimed wood for repairs significantly reduces the demand for newly harvested timber, thereby lowering deforestation rates. Choosing paints with low or zero VOC content can significantly reduce air pollution during and after application.

    Environmentally Responsible Practices

    Implementing environmentally responsible practices during wood siding maintenance is achievable through careful planning and execution. This includes minimizing waste generation through accurate material estimations, using reusable containers and tools, and employing proper cleaning techniques to prevent excessive water usage. Selecting sustainable materials, such as FSC-certified wood and low-VOC paints, further reduces the environmental footprint. Professional services often incorporate these practices as part of their standard operating procedures. For instance, a professional might use a pressure washer with a water recycling system to conserve water, or they might carefully remove and reuse existing siding components rather than replacing them entirely. Prioritizing these practices, regardless of whether the work is DIY or professional, contributes to a more sustainable approach to wood siding maintenance.

    Long-Term Maintenance Strategies

    Developing a comprehensive long-term maintenance plan is crucial for preserving the beauty and structural integrity of your wood siding. A proactive approach, incorporating regular inspections and preventative measures, will significantly extend the lifespan of your siding and minimize costly repairs down the line. This plan should be tailored to your specific climate and the type of wood used.

    Regular inspections and preventative maintenance are key to extending the life of your wood siding. Ignoring minor issues can lead to more extensive and expensive damage later. A well-defined plan ensures that problems are addressed promptly, preventing escalation and protecting your investment. This proactive approach will not only save money in the long run but also maintain the aesthetic appeal of your home.

    Preventative Maintenance Schedule

    A well-structured preventative maintenance schedule should be implemented to address potential issues before they become major problems. This schedule should include regular cleaning, inspections for damage, and timely application of protective coatings. For example, a homeowner in a region with heavy rainfall might need to schedule more frequent inspections for signs of rot or moisture damage than someone in a drier climate.

    Inspection Procedures

    Regular inspections are essential for early detection of problems. These should involve a thorough visual examination of all siding surfaces, paying close attention to areas prone to damage such as corners, joints, and areas near the ground. Look for signs of rot, insect infestation, warping, cracking, and loose or damaged boards. Note the location and severity of any damage found, and create a prioritized list for repairs. Consider using a checklist to ensure consistency and thoroughness. For instance, a checklist might include items such as: checking for cracks, assessing paint condition, inspecting for insect damage, and verifying proper flashing around windows and doors.

    Protective Coating Application

    The frequency of protective coating applications (paint or stain) will depend on several factors including the type of coating used, the climate, and the wood species. However, a general guideline might be to repaint or restain every 3-7 years, depending on the exposure and the quality of the coating. Proper surface preparation, including cleaning and repairing damaged areas, is crucial before applying any new coating. Using high-quality paints or stains designed for exterior use will significantly extend the life of the coating and protect the wood from the elements. For example, using a high-quality, UV-resistant stain can prevent premature fading and cracking, extending the time between recoating applications.

    Addressing Common Issues Proactively

    Proactive maintenance involves addressing common issues before they become significant problems. For example, promptly repairing minor cracks or replacing damaged boards prevents water penetration and subsequent rot. Regularly cleaning debris and removing overhanging branches reduces the risk of moisture buildup and insect infestation. Addressing these issues in a timely manner prevents small problems from escalating into costly repairs. For instance, a small crack in a board, if left unaddressed, can lead to extensive water damage requiring significant repairs or even board replacement.

    Conclusive Thoughts

    Ultimately, the decision of DIY versus professional wood siding maintenance hinges on a careful evaluation of your skills, available time, budget, and the condition of your siding. While DIY offers potential cost savings and a sense of accomplishment, professional maintenance ensures expertise, warranty protection, and often a faster turnaround. By understanding the pros and cons outlined in this guide, you can make a confident decision that best protects your investment and enhances the beauty of your home for years to come. Remember to always prioritize safety and consider the long-term implications of your choice.

  • How Often Should You Repaint or Stain Your Wood Siding?

    How Often Should You Repaint or Stain Your Wood Siding?

    How Often Should You Repaint or Stain Your Wood Siding? This question is crucial for maintaining the beauty and longevity of your home’s exterior. Understanding the factors that influence the lifespan of wood siding, from climate and wood type to the choice of finish, is key to making informed decisions about upkeep. This guide will explore these factors, offering practical advice on assessing your siding’s condition, preparing for repainting or staining, and choosing the right products for a long-lasting, beautiful finish.

    Proper maintenance not only enhances the aesthetic appeal of your home but also protects your investment. Neglecting your wood siding can lead to costly repairs down the line. By understanding the signs of deterioration and following best practices for application and maintenance, you can ensure your wood siding remains a source of pride for years to come.

    Factors Affecting Wood Siding Lifespan

    The longevity of your wood siding is significantly influenced by a combination of factors, primarily environmental conditions, the type of wood used, and the chosen finish. Understanding these factors allows for informed decisions regarding maintenance and repainting or restaining schedules, ultimately extending the life and beauty of your home’s exterior.

    Climate Conditions and Wood Siding

    Climate plays a crucial role in determining how quickly wood siding deteriorates. High humidity promotes the growth of mold and mildew, leading to premature decay and discoloration. Extreme temperature fluctuations cause the wood to expand and contract, potentially cracking the paint or stain and allowing moisture penetration. Prolonged exposure to intense sunlight leads to fading and degradation of the wood fibers, weakening the siding and reducing its lifespan. Coastal areas, with their high salt content in the air, present an even more aggressive environment for wood siding, accelerating the deterioration process. For example, wood siding in a humid, subtropical climate might require repainting every 5-7 years, whereas in a dry, temperate climate, it could last 10-15 years or longer.

    Wood Type and Repainting/Staining Frequency

    Different wood species possess varying levels of natural resistance to decay and insect infestation. Cedar and redwood are known for their naturally high oil content and inherent resistance to rot, allowing them to withstand harsh weather conditions better than other species. These woods generally require less frequent maintenance than softer woods like pine, which is more susceptible to damage from moisture and insects. Pine siding, therefore, will typically need repainting or restaining more often. For instance, cedar siding might require repainting every 8-12 years, while pine siding may need it every 5-7 years, depending on the climate and finish.

    Lifespan of Different Wood Siding Finishes

    The type of finish applied to the wood siding significantly impacts its lifespan. Paint offers the best protection against the elements, creating a durable barrier against moisture, UV rays, and insect damage. However, paint requires more frequent repainting than stain. Stains, while allowing the natural beauty of the wood grain to show through, provide less protection than paint. Sealants primarily protect against moisture, but offer less protection from UV damage than paint or stain. A high-quality paint might last 10-15 years, while a good quality stain might need reapplication every 5-7 years. Sealants often require more frequent reapplication, potentially every 2-3 years.

    Expected Lifespan of Various Wood Types and Finishes

    Wood Type Paint Stain Sealant
    Cedar 10-15 years 7-10 years 2-3 years
    Redwood 10-15 years 7-10 years 2-3 years
    Pine 7-10 years 5-7 years 1-2 years

    Signs Your Wood Siding Needs Repainting or Staining

    Knowing when your wood siding requires repainting or staining is crucial for maintaining its beauty and protecting your home from the elements. Ignoring the signs can lead to more extensive and costly repairs down the line. By regularly inspecting your siding and understanding the key indicators of deterioration, you can schedule maintenance proactively and extend the life of your investment.

    Visual inspection is the first step in assessing the condition of your wood siding. Several visual cues can signal the need for repainting or restaining. These indicators often appear gradually, so regular monitoring is essential for early detection.

    Visual Indicators of Deterioration

    Fading, cracking, peeling paint or stain, and mildew growth are common visual signs of deterioration. Faded siding loses its original color and vibrancy, becoming dull and washed out. This indicates that the protective layer is weakening and needs to be refreshed. Cracking and peeling paint or stain expose the bare wood to moisture, insects, and UV damage. Mildew, a common fungal growth, appears as dark spots or streaks, often in damp or shaded areas. These visual defects not only compromise the aesthetic appeal but also weaken the siding’s protective barrier. For example, imagine a once vibrant red siding now showing patches of faded pink and noticeable cracks. This is a clear sign that repainting is necessary. Similarly, a dark, fuzzy growth on sections of the siding indicates mildew and requires immediate attention.

    Tactile Indicators of Deterioration

    Beyond visual cues, the texture of your wood siding can also reveal its condition. Roughness and splintering are tactile indicators of deterioration. Running your hand across the siding should reveal a smooth surface; if it feels rough, splintery, or uneven, it’s a strong indication that the protective layer is compromised and needs attention. This roughness might be caused by the wood expanding and contracting due to moisture fluctuations, leading to cracking and flaking of the paint or stain. For instance, if you notice splinters or rough patches when lightly touching the siding, it’s time for a fresh coat of paint or stain.

    Assessing Structural Integrity

    Assessing the structural integrity of your wood siding involves looking beyond surface-level issues. Check for signs of significant damage, such as rot, warping, or insect infestation. Rotting wood is typically soft and spongy, easily indented with finger pressure. Warping is characterized by uneven surfaces or bending of the siding boards. Insect infestation may be evident through small holes or tunnels in the wood. These problems are more serious and may require repairs beyond repainting or staining; you might need to replace damaged sections of siding. For example, if you find areas of soft, decaying wood, immediate action is needed to prevent further structural damage.

    Common Problems Indicating the Need for Repainting or Staining

    A summary of common problems that indicate the need for repainting or staining is provided below. Addressing these issues promptly prevents more extensive damage and maintains the longevity of your wood siding.

    • Significant fading of the original color.
    • Extensive cracking or peeling of the paint or stain.
    • Visible mildew or mold growth.
    • Rough or splintery texture of the wood.
    • Signs of wood rot, warping, or insect infestation.

    Preparation for Repainting or Staining

    Proper preparation is crucial for a long-lasting and beautiful finish on your wood siding. Neglecting this step can lead to premature peeling, chipping, and overall degradation of the paint or stain. Thorough cleaning, repair of damaged areas, and careful surface preparation will ensure the new coat adheres properly and provides maximum protection.

    Cleaning Wood Siding

    Effective cleaning removes dirt, mildew, and loose paint, allowing for better adhesion of the new coating. Begin by rinsing the siding with a pressure washer set to a low pressure setting to avoid damaging the wood. For stubborn mildew or dirt, a solution of mild detergent and water can be applied, scrubbing gently with a soft-bristled brush. Always rinse thoroughly afterward to remove all traces of cleaning solution. Allow the siding to dry completely before proceeding to the next step. For heavily soiled areas, a solution of trisodium phosphate (TSP) can be used, following the manufacturer’s instructions carefully, and remembering to wear appropriate protective gear.

    Repairing Damaged Wood Siding

    Damaged areas, such as cracks, splits, or rotten boards, must be addressed before repainting or staining. Small cracks can be filled with exterior-grade wood filler, ensuring it’s applied smoothly and allowed to dry completely before sanding. Rotten boards should be replaced entirely. This involves carefully removing the damaged board, measuring and cutting a replacement to the exact size, and securing it in place with exterior-grade screws or nails. Caulk any gaps between the new board and surrounding siding to prevent moisture intrusion.

    Surface Preparation: Sanding and Priming

    Once repairs are complete and the siding is clean and dry, surface preparation is essential for optimal adhesion. Lightly sand the entire surface using fine-grit sandpaper (120-150 grit) to smooth any rough areas and create a better surface for the paint or stain to adhere to. Remove any sanding dust with a brush or tack cloth. For bare wood or heavily weathered surfaces, applying a quality exterior primer is crucial. This creates a uniform surface and improves the paint or stain’s adherence, resulting in a longer-lasting finish. Follow the primer manufacturer’s instructions regarding drying time before applying the final coat.

    1. Clean the siding: Rinse with a pressure washer (low pressure), then scrub with a detergent solution if needed. Rinse thoroughly and allow to dry completely.
    2. Repair damaged areas: Fill small cracks with wood filler; replace rotten boards. Caulk any gaps.
    3. Sand the surface: Use fine-grit sandpaper (120-150 grit) to smooth rough areas. Remove dust.
    4. Prime (if necessary): Apply an exterior-grade primer to bare wood or heavily weathered surfaces. Allow to dry completely.

    Choosing the Right Paint or Stain

    Selecting the appropriate paint or stain is crucial for ensuring the longevity and aesthetic appeal of your wood siding. The choice depends on several factors, including your budget, desired finish, and the specific climate you live in. Understanding the properties of different products will help you make an informed decision.

    Exterior Wood Paint Types

    Exterior wood paints are available in various formulations, each with its own set of advantages and disadvantages. Oil-based, water-based, and acrylic paints are the most common choices. Oil-based paints offer excellent durability and weather resistance, creating a hard, protective film. However, they have a strong odor, require longer drying times, and are more challenging to clean up. Water-based paints, also known as latex paints, are low-odor, dry quickly, and are easy to clean with soap and water. They are generally less durable than oil-based paints but provide a good balance of performance and convenience. Acrylic paints combine some of the best features of both oil-based and water-based paints, offering good durability, relatively quick drying times, and ease of cleanup. They are a popular choice for their versatility and performance.

    Stain Versus Paint for Wood Siding

    The decision between using stain or paint depends on your priorities. Paints create a solid, opaque coating that completely covers the wood grain, offering superior protection from the elements. Stains, on the other hand, penetrate the wood, enhancing its natural grain and color while providing some protection. Stains allow the wood texture to show through, offering a more natural look. However, stains generally offer less protection from UV damage and moisture compared to paints, requiring more frequent reapplication. The choice often comes down to a balance between protection and aesthetic preference.

    Factors Influencing Paint or Stain Color Selection

    Choosing a color for your wood siding involves more than just personal preference. Light reflectance is a critical consideration. Lighter colors reflect more sunlight, reducing the temperature of the siding and potentially lowering energy costs. Darker colors absorb more heat, potentially leading to increased energy consumption for cooling. Additionally, consider the environmental impact of the paint or stain. Look for low-VOC (volatile organic compound) options to minimize air pollution. Choosing colors that complement your home’s architectural style and surrounding landscape is also important for creating a cohesive and visually appealing exterior.

    Selecting Durable and Weather-Resistant Paint or Stain

    Durability and weather resistance are paramount when choosing exterior wood paints or stains. Look for products specifically formulated for exterior use and boasting high ratings for UV resistance, mildew resistance, and water resistance. Check the manufacturer’s specifications for expected lifespan and warranty information. Consider the climate in your region; areas with harsh winters or intense sun exposure require paints and stains with superior durability. For example, in coastal areas with high humidity and salt spray, a paint or stain with excellent mildew resistance is essential. Always follow the manufacturer’s instructions for application to ensure optimal performance and longevity.

    Application Techniques for Paint and Stain

    Proper application is crucial for achieving a long-lasting, beautiful finish on your wood siding. The method you choose – brush, roller, or sprayer – will impact the final look and the longevity of the paint or stain job. Careful attention to detail during application ensures even coverage, prevents defects, and maximizes the lifespan of your protective coating.

    Brush Application

    Brushes offer excellent control, especially in areas with intricate details or trim. Natural bristle brushes are generally preferred for oil-based stains, while synthetic brushes work well with water-based paints and stains. Begin by loading the brush with a moderate amount of paint or stain, avoiding oversaturation. Apply the paint or stain in smooth, even strokes, working with the grain of the wood. Overlap each stroke slightly to ensure complete coverage and avoid visible brush marks. For larger surfaces, work in manageable sections to maintain a wet edge and prevent lap marks. Regularly clean the brush to remove dried paint or stain to maintain its effectiveness.

    Roller Application

    Rollers are efficient for covering large, flat areas of siding. Choose a roller with a nap length appropriate for the texture of your siding – a shorter nap for smooth siding and a longer nap for rougher surfaces. Load the roller with paint or stain, ensuring it’s evenly coated but not dripping. Apply the paint or stain in smooth, overlapping strokes, maintaining a wet edge. Use a back-and-forth motion, working in sections to prevent the paint or stain from drying before you can blend it seamlessly. A paint tray and roller screen help to ensure even paint distribution and prevent splattering.

    Sprayer Application

    Sprayers provide the fastest application method, especially for large projects. However, they require more preparation and skill to avoid runs and drips. Before spraying, protect surrounding areas with drop cloths or plastic sheeting. Adjust the sprayer nozzle to the appropriate setting for your paint or stain and the surface texture. Maintain a consistent distance from the siding and apply the paint or stain in smooth, even coats, using overlapping passes. Avoid overspray by working methodically and maintaining a consistent speed. Clean the sprayer thoroughly immediately after use to prevent clogging.

    Achieving Even Application and Avoiding Drips and Runs

    Regardless of the application method, even application is paramount. Avoid overloading your brush, roller, or sprayer. Work in small sections, maintaining a wet edge to prevent lap marks. Apply thin, even coats rather than trying to achieve full coverage with a single heavy coat. Allow each coat to dry completely before applying the next. If drips or runs occur, gently smooth them out with a brush or roller before they dry. For significant runs, carefully scrape them off with a putty knife before reapplying the paint or stain.

    Applying Multiple Coats and Allowing Adequate Drying Time

    Most wood siding projects require at least two coats of paint or stain. Allow each coat to dry completely according to the manufacturer’s instructions before applying the next. This ensures proper adhesion and prevents peeling or chipping. In humid or cold conditions, drying times may be longer. Check the weather forecast before starting your project to avoid unexpected delays. Proper drying time between coats is essential for a durable and aesthetically pleasing finish. Ignoring this step can lead to problems such as peeling or uneven color.

    Maintenance After Repainting or Staining

    Proper maintenance is crucial for extending the life and beauty of your freshly painted or stained wood siding. Regular care prevents premature deterioration and keeps your home looking its best. By following a simple maintenance plan, you can significantly increase the time between costly repainting or restaining projects.

    Regular Cleaning and Inspection

    Cleaning your siding removes dirt, mildew, and other debris that can dull the finish and damage the wood over time. A yearly inspection allows for early detection of any problems, such as peeling paint, cracks, or insect infestation, enabling timely intervention before they become major issues. For cleaning, use a soft-bristled brush and a solution of mild detergent and water. Always rinse thoroughly to avoid residue buildup. During inspections, pay close attention to areas prone to moisture damage, such as corners and around windows and doors.

    Addressing Minor Issues

    Promptly addressing minor issues prevents them from escalating into more extensive and costly repairs. Small cracks in the paint or stain can be easily filled with appropriate caulk and then repainted or restained to match the existing finish. Loose or damaged siding should be repaired or replaced as soon as possible to prevent further water damage. For peeling paint, gently scrape away loose areas before applying a touch-up coat. Regularly inspect for signs of insect infestation, such as wood-boring insects, and address these immediately with appropriate treatment. Failing to address minor problems can lead to more extensive and expensive repairs later. For example, a small crack in the caulk around a window, left unaddressed, can allow water to penetrate, leading to rot and requiring costly siding replacement.

    Maintenance Checklist

    To simplify the maintenance process, consider using this checklist:

    • Spring Cleaning: Inspect siding for damage, clean with mild detergent and water, and rinse thoroughly.
    • Summer Inspection: Check for any signs of insect infestation, loose paint or stain, or water damage.
    • Fall Inspection: Check for any damage caused by severe weather such as high winds or hail.
    • Winter Inspection: Check for ice damage, especially in areas prone to ice buildup.
    • Annual Touch-ups: Address any minor imperfections, such as small cracks or peeling paint, with appropriate caulk and paint/stain.
    • Every 3-5 years (depending on climate and exposure): Consider a full cleaning with a pressure washer (low pressure setting) to remove more stubborn dirt and mildew. Always test in an inconspicuous area first.

    Cost Considerations for Repainting or Staining

    Repainting or staining your wood siding is an investment that protects your home’s exterior and enhances its curb appeal. Understanding the associated costs is crucial for budgeting and making informed decisions. Several factors significantly impact the final price, from the size of your house to the type of paint or stain chosen.

    Labor Costs

    Labor costs represent a significant portion of the overall expense. Hiring professional painters or stainers typically involves hourly rates or a per-square-foot pricing structure. Hourly rates can range from $30 to $75 or more depending on location, experience, and the complexity of the job. Per-square-foot pricing might range from $1 to $5, again varying by location and project specifics. Factors such as the height of your house, the need for scaffolding, and the intricacy of the trim work all influence labor costs. For example, a two-story house with extensive detailing will cost considerably more than a single-story ranch.

    Material Costs

    Material costs encompass the paint or stain itself, primers (if necessary), wood fillers, cleaning solutions, brushes, rollers, and other tools. The quality of paint or stain directly correlates with its price; high-quality, long-lasting options are more expensive but may offer better protection and longevity. The quantity of materials required depends on the surface area to be covered and the number of coats needed. For instance, a high-quality exterior paint might cost between $30 and $80 per gallon, while a premium stain could range from $50 to $150 per gallon. These prices are estimates and can vary based on brand and retailer.

    Preparation Costs

    Preparation is a crucial step that often gets overlooked in cost estimations. It involves tasks like power washing the siding to remove dirt, mildew, and loose paint; scraping off peeling paint; and repairing any damaged wood. The extent of preparation work needed will significantly impact the cost. If the siding is in relatively good condition, preparation costs might be minimal. However, if significant repairs or extensive cleaning are required, these costs can add up considerably. Consider the potential need for specialized equipment rentals (e.g., pressure washer) or the cost of purchasing necessary supplies.

    Professional vs. DIY Cost Comparison

    Hiring professionals offers convenience and expertise, but comes with a higher price tag. DIY projects can save on labor costs, but require time, effort, and the purchase or rental of tools and equipment. Weigh the pros and cons of each approach based on your skills, time availability, and budget. A professional will typically provide a more accurate and reliable finish, potentially extending the lifespan of the paint or stain. However, a DIY project, while potentially more time-consuming, can be a cost-effective option for those with the necessary skills and tools.

    Estimated Costs

    Scenario House Size (sq ft) Labor Cost Material Cost
    Small House, DIY 1000 $0 $300 – $600
    Medium House, DIY 1500 $0 $450 – $900
    Large House, Professional 2500 $1500 – $3750 $750 – $1500
    Small House, Professional 1000 $500 – $1250 $300 – $600

    Environmental Impact of Repainting or Staining

    Repainting or staining wood siding presents both opportunities and challenges concerning environmental responsibility. The choices made regarding paint and stain types, application methods, and waste disposal significantly impact the overall environmental footprint of this home maintenance task. Understanding these impacts allows homeowners to make informed decisions that minimize negative effects.

    The environmental impact of paints and stains varies considerably depending on their chemical composition. Traditional oil-based paints often contain volatile organic compounds (VOCs), which contribute to air pollution and smog formation. These VOCs can also have adverse health effects. Conversely, water-based paints and stains generally have lower VOC content, resulting in a smaller environmental impact. However, even water-based products may contain other chemicals that can affect water quality if improperly disposed of. Similarly, the type of wood preservative used in stains can influence environmental impact. Some preservatives contain biocides that can be harmful to aquatic life if they leach into waterways.

    Environmental Impact of Different Paint and Stain Types

    Oil-based paints, while offering durability, release significant VOCs during application and curing. These VOCs contribute to ground-level ozone formation, a key component of smog. In contrast, water-based paints, often labeled as “low-VOC” or “zero-VOC,” significantly reduce these emissions. However, it’s crucial to note that “zero-VOC” typically means less than 5 grams of VOCs per liter, not a complete absence. Oil-based stains, particularly those containing preservatives, may present similar VOC and biocide concerns as oil-based paints. Water-based stains generally pose a lower environmental risk but still require careful consideration of their ingredients. Natural oil-based stains, derived from plant sources like linseed oil or tung oil, offer a more environmentally friendly alternative, although they may require more frequent reapplication.

    Environmentally Friendly Options and Sustainable Practices

    Choosing environmentally friendly paints and stains is a crucial step in minimizing the environmental impact of repainting or staining wood siding. Look for products certified by reputable organizations like Green Seal or SCS Global Services, indicating that they meet specific environmental standards. These certifications often consider factors such as VOC content, the use of recycled materials, and the biodegradability of the product. Furthermore, employing sustainable practices during application, such as using drop cloths to minimize spills and overspray, contributes to reducing waste and environmental contamination.

    Minimizing Waste and Responsible Disposal

    Proper waste disposal is essential to mitigate the environmental impact of repainting or staining. Leftover paint and stain should never be poured down the drain or into the garbage. Many communities offer hazardous waste collection centers or programs where these materials can be disposed of safely and responsibly. Recycling programs for paint cans may also be available. Furthermore, careful planning and accurate estimation of the required paint or stain quantity can help minimize waste generation.

    Environmentally Conscious Choices for Repainting or Staining

    • Select low-VOC or zero-VOC paints and stains.
    • Opt for water-based products whenever possible.
    • Consider natural oil-based stains derived from renewable resources.
    • Look for paints and stains with certifications from reputable environmental organizations.
    • Use drop cloths and other protective measures to minimize spills and overspray.
    • Properly dispose of leftover paint and stain through designated hazardous waste collection programs.
    • Recycle paint cans whenever feasible.
    • Plan carefully to minimize waste generation by accurately estimating material needs.

    Warranty Considerations for Wood Siding and Finishes

    Understanding warranties for wood siding and associated paints or stains is crucial for planning repainting or restaining schedules and protecting your investment. Warranties offer a degree of protection against defects in materials and workmanship, influencing how frequently you might need to undertake these maintenance tasks. Knowing what your warranties cover can save you significant time and money in the long run.

    Warranties typically provided by manufacturers offer varying levels of coverage and duration. This coverage can extend to the wood siding itself, the applied paint or stain, or both. The specific terms and conditions are detailed within the warranty document, which should be carefully reviewed upon purchase. Failure to understand the terms could lead to disputes about coverage should problems arise.

    Warranty Information Typically Included

    Manufacturer warranties usually include details on the covered product, the duration of the warranty (often expressed in years), the specific defects covered (e.g., peeling paint, rot, splitting), and the process for filing a claim. They may also specify limitations, such as excluding damage caused by improper installation, normal wear and tear, or acts of nature. For instance, a paint warranty might cover peeling or fading due to a manufacturing defect, but not damage resulting from a severe hail storm. Similarly, a siding warranty might cover rot caused by a manufacturing flaw, but not rot caused by improper water management around the house. Many warranties will require proof of purchase and proper installation to validate a claim.

    Understanding and Utilizing Warranties

    To effectively utilize your warranties, keep all relevant documentation in a safe and accessible place. This includes the original purchase receipts, installation records (if applicable), and the warranty certificates themselves. Familiarize yourself with the warranty terms and conditions before any issues arise. If you notice a problem covered under the warranty, promptly contact the manufacturer according to the instructions outlined in the warranty document. Be prepared to provide necessary documentation, such as photos of the damage and proof of purchase. Responding promptly is crucial; most warranties have time limits for filing claims.

    Key Warranty Terms

    • Warranty Period: The length of time the warranty is valid, typically expressed in years.
    • Covered Defects: Specific issues or problems covered under the warranty (e.g., peeling paint, rot, cracking).
    • Exclusions: Situations or damages not covered by the warranty (e.g., damage from natural disasters, improper installation, normal wear and tear).
    • Claim Process: The steps required to file a claim, including required documentation and contact information.
    • Limitations: Any restrictions or conditions that might affect the warranty’s coverage (e.g., limitations on the amount of reimbursement).
    • Prorated Warranty: A warranty where the coverage decreases over time. For example, a 20-year prorated warranty might cover 100% of the cost of repair in the first 5 years, decreasing to 50% in the next 10 years, and so on.

    Troubleshooting Common Problems During Repainting/Staining

    Repainting or staining wood siding can present several challenges. Understanding common issues and their solutions is crucial for a successful and long-lasting finish. Proper preparation and technique are key to preventing many problems, but even with careful work, some issues may arise. This section addresses common problems, their solutions, and preventative measures.

    Uneven Application

    Uneven application of paint or stain often results in a patchy or streaky appearance. This can stem from several factors, including inconsistent application pressure, using improper tools, or applying too thick a coat. The solution involves careful and consistent application, using the right tools (brushes, rollers, or sprayers), and following the manufacturer’s instructions regarding coat thickness. Preventative measures include practicing on a scrap piece of wood before tackling the entire siding and ensuring proper thinning of the paint or stain if necessary.

    Peeling

    Peeling paint or stain is a significant problem indicating underlying issues. Common causes include inadequate surface preparation (failure to remove old, loose paint or failing to properly clean the surface), application over a damp surface, or using an incompatible product. Addressing peeling requires removing all loose paint or stain, cleaning the surface thoroughly, and then applying a primer suited for the existing surface before repainting or restaining. Preventative measures involve proper surface preparation, including cleaning, scraping, and sanding, and selecting appropriate primers and paints for the existing surface.

    Blistering

    Blistering is often caused by moisture trapped beneath the existing paint or stain. This can be due to poor ventilation, application over a damp surface, or underlying wood rot. Solutions include scraping away blisters, cleaning the affected area, allowing it to dry completely, and then repainting or restaining. Preventative measures include ensuring the wood is completely dry before application, providing adequate ventilation, and addressing any underlying wood rot or moisture problems before painting or staining.

    Troubleshooting Guide

    Problem Cause Solution Prevention
    Uneven Application Inconsistent application pressure, improper tools, too thick a coat Consistent application, proper tools, appropriate coat thickness Practice on scrap wood, proper thinning
    Peeling Inadequate surface preparation, application over damp surface, incompatible product Remove loose paint/stain, clean surface, apply primer, repaint/restain Proper surface preparation, dry surface, compatible products
    Blistering Moisture trapped beneath paint/stain, poor ventilation, damp surface, wood rot Scrape blisters, clean, dry, repaint/restain Dry surface, ventilation, address wood rot
    Runny Paint/Stain Paint/stain too thin, excessive heat, improper application technique Apply thicker coats, work in cooler temperatures, use proper application technique Follow manufacturer instructions for thinning, work in shade, avoid excessive heat

    Last Recap

    Maintaining your wood siding involves more than just aesthetics; it’s about protecting your home and preserving its value. By understanding the factors that affect siding lifespan, recognizing the signs of needed attention, and employing proper preparation and application techniques, you can extend the life of your siding and enhance your home’s curb appeal. Remember regular inspection and maintenance are key to preventing costly repairs and ensuring your wood siding remains a beautiful and durable feature of your home for many years.